
If you’ve been following for awhile, you know I tend to avoid things that are trending. Usually if something appears on a tv show (hello Carrie Bradshaw blue wedding heels) or is on every Influencer (ie, whatever the new It Girl handbag is), I avoid it like the plague. Perhaps it’s some form of reverse snobbery, but I definitely have an aversion to anything even slightly approaching popular, so deep is my commitment to an original style.
But, very occasionally, I give in to a Dress of the Moment (I see you, Strawberry Dress) or spot something on an actress that gets my heart all a flutter and I make it my mission to track down the original. Such a rare moment came while binge watching Emily in Paris – a show known for it’s rather over the top yet still thin plots and swoon-worthy clothing (I love when characters are so broke they need to all room together in a tiny flat and sing on a street corner to make money for rent, yet dash around resplendent in couture dresses and $1000 strappy sandals as if we won’t notice). This is definitely one of those shows where you have to suspend your disbelief.
Or do as I do and watch it for the clothes….


In one such episode, plucky Emily was making yet another pitch to the marketing team, and I just about fainted over her dress. After putting my research skills to good use, I came to learn this stunner came from the mind of Vassilis Zoulias, and featured a lace, one-sleeved bodice and bold silk plaid circle skirt. If there was ever a time for a fainting couch, this was it.
Unfortunately, the 4-digit price tag was more than a little out of my budget. But, the wheels started turning as to how I might create my own version….

The Design
To keep things versatile, I decided to make separates rather than a dress (I mean, who can’t style a royal blue lace bustier multiple ways??). The skirt would be simple: find the right fabric and whip up a circle skirt. The bodice would take a bit more fiddling, but I knew it could be done.
After a lot of sketching and thinking through the various elements, I decided the Landis bodice (by Gertie as part of her Patreon) would be perfect. There was already an armband detail, and I could keep the asymmetry of the original by just having one. It also had many of the other elements: a fitted bodice, sweetheart neckline, and, as an added bonus, I had already made it once before, so had worked out the minor fitting issues already. I think we have a winner!

Surprisingly, finding the right fabric took a lot longer than figuring out the pattern. I really wanted the right plaid, and it needed to have primarily orange and taupe, but with a flash of that royal blue. Turns out, this is not a simple task. I scoured every website out there that carried silk taffeta and, after looking at several swatches, found a stunning plaid silk shantung from NY Designer Fabrics. I ordered 4 yards and awaited her arrival…

After doing some digging, I learned the type of lace I should be trying to hunt down is called Guipure lace. This is a thicker type of lace, often used to create intricate patterns by twisting and braiding the threads, without a net background. I found the most stunning royal blue Guipure from New Fabrics, and scooped up 2 yards. In all likelihood, I could have gotten away with 1.5 or even 1 yard, but I wanted to have the flexibility to mess up (which is inevitable when working out a new pattern).
I also opted for a Kona cotton in cream for the base layer (fairly close to my skin tone, to give the illusion that the lace is sheer. Yes, I am that pale), and gathered my various notions. Okay, deep breath…and we’re off!!


If you similarly feel inspired to recreate this set, you will need:
BODICE
SKIRT
- Pattern: self-drafted circle skirt
- 4 yards of plaid silk shantung via NY Designer Fabrics
- Coats & Clark all purpose 9” zipper, natural

Construction – the Bodice
Lucky for me, I had made the Landis bodice before and was confident I could jump into the fashion fabric without making a toile (hot tip: if you are making a pattern for the first time, never ever skip the toile. Spoken from experience…).
From my previous make, I knew the 6 D/DD was the right fit for me, with a ~1″ bodice lengthening. Going from the updated pattern from my previous make, I quickly cut out the bodice and the lining pieces from the cream Kona cotton. I also cut out interfacing for the bodice to help stabilize things.


Once I had all of the bodice pieces cut, I quickly sewed together the pieces together to make the lining. Because I’ve made this one before, I’m not going into great construction detail here. But, if you’re trying the Landis for the first time and want more detail, be sure to check out this post.


I then spent a few hours getting organized with the lace overlay pieces. I wanted to be intentional about print placement, doing my best to pattern match without getting too crazy. I also wanted to minimize bulk, given the thickness of the lace, and removed the center front seam altogether so as not to disrupt the lace pattern.
I started by laying my center front pattern piece to find the optimal placement, and worked from there, doing my best to match up prints (but accepting that this was one instance where – deep breath – we can’t control everything).


For this pattern, I was going to use the sleeve option for the right arm only, and keep the bodice band flush to the body for the left arm. I wanted to take advantage of the edge of the lace here, which I thought would give it a beautiful fairy tale quality. I played around a fair bit, trying to find just the right placement.


The first step required to bring this pattern to life was to baste each of the lace panels on top of the cream Kona cotton (making them each a single piece of fabric. Because the cut lace had a lot of raw edges, I used clips and worked my way slowly around the perimeter of each piece.


Once all of the pieces were ready, I followed the pattern as usual, starting with the criss cross bands on the top of the bodice. Again, see this post for a more detailed walk-through, but I essentially stitched each to the lining fabric, flipped them right side out, and understitched as far as I could go. The key difference here is to make sure the lace overlay wasn’t caught in any of the stitches, as I wanted the edge of the lace to be a feature in the design.


I followed the same directions for the shorter, right side, which would be flush against the bustier. Then, because I had eliminated the center front seam, I sewed it to the center front (with right sides together, with the arm band facing to the left, flipped, and pressed it flat. You really need to get your pressing game face on here, because the thick lace really needs some coaxing to lay flat.


I stitched the bodice band along the upper curve of the bust, securing it in place. I did the same with the left bodice band, basting it along the top bust and in along the left bodice seam allowance. Then, I sewed the bodice pieces together, working one at a time and being careful around the curves. Again, because the fabric is pretty thick with all of the layers, you’re going to want to take your time here.


Then, I moved on to the next critical step: the boning. Here, I opted to stick with the simple option: 1/4″ boning with casing. Although there are more manual options out there, I’ve found this does the job and is insanely easy to put together. I use foot #38 for my Bernina, which is perfect for this job as it’s slightly raised on one side to accommodate the boning.


I added the boning to the front and back princess seams, on the side seams, diagonally on the side front bodice pieces, and diagonally on the back (I give additional details here if you’ve never used this kind of material before)


With the boning securely in place in the lining, I pinned the lining to the bodice at the top edge, and carefully stitched them together. Then, I flipped the fabric to the right side and pressed all of the seams with a LOT of steam. I also put it on my dress form for a few days and clipped the upper edges to sort of “train” the boning and fabric into shape.


For some finishing touches, I wanted to add a few flowers cut from the lace to cover up seams and add a bit of extra dimension. This would involve some hand stitching with matching thread. Although it can be time consuming, it’s really worth it for the finished product. I put on some old Emily in Paris reruns and got to work….


For the final steps, I pressed in the seam allowance at the back and up at the bottom, added in a separating zipper, and then slipstitched and final edges. I was so happy with the finished result, which managed to be both romantic and edgy at the same time…


Construction – the Skirt
The other half of this separates adventure was a simple circle skirt. This is a style of garment I’ve made more times than I can count, and I don’t even use a pattern at this stage. The only tricky aspect of this design was going to be (a) pattern matching and (b) directionality of the blue stripes.

The shantung was 44″ wide, with the most vibrant blue stripe running along the width rather than the length of the fabric. I wanted to swap this directionality, which would involve a little bit of fabric manipulation. I measured and cut the silk into 35.5″ wide pieces, which I would sew together to create a length of fabric, with the darker blue striped oriented horizontally.


Using silk pins, I carefully matched up the checked pattern – this is rarely ever going to be perfect, especially with a fiddly fabric, but use more pins than you think you need and go slowly.


Once I had reoriented the blue stripe, I treated it as a standard length of fabric, and cut out my circle skirt to my waist circumference (4.5″ radius = 28″ finished waist) and my ideal hem length (28″ + 4.5″ = 32.5″ outer radius). If you aren’t as familiar with the geometry behind making a circle skirt, check out this post for a more detailed walk through.
Using those measurements, I cut out one half circle and two quarter circles out of the silk and stitched them up at the side seams and up the back seam, leaving a 9″ gap for the zipper. I used the same pin and pray strategy to match up the checks as best as I could.


Wit the circle completed, I turned my attention to the waistband. I cut two 3.5″ x 34″ lengths of the same checked fabric, and backed it with interfacing to give some stability. Then, I added in a 9″ lapped zipper, and finished all of the raw edges inside with a quick slip stitch.


There is nothing more satisfying than when a sewing project actually manages to turn out the way you pictured it in your head. I mean, when does that ever actually happen? Needless to say, I was rather pleased with myself and couldn’t wait to take her for a spin….


The Debut
Truth be told, this project has been sitting on my dress form for a long while now. It has been an incredibly challenging couple of months, both personally and professionally. Professionally, it has become increasing apparent that I need to make some changes in terms of the way I balance work responsibilities, because the hours I put in this semester are just not sustainable in the long term. I literally collapsed at the end of this semester and, while I had a lot of things to show for it, my body (and sanity) just can’t take that kind of abuse.
Something I’ve never been great at is setting boundaries. But, if I want to continue to love this job of mine, we’re going to have to figure out how to push out of that comfort zone and start saying no…


Although a crazy end of the semester definitely compounded things for me, the hardest thing to hit us this month was saying goodbye to my furry soulmate, Finn. There are no words for how fiercely bonded I was to this animal, who has been a part of our family for the last 16 years. I’m not really at a place where I can talk about it without tearing up yet, and couldn’t even bring myself to find a photo to include in this post. My best friend told me there is really no way around grief – you just have to go through it. So, we’re moving forward as best we can. Crying when we need to, breathing in the moments where it hurts a little less.
I am heartbroken, and know a piece of me always will be. But I am so lucky that this wise, orange spirit chose to join my life and come along for the adventure of so many formative moments: my first postdoc, marrying Mr. Dressedapp, moving around the world (twice), starting my first real tenure-track job, buying our first home. He is so woven into the fabric of what feels safe and normal, that my entire world is well and truly rocked now that he’s not here. Though chaos and sadness and hardship happened outside, Finn was part of my sanctuary. The three of us created a family unit, where the world felt so much more manageable with one another to come home to. And now the call is coming from inside the house.
It will never feel quite right without him here. The house is too quiet, and the energy around us is shifted. I know we will get to a place where it hurts less. Where the sharp edges dull over time and we smile over the memories more. But, for now, we feel a stark emptiness when we look for him in places where we no longer find him.
But more than anything, the biggest thing I feel is grateful. Grateful that he found his way into my arms through the unlikeliest of circumstances. That we walked together for 16 years. That I got to love him and be loved by him. And, even though it was one of the hardest moments of my life, and I am endlessly grateful that I held him in my arms at the very end, and got to carry him gently out of this world.
Truly, I think that’s the best any of us can hope for.
xoxo
Construction Details:
Patterns: Landis Bodice, via the Gertie Patreon + self-drafted circle skirt
Bustier Fabric : royal blue Guipure lace via New Fabrics for the overlay; Kona cotton in cream (1090) for the base layer and lining
Skirt Fabric: plaid silk shantung via NY Designer Fabrics
Separating Zipper: Huntington Fabric
Additional notions (zipper, thread): JoAnn’s
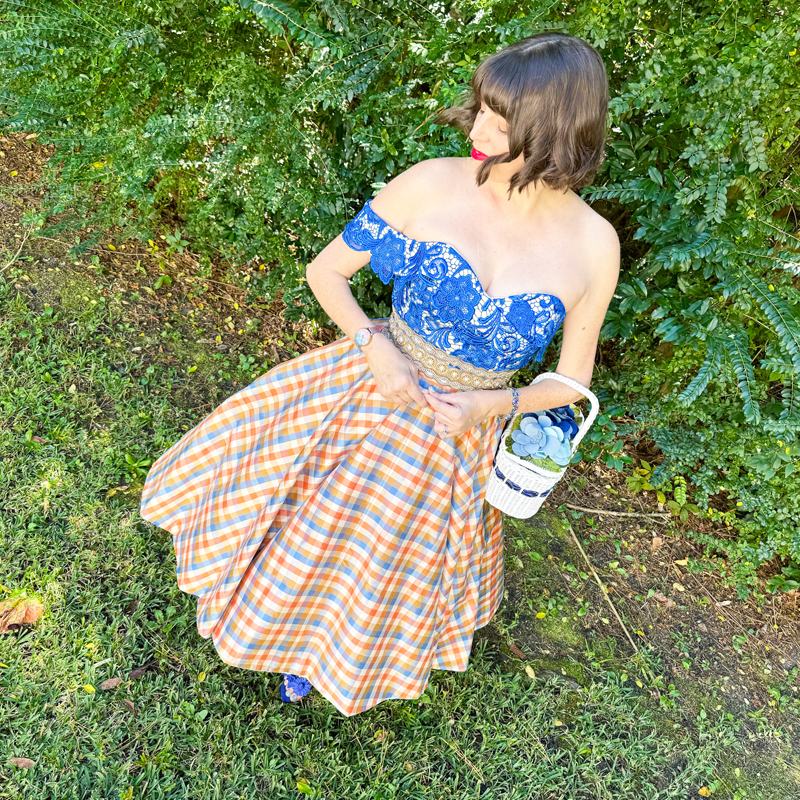
Outfit Details:
Bustier: Made by me!
Skirt: Made by me!
Bracelet: Firefly, shop in Outer Banks (similar)
Belt: Anthropologie (similar)
Handbag: Word from the Bird (similar)
Shoes: Sophia Webster, thrifted (same here)
.
instagram // twitter // facebook // pinterest
.
Any items marked with a “c/o” (courtesy of) a retailer mean I was provided with an item for free in exchange for a review and/or feature on my blog. I always provide my honest opinion of any item I’m reviewing, regardless of whether it was sent to me as a courtesy item or if I purchased it myself. In addition, this post may contain affiliate links. This means that if you click and/or make a purchase through certain links or ads on this site, I may make a commission from that click and/or purchase at no cost to you, which helps with the day-to-day running costs of my blog.