
There are some projects that simply take forever. Not because they’re particularly complicated, but because life just… happens. Several years ago now (it’s actually embarrassing to think about how long ago it was…), I started to draft this dress. Like most of my creations, she was born from a true vintage piece that could never be mine. And as with most unrequited loves, I forlornly tucked her into the back of my mind. But, I never forgot her.
Fast forward a few years to pattern drafting lessons with the endlessly talented Sewanista. We had tackled a few projects together (including my Dahlia dress and the Jane Austen appliqué project) and were figuring out our next sewing adventure. While flipping through my inspiration folder, I remembered this turquoise beauty. With a princess seamed bodice and panels of scalloped lace, she was simply calling my name. But, how do you go from a desire to fully recreating a vintage dress? To find out, read on…


The Design
Like most projects, this one started with an idea, but quickly took on a life of its own. Thankfully, I had saved the photos from the original vintage piece at Calendar Girl Vintage, so I had shots of her from every angle. Because she had some unique features, I would have to draft my own pattern rather than going off of an existing one.
For this, I started with my existing block, which would need to be modified to a strapless princess seam bodice. If you’ve never heard the term “block” before, it’s a custom-fitted base pattern from which patterns for many different bodice styles can be created. It was one of the first things I created with Sewanista when I started classes with her and it’s an essential tool if you want to start drafting your own patterns. My block is essentially the foundation for a basic scoop neck bodice that is 28″ at the waist and 36″ at the bust, with a nape to waist of 17.25″.


An interesting thing that I learned during this part of the process, is that a princess seamed bodice has no front darts – the darts are all captured in the curvature of the two front seams. To go from your standard block to a princess seamed pattern, you need to do the following:
- Imagine a red line going from the center of the shoulder on your block down to the apex of your bust.
- Going from the darts on your block you essentially “pivot the dart” at the side of your bust (ie, imagine rotating your pattern from the dotted line you just made and losing the dart under the armhole.
- Next, you separate the pattern into two separate pieces.
ClothingPatterns101.com had a great series of images to show you how to do this (which is much easier to see in pictures that read in words):

We streamlined the edges into curves using a curved ruler, adding a 5/8″ seam allowance to the curved edges, and were ultimately left with two pattern pieces for the front. As I wanted a strapless bodice shape, the shoulder pieces were shortened to just above the bustline. Then, we opted for a straight across back, being sure to line up the edge of the back bodice with the side of the front.


As I have learned over the years, at this point you want to create a toile to see if all of your measurements worked out and the bodice is the shape you want. A toile is great way to adjust any fit issues and check for any errors in the pattern (See? I learn from past mistakes). I needed a few nips and tucks here and there, but otherwise I was happy with the fit.

At this stage, I have three pattern pieces for the bodice, which I will call (for simplicity) Back, Side Front, and Front. The Front pattern piece will now be divided into two: one which will ultimately be a triangle of my scalloped lace, and the other which will be made out of the turquoise fabric.
The next step was the front triangular piece on the bodice, which would be a separate piece that I would sew layers and layers of scallop lace trim onto. For this, I had to determine the thickness and angle of my shoulder straps. Essentially, I took my Front bodice piece and drew a line to create 1/2 of the triangle. I made this cut, and then retraced these pieces onto new tracing paper, adding a 5/8″ seam allowance. Now, my “Front” piece is divided into a Middle Front and Center Front. The straps would follow the angle of the Middle Front (as in the green toile, above).

The Construction
Now that I was happy with the fit, the next step was to start to cut out all of my pattern pieces. I cut the Back, Side Front, and Middle Front out of the turquoise cotton fabric and the Center Front from a piece of plain white fabric. This would be the piece onto which I would add my trim. I opted for a white scalloped edge eyelet trim. I cut out multiples of each, as I would use the same pieces for my lining.


The first decision to make was how I wanted to lay out my scallop trim. I knew I wanted to scallops facing upwards, towards my face, but had to decide if I wanted each row offset from the other or in line with each other. The best way to figure this out is to lay them out and snap a photo. When I put them side by side, it was immediately apparent that I preferred the offset scallops.

Then, I cut out the scallop trim so that 1″ or so hung over the edge of the triangle. Working from the top, a carefully stitched each row of trim, watching to ensure the scallops were all offset and the trim was straight.


You’ll notice that the straps of the original dress extend down over the front of the bodice, which was definitely a feature I wanted to have. From the toile (which I used to determine the size of the front triangle), I extended the shoulder straps down to the base of the Center Front piece (see photo of toile above). I wanted the straps and what I’ll now call the “lapel” to be 1.5″ wide. So, I cut a strip of fabric that was 4.25″ wide (ie, my end width, doubled, plus seam allowance). Measuring from the waist to where the bodice meets the strap, I added an extra 5/8″ seam allowance ‘notch” to the lapel, which is where the lapel would be stitched to the bodice.


With the lapel piece facing inwards towards the center front, I stitched the lapel piece, to the bodice Center Front and then stitched both to the Middle front. To conceal all of the stitches, I sewed the lining of the Center Front to the inside of the garment. Lastly, I pressed the lapel outwards towards the Middle Front, trimming the seam allowance to reduce bulk.


With the front of the bodice now together, I attached the Side Front piece on either side. To stabilize the upper bodice, I pressed a 1″ wide piece of interfacing at the top of the bodice. I then sewed together the lining pieces of the Middle Front and Side front and attached them at the upper bodice and side of the triangular pieces.


The Delay………
The next part of this process took about 2 years. Not because it was particularly difficult, but because Mr. Dressed and I decided it was a good idea to move halfway around the world (again). Everything we owned lived on a boat for three months, including my sewing machine. Once it all arrived, this dress still sat half-constructed in my sewing pile for months on end. While I always meant to get back to her, other things, like unpacking, writing lectures, finding a place to live, all seemed to take precedence.
Plus (and I’m sure I’m not the only one who this happens to), sometimes with my sewing I tend to gravitate towards “Quick Reward” projects. If I have an hour, I will venture towards my pieces that need a hook an eye or a quick nip and tuck. It’s satisfying to put an hour of work in and have a wearable piece at the end of it. This project still had many days of work left in her, and I just never mustered up the energy to tackle it.

But, enter #thevintagesewingchallenge – it was a hashtag on Instagram that gave a series of daily prompts for a week in June for various sewing projects, one of which was “On the Cutting Table”. Following the prompt, I posted pictures of my half-finished turquoise beauty, partly to pat myself on the back for a beautifully constructed bodice and partly to kick myself in the butt because you can’t just wear the front of a bodice! Well you can, but police will be called. So, I suddenly felt a renewed energy to dust off my sewing machine and tackle this gone-on-far-too-long project.
The first step was to finish construction of the bodice. The front portion was complete, so this was just a matter of attaching the back panels to the side seams and adding in the rest of the lining. For the time being, I left the lining open, which I would use later to cover up the interior construction of the bodice.

Then came the construction of the skirt. Before I left Perth, Sewanista took pity on me and walked me through the process of constructing the skirt by making a miniature version it. Essentially, it would mirror the bodice, with a front triangular panel with rows of scalloped lace, a skirt “lapel” and a fuller than full circle skirt.

I decided to start with the circle portion of the skirt and tackle the front panel and lapel last. If you’ve never made a circle skirt before, it’s actually fairly straightforward, but requires a bit of math. To make a circle skirt, it’s easiest to think of it as one little circle at the center (where your waist is) cut out of one larger circle (which is your hem). So, from overhead view, your skirt will look like this:

A few important terms to know going forward:
- The circumference is the full distance around the outside of each circle
- The diameter is the full width from the center point of each circle
- The radius is half the diameter.
For me, I wanted a fuller-than-full circle skirt, ultimately ending with a 28″ waist (ie, 28″ is the final circumference of the inner circle). I also wanted the skirt to be 28″ long from waist to hem, which I would then hem to a final skirt length of 27″.
Now, because I like an obscenely full skirt, I planned to put 2 x 1″ pleats into each skirt panel (ie, 8 pleats total). This means I would need a 44″ waist circumference (ie, each pleat would remove 2″ of length from the waist, bringing the final circumference down to the 28″ I ultimately needed). So, to create the pattern for the skirt we want, we need to first figure out the radius of the circle for our waist.
Digging back to Geometry class, remember the formula for circumference of a circle: C = 2*pi*r
So, to get the radius (r) of the inner circle, we just plug in our desired circumference (C = 44″) and divide it by 2*3.14 (which is pi). So, doing the math, the “circle” for my waist would need to have a 7″ radius.
Last bit of math (which is oh so fun). What’s the circumference of the hem? We know we want the length of the skirt to be 28″, and thanks to our calculations above, we know the radius for the inner circle is 7″. Adding 28″ + 7″ tells us that the radius of the circle that makes up the hem is 35″. Because of the width of my fabric, the skirt will be made up of of 4 panels. So, we will need a pattern that looks like this, that we will cut out 4 times:

To help you out, Mood Fabrics even has a handy Circle Skirt Calculator to save you the hassle of math!
After the math is worked out, then you need to create the pattern from which to cut out your circle skirt panels. For me, the easiest way to do this is to get a large piece of cardboard or large piece of tracing paper and, from one corner, mark 35″ from the edge. Then, mark 35″ from the opposite side of the same corner. The gloriousness of a circle is that the radius is equal from the center point – so, if we now imagine the bottom right corner of our piece of paper is the center of our circle, we just have to draw two radii (one for our waist, and one for our hem).
My circle skirt life hack has always been to cut a piece of string to a few inches past the total length, and mark the total length with sharpie on the string (in my case, 35″). Then, I make a second mark at the radius I need for my waist (ie, 7″).
I pin the string to the corner of the cardboard and loop the string around a pencil at the 35″ mark I made on it with a sharpie. Then, pulling the string taught, I draw a line from my mark on one edge of the paper to the other, essentially creating a quarter circle. I do the same at the 7″ mark I made on the string, so I’m essentially left with a quarter of a donut. (Note: you can also do this with an 8th of a circle and cut the center on the fold, which I usually do – I tend to draw it out as a quarter for simplicity!)

The last thing we need to consider for this design is the triangle panel that was going to be inserted into the skirt, which measures 7″ at the top and 14″ at the base and was 28″ long. This is important, as the triangle needs to be “removed” from the circumference of the circle that makes up the waist (for else the waist will now be 7″ too big!

For two of the four skirt panels, 3.5″ was cut out of the waist circumference for each to make up for the lace panel. So, for my skirt, I now have two quarter circle pieces and two pieces with the portion that will be occupied by triangle removed. Next up was to cut it all out!


The panel on the front of the skirt was made exactly as the bodice portion – it just involved many more layers of scalloped lace trim and a lot more patience. I took my time with it, as I would have cried if I got to the end to find that, one mm at a time, I had slowly been making the layers crooked, which would completely throw off the eye. Working on layer at a time, I cut each piece of trim with about 1″ of overlap on the edge, and sewed them down working from the bottom upwards.
Once they were all stitched on, I trimmed the excess from the sides.


I opted to orient the scallops in the opposite direction than on the bodice, so they cascaded in a downward direction from the waist. This would give a lovely scalloped edge to my hem, and a beautiful visual detail radiating from the waist.

All right – I somehow managed to tackle all of that in one afternoon, and then used the following weekend to finish the skirt (I was on a roll people!). First up was the skirt lapel pieces – I wanted to have additional panels on the skirt that would mirror the lapels on the top, but double the width. So, I cut out two rectangles that were 28″ long by 7.25″ wide (3″ final width, doubled + seam allowance), folded them in half, and pressed them flat. With the fold on the outside, I stitched the lapel to each of the two the front skirt panels.
With right sides together, I sewed the whole piece to the center front panel. Using my iron, I then pressed it outwards. I repeated this for the other side.


After sewing the last two panels of the skirt at the side seam, next up was the pleats! As I said above, I wanted 2 x 1″ pleats into each panel (for a total of 8). For this, I just used a small ruler and carefully pressed the pleats, pinning them into place. I repeated this on all four panels, careful to ensure they were evenly spaced.
Then, I pinned the bodice to the skirt to ensure my math was correct (thankfully, it was), and stitched the bodice to the skirt.

The final stages to complete this dress were to put in the zipper, finish the lining, and hem to my desired length. For some weird reason that I’ve never been able to work out, zippers are my nemesis. All of them. Standard and invisible. They each individually vex me, to the point where I know this part of the process with take me a good two hours. I swear, my version of purgatory is me at a sewing machine having to put zippers into things for all eternity…
For this garment, I wanted to have a lapped zipper at the back. This is done using a standard zipper where a flap of fabric covers the zipper teeth from view. After arming myself with a few tutorials on YouTube, I took a deep breath and faced down my enemy. Given I just admitted to complete zipper inadequacy, you are given carte blanche permission to ignore my advice on the next several steps…
- To start, measure the length of your zipper and mark off the end of your opening. Then, sew up the back of the dress from the hem to the mark you made and press. You should now have a stitched seam with an opening at the top where your zipper will eventually be.
- Next, you want to press down the right side of the seam allowance 1/2″ and the left side (which will be your lapped portion), under 5/8″.
- Flip the dress to the right side (so you are looking at the outside of the dress). Sewing very close to the edge, stitch the right seam to the zipper, down to the bottom. Important: I sewed my zipper to the garment only – NOT my lining. You’ll see why in a bit.
- On the left aside, ensure the lapped edge is completely covering the zipper teeth. Stitch on the left side, ensuring your stitches do not come in contact with the zipper (I stitched 1/2″ away from the edge).
- Once you get to the bottom, ensuring you have your needle down, cross over and connect a line to stitches with the ones you made on the right side.
- If all went according to plan, your zipper should be securely in place, covered neatly by the lap.
Note: I have very few photos of this part of the process on the actual dress, because I was very busy ripping my hair out and swearing at my sewing machine while I did this over and over again until I got it right. But, this tutorial from Craftsy was super helpful. Clearly this lovely lady is MUCH better at zippers than I am.


One of the best parts about vintage garments is that the inside is sometimes even prettier to look at than the outside! So, I always like to try to finish the insides neatly. Recall that we had already attached our lining to the top and side portion of the bodice and only sewed the zipper to the outer portion of the garment.
I pressed the lining down to the inside of the bodice and pressed under the seam allowance to 5/8″ at the bottom, where the lining meets the waist. I also pressed the seam allowance at the edge near the zipper under enough to cover half of the zipper, but not get caught in the zipper teeth. In other words, I pressed the seam allowance to the inside of the bodice, so you couldn’t see it and were left with a clean fold. I then used what’s called a ladder stitch to invisibly sew my lining to my bodice.
If you’ve never done a ladder stitch before, you essentially run your needle through the top and bottom fabric in alternating stitches, creating a bit of a zig zag:

Over time, your stitches will look like a “ladder” connecting the two seams that you want to close.

Then, you carefully pull the string, and watch the seam close like magic! This stitch is amazingly useful, particularly if you have a popped seam on a garment you don’t want to completely take apart to get to the inside of to repair. In this case, I was able to attach the lining to the bodice invisibly, so the inside of the dress is just as pretty as the outside. Well, almost.

One detail the original dress had that I loved was a large bow at the waist. This is actually pretty simple to do and just takes (again) a small bit of math. I wanted my bow to be 9″ wide and 3″ in height. So, I cut out a rectangle that was 20.5″ by 7.25″: essentially I needed a rectangle that was my final bow width measurement doubled, plus the 5/8″ seam allowance on both sides, and my final height measurement doubled, plus the 5/8″ seam allowance on one side.
I folded the rectangle in half and pressed it flat. Putting my sewing needle in the down position, I stitched a continues straight stitch on two sides, stopping about halfway down on the third side.


I used this small hole to pull the fabric through so the raw edges were at the inside and pressed it flat. Then, I used my handy ladder stitch to close the small hole.

I folded over the ends of the rectangle so that they met in the middle, pressed them, and stitched them down. Then, I squeezed the top edges together to create the “bow effect” and secured it in place with a few hand stitches.


Although I somehow failed to take photos of this step, I cut a smaller rectangle and made a loop that would go around the center of my “bow”, similar to the one I made for the shoulders of my Jane Austen dress.


Because I’m a gal who loves options, I opted not to permanently stitch the bow onto the dress. Instead, I attached a brooch pin to it so it could be attached or left off depending on my mood.


The last steps were just a blind hem and adding a hook and eye to the top of the dress. I actually find blind hems very soothing (convenient, as this baby had 220″ of hem to do!)

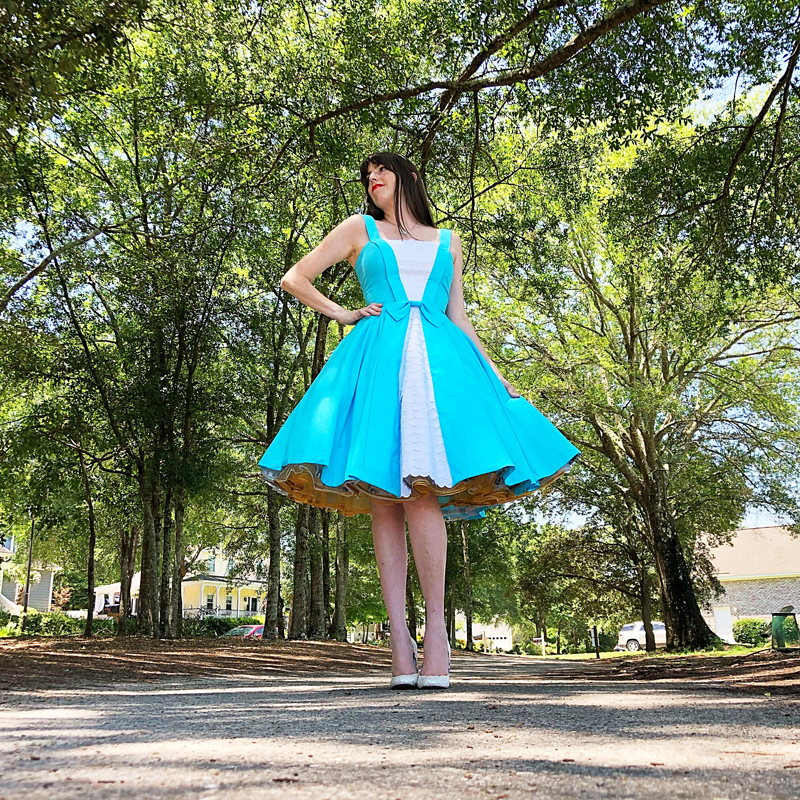
I could hardly believe it when she was complete! All in all, the actual construction took about 32 hours (well, 2 years and 32 hours). I was so pleased with how she turned out. The blue was a slightly brighter hue than the original, but otherwise the two could have been twins.


The Styling
The final (and best) step in this adventure was getting to wear her! I have to say, there is nothing like that feeling up zipping up a dress that you created. To go from yardage of fabric and trim to a piece of clothing is a feeling I will never get tired of. There is a special point of pride wearing this beauty out and receiving compliments from passers-by, asking where I bought this and getting to say that I made it myself.
This is almost always followed by the inevitable query of whether I would make one for them. Erghhhh….. unfortunately, unless they have a spare 2 years, I’m probably going to stick to making them just for myself….


I am reminded that every day I have the chance to pick up a needle and some thread and add to the story.
Jackson Greer


I‘ve gained a lot of skills over the years, but one that I’m most proud of has been my ability to sew (dissecting out a shark brain notwithstanding). It was something that seemed so outside of the realm of possibility all those years ago when I took my first class and learned how to thread a machine. But going back over my projects over the years, I’ve definitely grown with each new dress I’ve made. More than anything, it takes patience and practice and an amazing teacher (or, if oceans and continent now separate you, some quality youtube videos).
We ended up taking these outfit photos at a nearby golf course. And every five minutes or so, a group would zip past in their golf cart and exclaim over the dress. In particular, the older women would get that far away look in their eye as they reminisced about the dresses they used to wear as young girls. I love being able to bring a piece of the past forward, connecting the old with something new.
Now, my dress and I are off to have some fun together. In the meantime, if any of the above steps weren’t clear or you have a question about a particular technique, don’t hesitate to ask!
xoxo
Outfit Details:
Dress: Drafted and Made by me!
Necklace: gift, Swarovski (similar)
Headband: Forever New (similar)
Handbag: vintage (similar)
Shoes: Oh Deer (similar here & here)
Lip Color: Retrofuturist
.
instagram // twitter // facebook // pinterest
.