
I’ve always had a bit of a “Life Imitating Art” fascination, especially when it comes to fashion. I don’t know why, but I will forever be enamored with handbags that look like storefronts, or necklaces that look like rhinestone bagels, and shoes designed to mimic cake. Be it edible or not, I can’t get enough of a comestible lifestyle.
I suppose the best thing any of us can do is be true to ourselves. So it’s no surprise my wardrobe is bursting with lemon appliquéd vintage and wicker apple handbags. I wear them all proudly an unapologetically, veering into dressing like a human fruit basket more often than not. So I suppose it was only a matter of time before the fruit bowl found its way to my my sewing machine once again….


The Inspiration
Several months ago, I spied the most stunning vintage dress at forever-fav Mill Street Vintage. Gina somehow manages to curate the most amazing collection of 1950’s pieces, and this one was no exception. Done in crisp white with strawberries dancing around the hem, I got my trigger finger ready. As it happens, someone else’s trigger finger emerged triumphant that day, and I gazed sadly at the now strawberry-shaped hole in my closet.

My wonderful fellow curator of all things appliqué, Amy of Miss Hero Holliday, messaged me, as she too had lusted after the Strawberry Dress That Would Now Never Be. And she had a brilliant idea – what if we could recreate the print, but in appliqué? As someone who hadn’t quite ventured into print design yet, but could somehow craft all manner of things in felt, I was immediately intrigued.
So, I made a quick sketch, and before you could say “pucker up,” my next sewing project sent me sailing straight to the berry patch….

The Design
For a project like this, I would need two key things: First, the perfect base dress that was simple enough so as not to detract from the main feature. Second, I would need the perfect shades of red and green from which to build my berries.
For the base dress, I immediately turned to Simplicity S8873. If it looks familiar, it’s a pattern I’ve made before (and recently). This would be beneficial because I could skip the toile, and head straight to the fun part. I got some yardage of white Kona Cotton and called the matter settled.


As far as the felt, I looked no further than my standby – BBD Supplies. Having many moons ago invested in their swatch card, I could play with different shades of red and green and get just the right balance. I also wanted to play with some dimensionality, so needed a few good contrast colors to make everything pop. In the end, I went with bright red for the berries themselves, with hunter green for the leaves and accents of coral and champagne.


To recreate this set, you will need:

The Construction
I wanted to start with the bodice of the dress, to get it out of the way so I could focus on the more labor intensive skirt. I quickly cut out the Kona Cotton and made quick work of putting in darts for the bodice front and lining.
For those who may be seeing this pattern for the first time, I didn’t take many photos of this part of the process for this dress, because I went through the construction in more detail in this post. If you have any questions and are struggling to put this one together, pop a comment below and I’ll try to help!


One feature of the original dress I really liked was the piping detail around the bodice. It was simple enough so as not to distract, but really brought the border print up to the top part of the dress. Try as I might, I couldn’t find any pre-made piping in the deep green color I was after. So, the only solution? Make my own!
I scooped up some 7/8″ wide double fold bias tape in dark green and some 3/16″ cording from my local shop, and got to work!


Although I could have cut my own bias strip to the ideal width, it seemed a far easier solution to use pre-made bias tape. I opened each piece and put my cording inside, right at the edge of the inner fold.
I then closed the bias tape, keeping the cording inside. Using my piping foot (#12 for my Bernina Activa 220), I quickly secured the cording in place. Voila! Instant piping in the color I wanted (You can see a quick video of this process on my IG Reels).


Using the same double fold bias tape, I cut 4 long pieces and sewed the open ends together, which I then attached at the front and back corners to make my dress tie straps.

Then, I pinned my piping on the outer edge of my neckline, stitching it to the right side of the fabric, taking care to let 1/4″ of the bias tape extend over the edge (so I could sew the bodice together at 5/8″ inch) and clipping the piping around the curves. Then, I pinned my straps in place and put the right sides of the bodice front and lining together. Following the original stitch lines for the piping, I sewed the two together and flipped to the right side, pressing all of the seams down.
As someone who had never tried piping before last year, I was pretty proud of myself!


The bodice came together quickly in one afternoon. With that done and waiting on my dress form, I turned my attention to the skirt. For this, I wanted it to be super full. So, I measured a long 4 yard piece of Kona cotton at 34″ in width, which I would hem to my ideal length of 29″.


Because I didn’t want to spend too much time on sewing after the appliqués were on, I decided to hem the skirt first. This would also help me create visual balance when placing the pieces, because I wouldn’t have to imagine how it would look when hemmed. I pressed under the hem 3″ and used a blind hand stitch to get it in place.


With the base done, I turned my attention to the most important elements: the strawberries. From the original vintage print, I knew I wanted a mix of 6 larger strawberries in the lower third of the dress, with smaller versions of the larger berries in 2 rows around the hem.
I started by measuring out where I wanted my berries, marking places for the large and small berries so everything would be evenly spaced. I wanted the small berries to sit right at my folded hem mark, 3″ up from the hem (which was an easy line to follow), with two rows of berries at 4″ wide in total. I would then put my larger berries 3″ up from those rows. I marked these positions with pins all the way along the hem of the skirt


For the berries themselves, I found an .svg file I really liked, which had just the right amount of dimensionality. Using my Cricut Maker, I cut the base of the berry in bright red, and the accent shine in coral wool blend felt. I was going to have 8 large berries total (12″ tall, including stem, and 8.5″ wide), and Cricut made pretty quick work of the process.


After the berry elements were cut, I quickly got the stems and leaves cut out of the Hunter Green felt. It’s so important with pieces like this to find just enough detail, without overwhelming the design. I played with possibly layering up some leaves for additional dimension, but it started to look too busy.


Once I had the main elements, I set my Cricut to cut out the seeds for the strawberries out of champagne felt. This is where the berries actually started to come to life. With one large berry together, I tested the placement of the large berries about 2″ up from where the mini berries would be, just to get a sense of balance. Happy with that, I let Cricut cut out the rest.


Next, I needed to focus on my mini berries. This was going to take Cricut a fair amount of time, because I had measured out that I would need 146 in total (you read that right: 146). Because they were smaller (~1″ wide), I wasn’t going to have the shine and accents in felt (though I had a plan for a way to add a bit of sparkle later). I rolled out the red felt, and let Cricut get to work.


I then repeated the process with the stems and leaves of the berries – because they were a little fiddly, I lost a few stems in the process. But, within a few hours I had all of the elements I would need to start my berry patch.


Now that I had all of elements, it was assembly time! First step was getting all of the stems on my mini berries. I turned to my tried and true favorite fabric glue, Aleene’s Fabric fusion. I started by lining up ten berries a time.


Using my fabric glue pen, I ran a quick arc of glue on the upper part of the berry. Then, I pressed the stem and leaves in place, working quickly so the glue didn’t set. Once I got through all of the berries, I set coasters on top of them and left them overnight to dry.


I also wanted to use my fabric glue to secure the major felt elements in place on my large berries. I started by placing all of the pieces where I wanted them, which I would glue in place one by one. Starting with the seeds, I applied a generous amount of glue to the back, and pressed it in place. I also added glue to the back of the coral piece, which I carefully pressed in place around the seeds.


As a little bit of added dimension, I cut out a few half moon shapes from the coral felt, which I glued in place around a few of the seeds, as if light was just hitting the morning dew. After everything was dry, I laid a few of the elements on the skirt to confirm the scale was correct and I didn’t need to make any placement changes. Overall, I was really happy with it.


Because I am a girl who loves her sparkle, I had a few ideas on ways to bring in some shimmer to both my large and small berries. For the large fruit, I was going to add some additional accents in sequins, that would mirror the dew shine I had added using felt. I grabbed some spare iridescent sequins I already had in my stash.

If you haven’t sewn on sequins before, my method here was to bring my needle up through the center of the sequin, and down again on the back perimeter. Bring the needle up about half a sequin’s length away from the original, threading on another sequin, before bringing it down through the center hole of the original. Repeat this until you have your complete row, securing it in place with a final stitch through the leading sequin.
Using this technique, I quickly sewed 2-3 arcs around a few random seeds.


It’s a small detail, but it felt like a really effective one. I moved quickly through my 8 strawberries, until I had a bit of sparkle reflecting off of each one. I then added the final detail of the leaves and set piece, which I glued carefully into place over each one.


Next came the mini berries. This would definitely be the most labor intensive part of the process, given just how many there were. But, I wanted to add seeds (and sparkle) to my mini berries, which I would do using hand sewn beads. I found some seed beads with a bit of pearlescent sparkle, and gathered my stack of mini berries.


To add this effect, I created 4 staggered rows of beads. Starting with the center bottom, I sewed on each bead with a single stitch. Working my way up, I offset each row, quickly adding rows. I got into a rhythm with this fairly easily, and was able to get through the stack by working an hour or so at a time over several days.


Miraculously, all of my elements were done and it was time to start building the skirt! Because everything was already cut, hemmed, and my measurements marked with pins, it would just be a matter of getting it all in place and making sure the balance was correct. I started by creating two rows of the mini strawberries, offsetting the two rows to give a staggered effect.


I then turned my attention to the large berries. There were far fewer of them, but I needed to get the measurements just right. Because of their size, if things were off even a little, the eye would jump to it.
I worked out the math ahead of time. Starting with what would be the center front, I marked the position of each 8.5″ wide berry, spacing at 9.5″ apart (which would meet my 146″ yardage perfectly (including a 1″ seam allowance at the back). I marked these with my disappearing ink pen, and then added the large berries to check my math.


I was pretty stoked to learn that, once again, math works! I made a few minor tweaks to the elements here and there, adjusting my mini berries and keeping it all even. Once I was happy with it, I then pinned it all in place.


Next came another labor intensive part: sewing it all on! I am no stranger to appliqué, but knew this one was going to be a lot of work. But, ultimately the hardest part is starting. I loaded up a season of the Great British Baking show, gathered my red thread, and slowly worked along the row of mini berries.
I like to hand appliqué elements on using a tiny, tight backstitch, which means your stitch is practically invisible from the outside.


I followed the same process for the larger berries. The only difference here was switching between red and green thread (which I didn’t bother to do for the smaller berries, given their size). I also added a row of stitching up the center of the large berries to be sure they were very secure.


With all of the elements secure, it was time to attach the skirt to the bodice and finish this dress. To start with, I grabbed my favorite ruffler foot (Bernina Foot #86) – which quickly took one of my 4 yards edges down to 29″. If you love a full skirt and have a sewing machine that offers a ruffler foot in their repertoire, I can’t recommend it enough.


I was at the final steps, which included sewing the skirt to the bodice and adding in a 22″ lapped zipper. Lucky for me, this one went in reasonably quickly (I guess practice really does make perfect). If you struggle with zips, I always recommend this tutorial which helped me immensely when I first started out.


Once the zip was in, I pressed under the bodice lining and sewed it to the skirt using a quick slipstitch. This finishes the inside of the bodice so nicely, and hides all of the seam allowances. I then carefully pressed in one of my custom made garment labels from Heart of Wonder.


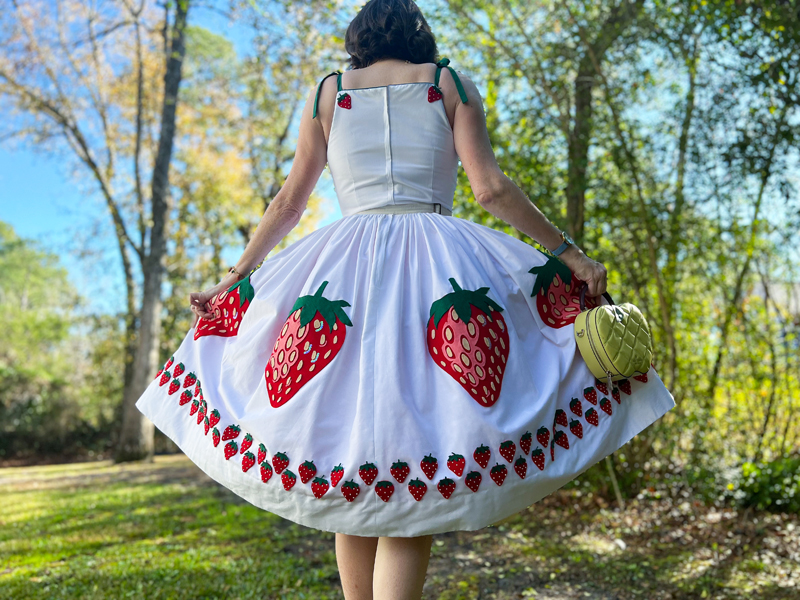
As a final finishing touch, I got cheeky and added two strawberries to the back of the dress. I thought it needed just a little something to bring the brightness of the hem up to the top of the dress. I am a gal who likes to have an exit….


And just like that, she was done (just like that, plus about 85 hours of work and pinpricked fingers). I put her on my dress form and (dare I say it) I think I like my appliquéd version better than the print! I love the 3D quality and how bright and vibrant the print is against the crisp white of the dress. This is a dress that speaks of summer and picnics and fresh starts.


The Debut
I have definitely been feeling the hands of Spring beckoning me forward. With March squarely here, the cold evenings are giving way to warm afternoons. We’re all shedding our cardigans and jackets and starting to see the warmth in the world ahead. I for one, cannot wait…


I have only to break into
the tightness of a strawberry,
and I see summer –
its dust and lowering skies.
Toni Morrison


It’s been an absolutely mad few months at work. While I’m used to being busy, this took it to another level. I haven’t had an evening off or a weekend day where I wasn’t working for a good 6-7 weeks. While I know that I have responsibilities and things that need doing, it is so important to realize that working that much does no one any good.
So, this past weekend I stopped. I accepted the world wouldn’t go into a holding pattern if I didn’t sit at my computer for a day. So instead, I sat at my sewing machine. I finished a few pieces that had been languishing, and started sketching ideas for my next make. My sewing room can be a magical place – where there are no deadlines and no one requires anything from me. And like biting into the first juicy strawberry of the season, I remembered the tart, surprising joy of reclaiming myself.
xoxo
Construction Details:
Patterns: Simplicity S8873 for the base
Fabric : 5 yards of Kona Cotton in Snow
Appliqué: Felt from BBD Supplies
Seed Beads: Etsy
Piping: Made from bias tape & cording
Additional notions (zipper, thread): JoAnn’s
Outfit Details:
Dress: Made by me!
Capelet: vintage (similar modern & vintage)
Necklace: Betsey Johnson
Bracelet: gift, Kate Spade (same one here)
Handbag: Kate Spade
Shoes: ReMix
.
instagram // twitter // facebook // pinterest
.
Any items marked with a “c/o” (courtesy of) a retailer mean I was provided with an item for free in exchange for a review and/or feature on my blog. I always provide my honest opinion of any item I’m reviewing, regardless of whether it was sent to me as a courtesy item or if I purchased it myself. In addition, this post may contain affiliate links. This means that if you click and/or make a purchase through certain links or ads on this site, I may make a commission from that click and/or purchase at no cost to you, which helps with the day-to-day running costs of my blog.