
Have you ever met a dress pattern and fallen in love at first sight? Some just speak to me, and such was my first encounter with Simplicity S8873. It’s crisp and clean, but has a bit of sass in the shoulder ties. Plus, it looked like a pretty straightforward make. Truly, sometimes simplicity really is best.
I very rarely ever sew to the season. In summer I find myself brimming with wool felt circle skirt ideas. And in winter I inevitably gaze longingly at my rack of flouncy sundresses. But, I’ve learned to just lean into it. Knowing how crazy my life can get, I start a project and usually inevitably finish just in time for the season it’s meant to be worn in anyway. So, on we sew….


The Design
I had eyed up Simplicity S8873 for awhile. But, for some reason, I had never taken the plunge and I can’t for the life of me figure out why. I think sometimes I can get a bit hyper-focused on challenging myself, when in fact choosing a simple silhouette and letting the fabric be the star can sometimes be the biggest challenge (especially when you have a tendency towards extra).

Now, when the perfect pattern meets the perfect fabric, you know it’s going to be a good day. If this fabric looks a bit familiar, it’s because I became obsessed with it ever since I saw it on Gertie’s Instagram. I made it a mission to get it in every color way, because it was impossible to choose between them, and it’s already appeared in many projects (including this dress and this playset). So, with the key ingredients in place, we were off to the races!


To recreate this set, you will need:

The Construction
Whenever I try a pattern for the first time, I have to resist the very real urge not to jump straight into my main fabric. It’s important to do a toile first (aka a test of the pattern), so you know if you need to make minor tweaks. For this, I start by tracing the pattern on butcher paper, and trying it out on some scraps of fabric from previous projects. Based on my measurements (36″ bust, 28″ waist) I went with the size 12 to start, and we’d see where we ended up.


I‘ve done enough of these now to know my personal proportions suit vintage style well (with the exception of bodice length – I almost always need 0.5-1″ of extra length there). So, when I do toile, I almost always do it in fabric that I could use as a dress lining if it turns out I don’t need to make major changes. So, I cut out the test in a mint green that would serve as the perfect lining…


This pattern really only has 3 pieces that make up the bodice – a center front on the fold and two back pieces that connect at the side seams. I quickly added the front and side bust darts into the bodice front, and then sewed in the narrow darts at the back bodice. Then, I connected them at the sides.
Surprisingly, the toile fit really well – it was snug, but with enough room for the girls to breathe. I was also pleasantly surprised to see I didn’t have to lengthen the bodice – having tie straps definitely helps give some wiggle room here, which I always appreciate.


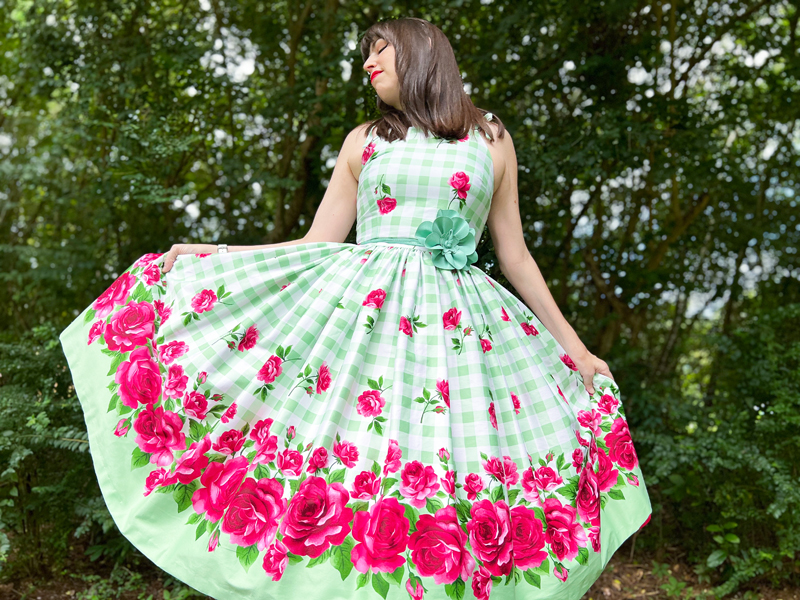
After feeling confident in the toile, I quickly moved on to the border print fabric. I wanted to keep the gingham print for the bodice, and just run the border print along the hem. Playing against type, I also resisted all urges to add trims or rhinestones or any accoutrements (maybe I’m growing??). I started by quickly cutting out the three bodice pieces, avoiding the border print and taking care to match up the gingham.


I started by pressing lightweightinterfacing to all of my bodice pieces, which I love to help keep the pieces stable. It also had the added bonus of giving the garment a bit of structure. I then very quickly sewed in the darts to all three pieces, pressing them flat and towards the center.


I then stitched the side seams together, connecting the front bodice to the two back bodice pieces. Because my prior makes have been so complicated, I was sort of shocked to have a bodice come together so quickly.


Next step was to cut and put the four straps together. For this, I cut four identical 2″ wide rectangular pieces. Then, I pressed the edges in 1/2″ on both sides, before pressing them in half. I stitched along one edge, making sure to tuck one end under to give it a clean finish.


Then, I pinned the straps to the marks on the right side of the bodice, being sure the straps faced downward (which would flip once you turn the bodice rightside out later. You also want to be sure you keep the straps out of your seam allowance.

I then pinned the bodice to the lining, with right sides together, all along the top edge of the bodice. I stitched at 5/8″ seam allowance, being sure I didn’t catch any of the strap ends in my sewing.


I clipped into the curved edges and, after flipping the fabrics to the right side, top stitched the upper edge, which helps keep those seems around the neckline flat. I was pretty tickled at how cute it looked already – with the shoulder straps adding the secret sauce.


I could hardly believe it, but in no time we were already onto the skirt! I’m just not used to finishing a dress in a single weekend, so this was a newfound lovely novelty for me. I quickly cut one long panel for the skirt. Personally, I like mine uber full, so I went with 4 yards of fabric for this baby.


If you’ve been following for awhile, you know my favorite tool is my ruffler foot (Bernina Foot #86) – which quickly took that 4 yards down to 29″. If you love a full skirt and have a sewing machine that offers a ruffler foot in their repertoire, I can’t recommend it enough. Not having to ruffle my skirts by hand is a joy that cannot be described…


Then, I attached the skirt to the bodice, careful to keep the lining out of the way and not to let the ruffles bunch up (which they are definitely inclined to do, given how full the skirt is). But, this came together without issue.

I was at the final steps, starting with the zipper. This dress took a 20″ lapped zipper, which went in reasonably quickly. Although these used to stress me out, I can almost do them without thinking now (check out this tutorial if you still find them vexing! Gertie’s prescribed order of pinning saved my life.).


I then quickly completed my finishes: hand-stitching the lining to the bodice, pressing up and sewing a blind hem, and carefully pressing in my custom made garment labels from Heart of Wonder.


I think it’s safe to say this dress was a complete win – it was such a speedy make, and is one of those dresses that earns an “Awwww how pretty!” from everyone who sees her, And I have to agree – there is something so sweet and endearing about the print, you just can’t help but smile when you see her.
Don’t be surprised if you see this pattern a few more times. I may have already used her more than once…

The Debut
This is such a crazy week, as the Spring semester has started. Needless to say, I need to bring out the Big Fashion Guns to keep my feet moving forward. It’s always so hectic to start a new semester and get back into the groove of teaching. But, a lovely dress always makes it a little easier….


So far, my plan to tiptoe into this year with a healthy dose of trepidation is working well. I almost feel a sense of relief in just being for awhile, rather than having to add even more to my Self-Actualizing To Do list. I’ve also decided to spread the word, which has started catching fire around work and in my circle of friends. And now that the gospel has been heard in all corners of lab and air, hometown and far flung destination, there seems to be a collective agreement to tiptoe rather than race. Choose self-care over constant “improvement”.
So, with one careful foot in front of the other, a new semester has begun. With new students to teach and new challenges to face. Good thing I packed a power suit…
xoxo
Construction Details:
Patterns: Simplicity S8873
Fabric : 5 yards of Hopscotch Gingham Sateen in green by Gertie via Spotlight
Additional notions (zipper, thread): JoAnn’s
Outfit Details:
Dress: Made by me!
Belt: Modern Millie, gift
Handbag: Mary Frances
Shoes: Betsey Johnson, gift (similar)
.
instagram // twitter // facebook // pinterest
.
Any items marked with a “c/o” (courtesy of) a retailer mean I was provided with an item for free in exchange for a review and/or feature on my blog. I always provide my honest opinion of any item I’m reviewing, regardless of whether it was sent to me as a courtesy item or if I purchased it myself. In addition, this post may contain affiliate links. This means that if you click and/or make a purchase through certain links or ads on this site, I may make a commission from that click and/or purchase at no cost to you, which helps with the day-to-day running costs of my blog.