
I think, no matter how daring you are, you can always get stuck in a bit of a rut. While I have a reputation for being somewhat fashionably “You Do You“, I’ll be the first to admit that I have my comfort zone. Without fail, day or night, you can be sure you’ll see me in a full skirt cinched within an inch of its life and as many crinolines as I can conceivably stack beneath some manner of glitter.
I make no secret of the fact that I simply don’t do pants. While they are a necessary evil (time spent on a boat necessitates the two-legged approach now and then), for the most part, pants just never feel like me. I love a cinched waist, but I’m not a fan of feeling restricted anywhere else. Plus, as one of life’s tall people, I very rarely can find a pair with an appropriately tall inseam. So, in the spirit of sewing and stepping out of your comfort zone one leg at a time, the day had finally come where I was going to do the unthinkable:
Yes, ladies and gents – I’m making shorts!


Something I’ve become more and more conscious of lately is fabric waste. Whether it’s the mounting stories of landfills filling with fast fashion or the horrible stories of conditions faced by workers in garment factories, I’ve been trying to be more intentional about what I buy. I’ve also been making a concerted effort to reduce my own waste, keeping scrap fabric as much as possible and trying to incorporate excess yardage into future projects.
A short while back, I was lucky enough to snag this stunning Hopscotch print by Gertie in multiple color ways. I used it to make the most sumptuous Liz Dress. Despite the fact that I managed to get 4 full yards into the skirt of the dress, there was still enough leftover for a top. And while I have other plans for the majority of the green color way (stay tuned), I knew I had just enough for a pretty fabulous pair of shorts….

The Patterns
While my appliqué circle skirts will always have my heart, I have to admit I’ve become completely enamored with Gertie’s sewing patterns lately. About 6 months ago I joined her Patreon, and have been busily testing my sewing know-how and upskilling through her fit clinics.
So, I thought this was a great opportunity to give the bodice from the Lamour dress a whirl and match them up with the Loretta shorts. Everything in Gertie’s “L” series are designed to be modular, which means you can easily swap bodices and bottoms. While I could have made this into a playsuit by stitching them together at the waist, I decided to keep them as separates so I could wear it as a playsuit, but also mix and match to my heart’s content.

To recreate this set, you will need:

The Construction: Lamour Bodice
I decided to start with the Lamour bustier. Even though it took me a little while, I’ve really warmed up to the whole pdf pattern concept. I printed the Lamour in size 6, D/DD (which should end up with finished measurements of 37″ bust and 28.5″ waist). This particular pattern should fit really snugly, so you don’t want too much ease between your measurements and the finished garment.


Since it would be my first time with this pattern, I started by making a toile (ie, a mock up of the pattern that will help you identify any fit issues before you cut into your fashion fabric). Other than adding a 1/2 to the bodice length, I found the fit of this one to be great – fitted at the waist with enough breathing room for the girls.


Feeling bolstered by the fit of my toile, I took a deep breath and decided to take the plunge by cutting into my fabric. This was going to be a bit of a pattern matching nightmare – there were 8 pieces total to make up the bodice, and I really wanted to match up those plaids at the seams. I also spent some time thinking about where roses would appear on the finished dress (no one needs a bloom over her nipples. Just sayin’….)


I am definitely no expert at this, but I found the best way to match up the plaids was to use the clips in the pattern to double check where things would line up. It takes a little bit of extra time, but is definitely worth it in the end.


In addition to the pattern pieces, I also cut out a matching lining (in a light blue fabric I had in my stash) and a set of each pattern piece out of the interfacing, which would stabilize the bodice (I personally prefer interfacing to an underlining). I carefully pressed the interfacing to each piece, taking care not to create and ripples.


I started out by prepping the front bodice pieces, which have a pleat at the front as a bit of a design detail. I highly recommend taking care with this step – if you’re anything like me, it will drive you CRAZY every time you wear it if the front pleat doesn’t match up. So, I pressed the marks together and stitched the front center seam, pinning and (unpicking) and praying…


Once the center seam was together, I prepped the princess seams by staystitching along the curve and clipping in every 1/2″ or so along the seam. This is a really useful step, because it’ll help the princess seams come together neatly. One other benefit of making a toile, is I definitely feel like I worked out any kinks he first time around, so this one went together quickly.


The Loretta shorts came with a cute expansion option of adding a curved neckline detail to the Lamour (the L Series is seriously the bomb). So, I decided to give it a try, because I loved how finished it would make the bustier. I laid out my neckline pieces (one in plaid and one in the solid blue lining).

I was also going to step up the finishing by adding a piping detail to the edge of the neckline piece. I found a perfect match in this blue bias tape maxi piping, which went perfectly with the lighter blue in the plaid. To begin with, I measured out 5/8″ from the edge of the neckline piece, and clipped into the piping so I could fit it around the curves.


Using piping foot #12, I slowly stitched the piping to the right side of the fabric, taking care around the curve (which got a little tricky). Then, with right sides together with the lining, I flipped the piece over and followed my stitch line, hiding the edge of the bias tape inside the lining. Given it was my first time trying piping on this tight of a curve, I was pretty pleased with the result.


After I basted the two neckline pieces to the front bodice, I could finish things off by sewing the side and back princess seams together. Again, I took great care to match the plaid, matching notches and pinning every inch or so to try to ensure everything matched up.


Then, I pretty much repeated the whole process with the lining. In a world where my toile didn’t require any adjusting, I could have actually used the toile for this (I like to make my toile out of a fabric color that could work as a lining, just in case).


To give some serious structure to the bodice, I also decided to put in some boning at each of the seams (except the center front), as well as diagonally on the side bust and back pieces (this baby would be going nowhere). You can make your own boning casing, but I have found 1/4″ boning with casing to be super handy. It’s not as strong as steel boning, but as I’m not going to be wearing this as a true corset, the plastic boning does the job just fine.

I started by measuring the length I would need, and cut out strips of boning with casing. I scrunched the casing down about an inch, and trimmed and tried to curve the edge of the plastic boning, before covering it with casing again (use some old scissors for this. It can do a bit of a number on them).


After doing this for each piece, I pinned the boning in place on my lining (very important – you don’t want to sew it to your bodice, or the stitch lines will show.

On the wrong side of my lining, I sewed around the edge of the casing, securing the boning in place. For this, I’ve found foot #38 to be amazingly handy. I repeated this up and around each piece until they were all secured to the lining.


Then, with right sides together, I sewed the lining to the bodice at the top seam, clipping the concave curves and notching the convex ones. If you’ve measured your boning correctly, it should be just in the inside of your stitch line.


One trick I’ve learned with boning is that you sort of have to “train” it into the shape you want. I put the bustier on my dress form for the next couple of days, using clips to coax the boning into the curves. I also clipped it to myself a few times, which lets the heat of your body mold it into shape. It will look really bad at first – but, once it settles into the curves it will start to look more like it should.


After a few days of this, I was ready for finishes. For a bodice like this, you will want to use a separating zipper. Unlike a normal zip (which is connected at the bottom), this one will quite literally separate into two halves, allowing you to get in and out of the bustier.

The process for getting the zip in is the same (and I’ll be doing my standard lapped zip for this piece). First, open up the lining fully and press under the bottom edge of the bodice and the right side of the back seam allowance under 1/2″. Then, pin the right side of the zipper to the right back seam allowance, sewing it quite close to the zipper teeth,


Press under the left back seam allowance 5/8″. Then, close the zipper and pin the left side to the left zipper, taking care to match up the top and bottom edge. Then, open the zipper and sew in place at 1/2″.


For the final step, you want to finish the bottom edge. I decided to just press under the bodice edge and lining and topstitch the two together using a matching thread. If you don’t want to see that stitch line, you can connect the two instead using a ladder stitch (which will make your stitches invisible).
Lastly, I finished the edges at the zipper with a quick slip stitch.


I have made SO many skirts over the years (especially the last two years). I’ve really challenged myself on more and more intricate designs, from hand sewing 12,000 sequins to prong set rhinestones to crazy amounts of appliqué. But, I am feeling so proud of this bustier. I really haven’t stretched myself in terms of complex bodices – but I felt like sky was the limit when I zipped her up and she fit like a dream.


The Construction: Loretta Shorts
With the bodice complete, I turned my wary attention on The Place I have Yet To Have Gone Before: shorts. I had seen others post their version of the Loretta shorts, and knew I loved the style: a high waist, flared leg, and cute bucket style pockets. So, with some trepidation, I printed the pattern and started to tape it together.


Because it was my first time with this pattern (and my first time making anything with leg holes, period), I was definitely not skipping the toile. Using some leftover cotton from various projects, I was pretty pleased to find that the toile fit reasonably well. I decided to lengthen the leg a bit, as they were on the short side for me (I’m cheeky, but don’t want to be that cheeky). And then, we were ready to go!


As with the Lamour bodice, I got a bit pedantic about pattern matching. If you identify with this pain, just know you will spend hours pinning, unpinning, squinting, and getting very frustrated at this part of the game. But, I personally find it really makes the finished product look so much more expensive (and times when I haven’t done it, it bugs me to this day).


Once I took the time to match up the gingham, I cut and laid out all of my piece. One nice thing about this pattern is that it really only has 5 pattern pieces (front, back, pocket, pocket bag, & waistband), with the pocket being the trickiest part to get right.

The first step called for some serging of seams: Because the shorts aren’t lined, overlocking the edges will really help to prevent fraying. I dusted off my old serger (I have a Brother 1034D and it’s great for this type of work). I zipped through overlocking the edges of all of my pieces, and was ready to get to sewing!


The trickiest part of this pattern is getting the pocket in, with a clean corner. I started by stay stitching a sharp corner on the front of the shorts. Then, matching the dots, you stitch the pocket to the shorts front along the vertical edge, almost as if you were creating a dart. This boggled my mind a bit, but I highly recommend watching Gertie’s How To Video for this step on her Patreon. It really helped me work out what was going on.


Then, clip the corner to the blue dot. With right sides together, I sewed the pocket bag to the horizontal edge of the shorts front (where the pocket opening would be). I stitched just up to the dot, careful not to catch the other piece of fabric. Press that seam open.


To get a nice clean edge, I under stitched the pocket bag, and pressed it to the inside, which would effectively line the pocket. Never, ever skip the pressing steps, which will keep everything looking clean and crisp.


Working now from the inside, you want to stitch the pocket vertical and horizontal edges together. Then, match all of your side seams (which will include the shorts front, pocket, and pocket bag) and baste them so they stay together. You should have one side of your shorts, with a clean pocket.


I repeated the process for the other side (which took far less time, now that I understood the process. Then, I sewed the two front pieces together at the center front. I was so darned pleased with my gingham pattern matching, you have no idea. Seriously, I was practically patting myself on the back.
You know how the story goes, though. Woman preens, Universe cackles. This is where I realized a critical error: I was so focused on matching up my gingham, I didn’t even notice I had cut a fig leaf right at the crotch. With juuuust the tiniest amount of red peeking out. Sigh.


I unpicked, recut the pieces, and took another few hours to get back to the same place, sans fig leaf. Luckily, I had enough fabric to recut the right panel and get it looking like I wasn’t trying to imitate Eve in the Garden of Eden, but man was I annoyed at myself. Ah well, at least I noticed before the entire pair of shorts was together!

Turning my attention to the back, I quickly added darts to both back pieces. Then, even though I always think of it as a final steps, the instructions recommended putting the zipper in now, before the back was connected to the front. Dutifully, I took my 7″ zip, and put it into the back as a lapped zipper.
TIP: If I make these again, I think I will go with a 9″ zipper. The 7″ was fine, but if you have hips like I do, they are a bit of a squeeze to get on with the shorter zipper.


Then, with right sides together, I sewed the short front and back pieces together at the side seams and the inseam, taking care to match up my checks.

Next, I pressed the hem of my shorts under 1/4″ and then again at 1/2″. I finished the hem with a simple topstitch. You can do an invisible hem if you want, but I found a topstitch to be fine (and saved me some time).


Then, with the shorts mostly complete, I turned my attention to the waistband. I treated it just like a waistband for one of my skirts, starting by first pressing the interfacing to the waistband, and then sewing it to the waistband lining. I like to under stitch the lining, which always gives a nice clean edge when I fold in half and press.


I sewed the waistband to the shorts themself at 5/8″, taking care to be sure that my darts all faced in the right direction and there were no puckers in the fabric.


Then, I pressed the waistband lining to the inside, and secured everything together with a topstitch. As a final step, I sewed in two waistclasps to the inside of the waistband tab.


I honest and truly shocked myself with how much I loved these shorts. As Mr. Dressed said, they are as if shorts were a dress. They are fitted at the waist, cinching me in the way I like, but flair cutely at the bottom. And don’t even get my started on those pockets. While this project had a few stops and starts, I don’t think it was enough to burn me on shorts forever. Who knows, I may even be a shorts convert…
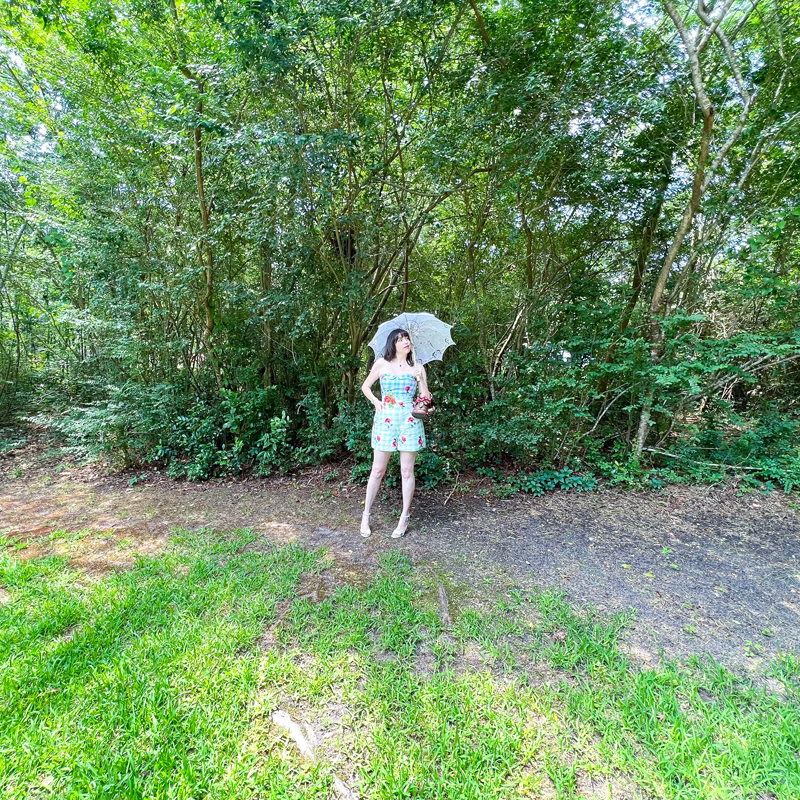
The Debut
I paired my new Lamour Bustier with my Loretta shorts, and they looked like they were made for each other. I love that I effectively created a playsuit that suited my proportions (off the rack playsuits give me a permanent wedgie. Tall Girl Problems). But, by keeping them as separates, these pieces leave room for a ton of versatility (no lie, but I’ve already paired this bustier with about 12 different things in my closet). So, I think we can call this project a success!


Just like the rose
holds her beauty among the thorns
we can gather our strength
from the most unlikely places.
Christine Evangelou


I guess the moral of the story is – never get stuck so deep in a rut, no matter how comfortable it is there – because there are always new things to discover about yourself. We are forever changing, learning, becoming new versions of ourselves. I never want to be afraid to venture where I haven’t before because I am so enamored with a version of myself from the past.
Now, before you start thinking that I’m about to trade all of my dresses for trousers, never fear. There will be more than a few dresses in my future. But, I like leaving room for the unexpected. To remind myself there is always room to grow.
Any rut you’re looking to climb out of?
xoxo
Construction Details:
Patterns: Loretta Shorts and Lamour Bustier via Gertie’s Patreon
Fabric : 1.5 yards each of Hopscotch Gingham in blue and green (you need extra to pattern match)
1/4″ plastic boning (w/casing): JoAnn’s
Piping: JoAnn’s
Additional notions (zipper, thread): JoAnn’s
Outfit Details:
Bustier: Made by me!
Shorts: Made by me!
Necklace: Stranded Treasures
Brooch: Ever Faith
Handbag: Mary Frances Accessories (similar)
Shoes: Katy Perry, sold out (similar)
.
instagram // twitter // facebook // pinterest
.
Any items marked with a “c/o” (courtesy of) a retailer mean I was provided with an item for free in exchange for a review and/or feature on my blog. I always provide my honest opinion of any item I’m reviewing, regardless of whether it was sent to me as a courtesy item or if I purchased it myself. In addition, this post may contain affiliate links. This means that if you click and/or make a purchase through certain links or ads on this site, I may make a commission from that click and/or purchase at no cost to you, which helps with the day-to-day running costs of my blog.