
I’m an 80’s baby, which was all about color and exuberance and some seriously poor fashion choices. There is something about stone washed jeans and puff paint that makes me both nostalgic and horrified at the same time. And I must admit I was definitely one who gleefully joined the splatter paint phase, unapologetically adorning my clothes, my version of “art”, and even my bedroom walls with color.
Despite being vehemently opposed to most things 80’s (let’s be honest, the spiral perm was kind to no one), I guess it was only a matter of time before it started to seep into my fashion. Truthfully, you just need to hear the first strains of “Livin’ on a Prayer” push through the din in a bar or have someone start the theme song to Fresh Prince, and your comrades in 80’s arms to come out of the sponge-painted woodwork, belting every lyric in perfect synchrony. So, perhaps it was simply inevitable I would find a way for 80’s to meet 50’s in my latest sewing adventure….


The Inspiration
While I made no secret of my love for recreating vintage appliqué pieces, I’ve gotten more and more inspired lately to bring vintage prints to life. Since I have very little skill in the way of graphic arts, I’ve started to wonder if I could bring the print forward in sharp relief, doing what I do best: painting with felt.
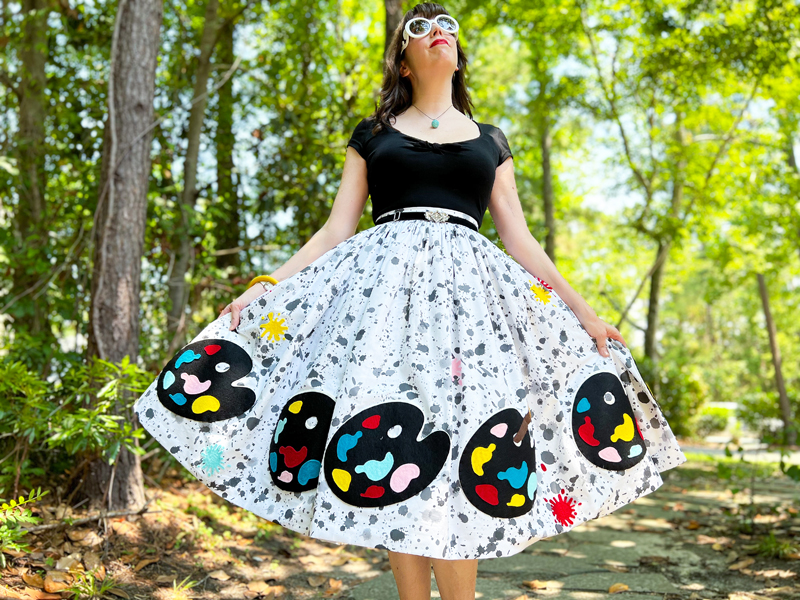
I’ve had a vintage skirt on my wishlist for awhile now – I’ve seen a few of my fellow favorite ladies who have it, but seem to always just miss it. Although it’s a 1950’s skirt, the print evokes the 80’s for me: a black and white splatter paint background, with painter’s palettes around the hem. It speaks of color and creativity and coloring outside the lines. And boy did it make my appliqué wheels start to turn…


The Design
Before I could determine if this was a viable project, I needed to know if a background print similar to the original existed. I knew I could make the applique easily enough (thank you Cricut Maker!), but I needed just the right backdrop. So, the hunt began for a black and white print – one that felt reminiscent of the 80’s, but wouldn’t distract from the pieces I planned to put over it.
While there were a few candidates, I found the perfect print at Spoonflower called “Splat“. Designed by Danika Herrick, it boasted a white background with shades of black and grey splatter paint. My 80’s baby’s heart started to hear strains of Madonna as 4 yards began their journey my way….


Next up: felt. Lucky for me, I have my go-to shop for wool blend felt: BBD Supplies. I was aiming for about 8 painter’s palettes total, and would need a range of colors to make it happen. I went with 1/2 yard each of felt in black and fresh linen for the palette itself, and then 12 x 18 sheets of wool felt in right red, pink, alluring aqua, turquoise, & yellow for the paint splotches.
Although the original stuck to fewer colors of red, mint, and yellow, I threw a few extra to jazz it up a bit (plus, I think it’s literally impossible for me to avoid blue).


To recreate this skirt, you will need:

The Construction
I knew this one would essentially be a dirndl skirt – which you make by gathering one edge of a long rectangle of fabric. So, I quickly cut out a rectangle that was 4 yards in length x 32″ wide (which would get to my ideal length of 29″ after taking into account seam allowances). I laid it out on the floor so I could build upon it directly.


Most of my attention for this piece would go into the painter’s palettes themselves. In Cricut Design Space, I found a template for an existing painter’s palette (#M26273EF2), which I would slightly modify to get the design I wanted. I started by cutting out the shadow in linen felt.


Then, I cut out the foreground of the palette in black wool blend felt, which I would put on over the linen, slightly off center. This would give a bit of depth to the design and would look like the palette had a shadow. I tested it against my splatter paint fabric and loved how it popped against it.


Next, I turned my attention to adding some color. Working from the palette in Design Space (#M26273EF2), I enlarged the existing paint blobs and added a few extra, which to my eye looked a bit more balanced against the large-scale of the palette. I let Cricut do her thing, and quickly had my paint splotches.
I laid them in place on the palette to test their placement until it looked random, but intentional.


In measuring out the design, I wanted the paint palettes to be ~3″ up from the hem, with 6″ between each palette. This meant I would have 8 total palettes along the entire hem to keep it all even. Rather than have each one the same, I decided to randomize the colors of paint squeezed onto each palette. I put Cricut to work cutting out the various colors, until I had the rainbow on my sewing table.


Then came assembly – I laid each of the paint splotches onto the palettes, and tested their placement on the skirt itself. I wanted to be sure the design was staying pretty random, without putting palettes with same color pattern next to each other. I was pretty thrilled with how it was looking so far…


While I was going to hand-sew the palettes onto the skirt, I have found fabric glue to be a life-saver in assembling felt-on felt. My favorite is called Aleene’s Fabric Fusion – which comes in a handy pen. Working one piece at a time, I added a generous amount of glue to the back of the piece of felt, and pressed it carefully in place onto the black.


I then glued the black palette to its “shadow” and left everything to dry overnight. I have found that adding coasters on top of the pieces while the glue is drying adds just the right amount of pressure…


While the glue dried, I set to work on the next design element. A feature of the original vintage skirt that I loved was these random colored paint splashes throughout. Because my print was black and white, I knew I would have to make these out of felt as well. I found the perfect assortment of paint splotches on Design Space. Working from the same colors on the palette, I cut out a series of different splatter shapes.


Once they were cut, I worked to randomly scatter then along the length of the skirt. I wanted it to look very random, as if the painter was too lost in the creative process to notice she was getting color all over herself.


Once I was happy with their placement, I used my fabric glue to adhere the splotches onto the skirt. This is where the pen comes in handy, because you want to be sure you’re getting the glue out to the very edges of the piece.


To keep the paint splotches from looking like a virus (especially these days!), I also glued a few circles and dots around the ended of the splatter. This really completed the look, making it seem like a brush had just splashed against the canvas.


As a final detail, I decided to add two paintbrushes to my design (what is a painter without her brush?) Using some spare felt I had in my stash, I cut out two brushes with my Cricut – one dripping in blue paint and one in red.


Working one element at a time, I built my brushes by glueing all of the elements together using my fabric glue. I made sure to let them dry overnight to be sure everything was secure (glitter backed felt in particular is one you want to be generous with the glue and the dry time!)


I added the paintbrushes to the skirt, threading them through the palette. I also added a few additional strategic drips from the brushes to add to the effect that this skirt was a result of their handiwork….


With all of the pieces in place, next came the tedious part: appliqué! Although many of the elements were glued, it was still going to take some time to sew down each of those painter’s palettes. But, working on piece at a time, I put on some old episodes of Project Runway and worked carefully around each one, securing it in place with a tiny, tight backstitch.
I did it for both the black and the white elements, and also was sure to stitch the paintbrushes down, where appropriate.


Now that everything was secure, we could go from a rectangle of fabric to an actual skirt! Working on the edge opposite my paint palette appliqués, I quickly gathered the skirt using my ruffler foot (Bernina Foot #86 for my Activa 220). I personally use the tightest setting and a short stitch length, which gets my 4 yards of fabric down to 29″ with no issue.


And then it was time for the waistband. I cut two strips (2.5 x 32″) out of the splatter paint cotton and one out of interfacing. I pressed the interfacing to the back of the front waistband to prevent distortion.

Isewed the waistband to the waistband lining at the top seam. Then, I pressed the seam allowance to the inside, and sewed along the edge of the seam, before pressing the waistband carefully in half.


Before I could sew it to the skirt, it was time to tackle The Zipper. As has become my standard, I decided to go with a lapped zipper using a 9″ white zip. It has such a nice finish, and is very true to the vintage style I draw so much inspiration from.


I added the waistband to the skirt at a 5/8″ seam allowance. I pressed the lining under on the inside, and pinned it in place. Then, using a slip stitch, I secured the lining to the back side of waistband.


As my finishing touches, I pressed under the hem selvage so that none of white was showing, and finished the hem with a blind hem stitch. Then, I sewed two waist clasps to the waistband and pressed one of my custom clothing labels in place.


And there she was, a vintage print brought to life! I think I might even prefer mine to the vintage original – the applique pops so brightly against the background. And the raised elements look as if art simply cannot be contained and is almost bursting out from the hem…

The Debut
Truth be told, I’ve always been a little bit of a control freak. Type A through an through, I’ve always favored neat corners and perfect edges. This might be the ideal skirt for me to make. To push beyond order…to remind me to let go, let it be, and color outside of the lines now and again….


If you could say it in words, there would be no reason to paint.
Edward Hopper


There is something so boring about normalcy. About staying within a prescribed set of rules, with no room for creativity or chaos. I remember being in kindergarten and trying to hard to keep my crayon strokes inside the black markings – as if venturing outside into the unknown was some sort of failure.
These days, I look for a world awash with color. One where the status quo is challenged and the unexpected is celebrated. Because reality is messy and complicated. But, inspiration and creativity is born from diversity. New ideas, new ways of looking at the world, new solutions. They never would have existed if we stayed inside those lines.
What boundary will you break today?
xoxo
Construction Details:
Skirt pattern: self-drafted
Fabric : “Splat! in Ink” by Danika Herrick via Spoonflower in Petal Signature Cotton
Felt: BBD Supplies
Additional notions (zipper, thread): JoAnn’s
Outfit Details:
Top: Unique Vintage (similar)
Skirt: Made by me!
Sunglass: Amazon (similar)
Necklace: gift (similar)
Belt: Alannah Hill (similar)
Handbag: Looks Like Summer
Shoes: Steve Madden (similar here & here)
.
instagram // twitter // facebook // pinterest
.
Any items marked with a “c/o” (courtesy of) a retailer mean I was provided with an item for free in exchange for a review and/or feature on my blog. I always provide my honest opinion of any item I’m reviewing, regardless of whether it was sent to me as a courtesy item or if I purchased it myself. In addition, this post may contain affiliate links. This means that if you click and/or make a purchase through certain links or ads on this site, I may make a commission from that click and/or purchase at no cost to you, which helps with the day-to-day running costs of my blog.