
I know we all have those photos saved to our Pinterest boards – the elusive collector’s items, the seemingly unattainable vintage. More often than not, I’ll have a photo saved of a vintage piece, and then will inevitably see it appear a few weeks later on some of my fellow vintage huntresses. And all I can do is hope that one day it will be released back into the wild…
But then there are other pieces you never see appear in the throng. They seem to be preserved solely on memorex, with the same photo shared on ISO lists throughout the community. This was true of the Juli Lynne Charlot train skirt from last year’s sewing adventures, which I had only seen in a very famous photograph. And it was also true of a seemingly elusive print, with a turquoise base and daisies dancing in pink ballgowns, like a garden-themed masquerade ball.


Fabric Design
While I have definitely been flexing my appliqué muscles of late to recreate pieces I have lusted after for years, I really don’t have skills in graphic design (drawing with felt? No problem. Actual drawing? Erghhhh…..). I have been fortunate enough to work with some incredible artists over the years to try to bring certain prints out of the theoretical ISO and into my very real closet (the trompe l’oeil ribbon print is still one of my favs!).
While scooting around some of my favorite groups on FB, two fellow vintage-enthusiasts and sewists Rose and Jaye posted a stunning roadrunner print that they had commissioned to be recreated from an original vintage print. A few clicks of the mouse and I learned the amazing artist was Raquel Van Nice, who I learned is a graphic artist that sells her designs through Spoonflower.


I sent Raquel a message and a photo of the dancing daisies print I was hoping to recreate, to see if she felt confident in her ability to bring it to life from an (admittedly grainy) photograph. Because the only photo I could find was really low-resolution, it was going to be a struggle. But, Kristina to the rescue! (I swear, our vintage network is vast and powerful…). She had much better, high-resolution photos of from the original listing (as opposed to the down-res Pinterest version).


I sent the new photos to Raquel, who felt she could definitely recreate the print now that we had photos she could zoom in on. She quoted me a price for her time and a timeline (which were both very reasonable) and we were off to the ball!


If you’ve never had fabric designed before, I think it’s important to put some thought into it before hand. A few things to consider:
- What vibe are you going for? When thinking about contacting a graphic artist, it’s important to remember everyone has a different style. One flip through Raquel’s shop and I knew her style would match really well with the vibe I was hoping to get from this print. It’s definitely worth flipping through an artist’s portfolio, website, or online shop and seeing if what you’re after is in line with the kinds of things they design. When in doubt, always reach out and ask!
- What is your price point? Something I feel very passionate about is paying artists for their hard work. You need to consider your budget, not just for what the cost of the fabric and notions will inevitably be, but also for the time the artist is going to put into it and plan accordingly. If it’s more than you can afford, don’t try to haggle. Their years of training and investment in their equipment and education isn’t determined by how much we can pay. Thank them for their time and let them know you will start saving!
- Timeline: If you need a certain print by a certain time, it’s really important to let the designer know this ahead of time. Art takes time and can’t be rushed. Raquel was amazing and up front about timeline expectations. On top of that, I’m really grateful we took the extra time needed to go back and forth as the print progressed to make minor tweaks until we were both thrilled with it.
- Accessibility: Something Raquel asked me when creating her original quote, was whether I wanted this to be exclusive (ie, the Spoonflower listing would be kept private, so that only I could purchase the fabric), or if I was all right with commissioning the print and letting Raquel continue to sell it in her shop. This is really important, because it means the artist can potentially continue to generate revenue beyond the original commission. Even if you want a print to stay rare, you can contribute to the long term success of a small business. Everyone is going to feel differently, but I opted to make it available to all: Both so Raquel could benefit from the hours of work she put into doing this for me beyond just my sale, but also because I knew of at LEAST 5 other gals who had been hunting it with the same fervor as I was…
- Being flexible with the details: Whenever I go into something like this, it’s important to realize it will never be exact to the original. There needs to be some flexibility in this – especially given we are working from photographs, where the print is a bit hidden in folds. I am personally stunned at how close Raquel was able to get it (which took hours of her squinting and zooming in on these photos). But, you want to be understanding if there are some artistic licenses that may need to be made.

N Because I was going to make a skirt, I ordered 4 yards of the Dancing Daisies print in organic cotton sateen from Raquel’s shop Raqilu on Spoonflower. After 7 days (got to love that Spoonflower hub in NC), it was printed, shipped, and on my doorstep and I got to finally see the print I had hunted for so long in living technicolor. Needless to say, Raquel did an amazing job – it honestly looks so remarkably spot on to the vintage original that my eye couldn’t spot a single discrepancy.
With the fabric in hand…it was time to get sewing!

To recreate this skirt, you will need:

The Construction
The base of the skirt was going to be pretty straightforward. Because I love a skirt so full it will make 18th century women in their pannier dresses cry, I was going to use all four yards of fabric in this baby.


One extra bit of planning needed to go into the skirt as I was measuring. In the original, you can see three parallel rows of pleats in the lower 3rd of the skirt, above the dancers. They looked to be about 1″ each to my eye. But, because I’m on the tall side, I could only fit in 3 x 1/2″ pleats and still keep the length.
Each pleat would take 1″ out of the length, so 3″ + 1/2″ waist allowance + hem + 29″ length means I needed to measure out 33.5″ of total fabric length. I quickly measured the height I would need (which would end up at my ideal 29″ wait to hem).


One would think at this point I would just gather the waist, zip on a waistband and call it a day. But, I knew early on this was going to be no standard dirndl skirt. While I love recreating vintage originals, I just can’t help but put my own spin on them. To me, this piece was just calling out for some bling….
While Raquel was hard at work designing the fabric, I spent some time looking at the original and planning out how to make it mine. And I had to admit – those polka dots on the skirt just called to me. Occasionally an idea pops into my head and I shake it off. Other times, I just run with it. I decided to bespeckle the polka dotted skirts with prong set rhinestones to give a bit of extra sparkle. Although there are all kinds of rhinestones out there, including hot fix and glue versions, I wanted to stay true to the era and go with prong set.


I decided to play with three different sizes and two different colors of rhinestones: a clear and a pale pink. I actually fell down the rabbit hole for awhile trying to figure out the best options. Turns out, rhinestones come in about 8 million varieties. After ordering a bunch of samples from various places, in the end I kept it simple and went for a standard flatback in a “xilion enhanced rose” shape (which means round, multifaceted, with a flattened top).


By this time, the fabric had arrived, so I was able to measure the largest to the smallest sizes of polka dots. Using these as a guide, I decided to go with rhinestones in SS12 (3.1mm diameter), SS16 (4mm diameter), and SS20 (4.8mm diameter) in both the clear crystal and the light pink, and got corresponding push-through flatback rhinestone settings in SS12, SS16, and SS20.
You want to be sure you get the “push through” settings for these, which will literally push through your fabric and clasp the rhinestone on the other side.


Once all of my supplies arrived, I got down to work. I started at one end of the fabric, and slowly worked from one dancer to another, adding rhinestones to a random sample of the daisies wearing polka dotted dresses.
Although I researched all sorts of instrument that might work to help set the rhinestones, it was really hard to find something (where are all of my modern Bedazzlers???) But, it actually ended up being easier to do it manually using tweezers. I started by laying one section of the fabric flat on the table.


I‘m honestly not sure of the “right” way to set rhinestones, but here’s the method I found to work best for me. I started with the prong setting, which I would press up from the back side of the fabric, making sure the four prongs pierced through the other side.


While holding the setting in place, I would then add the correct-sized stone to the center of the setting. Using the tweezers, I would carefully press down each prong one at a time, making my way around the setting.


Once it was in place, I would check to ensure it was fully pressed, and then move onto the next. I would mix up the two colors and sizes throughout, so it looked random but intentional, scattering just the right amount of sparkle around the print.


I then worked tirelessly over the next few nights (my fingers were so sore), repeating the process over and over and over and making may way along the entire length of the fabric. I generally added ~14-15 rhinestones per dancer, which ended up using up approximately 450 rhinestones to set along the entire skirt.
Seriously, why do I do this to myself. WHY? Oh yeah, glitter….


With my hands cramped and sore, I was finally ready to add the waistband! I cut two 2.5″ x 32″ strips out of the polka dotted portion of the fabric and a third out of interfacing. I pressed the interfacing to the back of the waistband to add some structure.

I stitched the two pieces together at the top, pressed the seam flat, and then under stitched the lining, folding it in half. I set it aside in preparation of adding it to the skirt.


I took all 4 glorious yards fabric for the fullest skirt I could manage. I ruffled one edge with my very favorite ruffler foot (Bernina Foot #86 for my Activa 220), and then attached it to the waistband at 5/8″ seam.


Although I dread it every time, it was time to tackle The Zipper. Keeping true to vintage style, I opted for a 9″ natural zip and a standard lapped zipper. Luckily, I’ve done so many of these over the last year that it went in with minimal issue.


Once the zip was in, I added the waistband to the skirt at a 5/8″ seam allowance. For this, you want to work pretty slowly and ensure your tiny ruffles don’t get bunched up at any point.


Next, I pressed the lining under on the inside, and pinned it in place. Then, I finished the inner waistband with a simple slip stitch, moving along the inside of the waistband and hiding the seam inside.


I finished the hem with a blind hem stitch – which I worked on while binging on old episodes of ANTM (which I swear…gets more and more disturbing with every rewatch…). But, Tyra got me through all 4 yards relatively quickly…


You might be thinking we’re pretty much done at this stage. Zipper in, hem complete. But, we’ve met right? You may recall, one feature I really loved in the original was a series of 3 pleats along the lower third of the skirt. They add a little bit of extra something (and for those of you out there more petite than I – they can be a great way to shorten a skirt when you don’t want to disrupt a border print).

Because of my Amazonian proportions, I opted to make the pleats 1/2″ wide each. Because you lose another 1/2″ in the pleat itself, with 3 of them total I would lose 3″ of total skirt length. Starting with the top most pleat, I made three markings, spaced 1/2″ part. I repeated this every 8″ or so long the hem, and pressed the pleat flat along the marks.


Once I had the first, I repeated this process for the second and third pleat, pinning them as I go. Then, I sewed each down around the perimeter of the skirt, giving them a final press for good measure.


For my usual finishing touches, I sewed in a large hook and eye at the waist tab and carefully pressed in my custom label from Heart of Wonder (which I need to order more of soon if this sewing bug doesn’t let up).


And then, of course, I had to make myself a matching mask. I absolutely fell in love with Gertie’s free Glamour Mask pattern – after some great advice from my girl Rose, I went with the larger of the two sizes, which ended up being perfect. I then added to add a few matching rhinestones…because a gal needs some way to shine in a pandemic.


There is something amazing about bringing one of your ISOs to life: it somehow becomes something more in your hands. I am in love with how this turned out – both in how Raquel was able to get the print so close to the original, and all of the ways I was able to make it uniquely mine…
The Debut
Daisies have always presented one of the happiest flowers for me. Simple and unassuming in their joy. Maybe not known for their beauty, but known for the way they can brighten up a room without clamoring for attention the way roses and orchids might. I am kind of loving that the daisies get their moment in this skirt. They get their night to shine. To don the most beautiful dress and go to the ball.


The Daisy follows soft the Sun—
when his golden walk is done.
Emily Dickinson


It’s that point mid-semester where students and professors alike start dragging. We just had fall break, which is ordinarily a nice time for a recharge. But, energy levels are low and morale even lower. So, here’s hoping I can bring a bit of sunshine to class today…
We’ve also simultaneously hit that magical time of year here in Wilmington where the weather is just perfect. You can be outside without a jacket but your face doesn’t melt off in the heat. I know it won’t last, but I for one plan to dance like a daisy at the ball while she lasts.
Care to dance with me?
xoxo
Construction Details:
Skirt fabric : 4 yards of Dancing Daisies in Cotton Sateen by Raqilu
Flatback rhinestones in SS12, SS16, and SS20 in clear crystal and light pink
Push-through flatback rhinestone settings in SS12, SS16, and SS20
Additional notions (zipper, thread): JoAnn’s
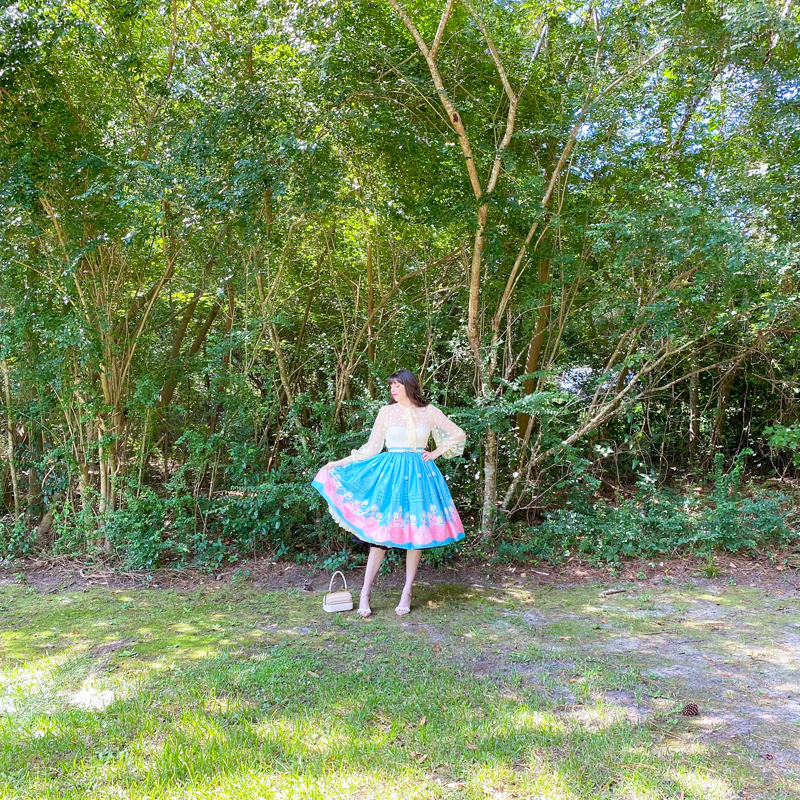
Outfit Details:
Top: Modern Millie’s, sold out (similar here)
Skirt: Made by me!
Belt: Alannah Hill (similar)
Handbag: Looks Like Summer, sold out (similar)
Shoes: Betsey Johnson
.
instagram // twitter // facebook // pinterest
.
Any items marked with a “c/o” (courtesy of) a retailer mean I was provided with an item for free in exchange for a review and/or feature on my blog. I always provide my honest opinion of any item I’m reviewing, regardless of whether it was sent to me as a courtesy item or if I purchased it myself. In addition, this post may contain affiliate links. This means that if you click and/or make a purchase through certain links or ads on this site, I may make a commission from that click and/or purchase at no cost to you, which helps with the day-to-day running costs of my blog.