
I make no secret of the fact that I love to create. More and more lately, I’ve released myself of any mental shackles that might feel a bit intimidated by a project, and have adopted a, “why not just try it?” approach to my sewing. Given we have had months of isolation behind us and what looks to be many miles of isolated road stretching in front of us, no time like the present to just give things a shot. Segue to my latest sewing project….
For many years I’ve had a very iconic photograph saved into my Want Folder, shot by a famous photographer Nina Leen for Life Magazine, circa 1950. The photo, entitled “Conversation Skirts,” depicted an overhead view of the most stunning circle skirts imaginable. I’ve seen a few different versions of it – some in color and some in black and white, some with several ladies in the skirts and sometimes just one. But, my eye always went straight to the center. To a somewhat forlorn looking blond woman wearing the epitome of Juli Lynne Charlot perfection: the train tracks skirt.


The Inspiration
For the most part, when hunting a vintage piece, you almost always see at least one in the wild. When you’ve been around the vintage block a few times and follow your favorite sellers and fellow enthusiasts, most of the time you catch a glimpse of the piece you covet. But, this train tracks skirt has eluded me.
Other than these photographs, I’ve never seen this skirt anywhere else. Never in a shop photo of a skirt long sold or on a lucky lady sharing a favorite piece from her collection. This one was always shrouded in a bit of mystery. And, it should come as no surprise that it made me love it even more….


Every so often, this skirt would float across my mind, and I would mull over the mystery of why it seems to only exist on film. Is it possible it was one of a kind and made just for the photo? Maybe it’s languishing in a fashion closet somewhere, with pieces styled for photoshoots. Or maybe the model squirreled it home with her in a handbag (not that I blame her). I have definitely not scoured the globe, but given the power of the internet and the fact that many vintage huntresses are keen on this piece, I’ve only ever seen this exact photo saved to many a wishlist.
So, in a true manifestation of Life Imitating Art, I decided it was time to bring the skirt from the page and into technicolor. Yes, ladies and gentlemen, it was time to tackle the infamous train tracks skirt….

The Design
My plan for this piece wasn’t to take a lot of poetic license – I was going to try to reconstruct it as close as I could to the original (there would be a lot of zooming in and squinting at that old photograph, that was for sure). Breaking it down into its elements, the skirt had a light turquoise base, with a railroad track that shifted from an overhead view to a side view and back again, giving a locomotive home to a train in a color palette of creams, pinks, purple, and brown.
Some of the smaller details became clear upon closer inspection – the bar with which to “switch” the tracks, the scattering of sequins at the base of the train cars, the ruffle around the hem that almost gets lost in the dark flooring of the photo. I made a quick overhead sketch and just like that, fell down the sewing rabbit hole yet again….

I started the process of tracking down just the right elements to bring it to life. Being that it was summer when this project kicked off, I wanted to stick with cotton. North Carolina heat is GHASTLY (and lasts well into October most years), and I knew I couldn’t wait until winter to wear this once it was finally done. So, I opted for a Kona Cotton in Aqua for the base and lining, with a black Kona Cotton ruffle around the hem.
I was originally going to buy some yardage of black Kona Cotton and cut it into strips, but I found that I could purchase pre-cut 40″ x 2.5″ strips of Kona Cotton in a roll, which would save heaps of time.
I mean, time is sewing, amiright?


After hours of squinting and zooming, I did a rough sketch of each of the appliqué elements that would eventually go on my skirt. This would be helpful later when I would cut each piece out, but also helped me wrap my head around how many colors would go into each element so that I could make my felt choices.
Although it may not seem like it, a lot of thought needs to go in at the planning stage when choosing your colors to keep things cohesive. I wanted to try to stick to a certain number of colors to keep it looking intentional, rather than chaotic.

With my rough sketches done, next came the felt. As per usual, I went to my standby BBD Supplies and consulted their swatch card. This card has come in oh so handy for my many projects, because I can see how various colors will work together and not have any surprises when I go to start sewing.
After much hemming and hawing, I decided to go with 1/2 yard each of wool blend felt in black and champagne for my train tracks, and then a 12 x 18″ sheet each of felt in linen, fuchsia, pink, mint, purple rain, and teddy bear brown to make up the train cars and other appliqué pieces.


Because it looked as though there was sequined detail throughout (and seeing this on other JLC skirts), I also scooped up a bag of assorted sequins and pink and silver beads, which I would supplement with some additional sequins I had in the vast haberdashery that is my sewing room.


To recreate this skirt, you will need:

The Construction
As usual, I started with the base circle skirt. I pre-washed all of my fabric to deal with any potential color bleed and shrinkage and quickly measured and cut my circle skirt (if this is your first, check out this post for a tutorial).
This would be slightly different than my previous skirts, because I wanted to add a ruffle at the bottom, which I would need to take into account in my skirt calculations. I wanted a total waist to hem of 28.5″, with 2″ of that as ruffle. So, I would need to cut a circle skirt to my regular measurements of a 28″ waist (4.5″ radius) and 27″ length (31.5″ radius). When I would add my 2.5″ ruffle (taking into account hemming and seam allowance, ~1″ altogether), I would be left with my ideal 28.5″ length.


I cut out two half circle and four quarter circles of the Kona Cotton in Aqua for the base and lining, so I could have a back zip, but keep the seams at the sides. I stitched both base and lining together at the side seams to create a full circle and laid them flat.
As per usual, this is the point where I start to feel that frission of excitement I always get when I get to turn my creative eye onto the embellishments…


Seeing as the entire design revolves around the train tracks, I knew I would need to start there. Going from the photograph, the tracks on the original swooped and curved around the hem – you would see the railroad ties in the back and right sections, but not on the left side and left front (idea here being as if you were viewing the tracks from above on one part of the skirt, and from the side on the parts where would would be seeing the train).
I started by drawing my curves using my chalk wheel – this part ended up being tricky, because my chalk was white and a bit hard to see on the light blue cotton. But, I persevered and kind of just went with it.

Once I was happy with the chalk outline, I cut a series of thin 1/4″ strips out of the black wool blend felt. I didn’t have the yardage to make it one long continuous strip, but knew I could easily overlap and connect them later.


Once cut, I started by laying a single strip of black felt over my chalk lines, matching the curves. Seeing it in black was far more effective than the barely-there white chalk marks. When I got to the end of a piece, I simply created an overlap with a second piece, which would create the illusion of a single, continuous track. I made some minor adjustments and then moved on to the overhead track sections.


The two sections viewed from above would, of course, need two black strips of felt running parallel to one another, which would meet at a “V” near the front right and the back left of the skirt.
I laid these in place and, after a few quick measurements along the length to make sure they were parallel, moved on to the wooden planks than would need to run under the tracks.


I went with wool blend felt in champagne for these – I started by measuring and cutting several 2.25″ wide strips using my rotary cutter, which I quickly sliced into 0.5″ planks.


Once I had a pile, I worked my way along the sections of overhead tracks and laid them in place under the strips of black felt, keeping them as evenly spaced as possible.


Once I had one set done, I moved on to the other side. I stepped back every so often and made a few minor changes, and then I pinned each of the railway ties in place. And I may have been humming “I’ve Been Workin’ On The Railroad” all the live long day….


Because the train tracks were really the base upon which everything else was going to sit, I decided to sew them down early on in the process. Usually I wait until all of my appliqué is in place before committing to stitches, but the tracks were just so fiddly and I didn’t want to run the risk of smooshing the other appliqué pieces when running them through my sewing machine.

Working slowly, I machine stitched at the center of the black strips, working from the back of the skirt down to the front. In addition to securing the rails, it also securely stitched down the railroad ties in the process. Although they may need a hand tack or two, I wouldn’t have to worry about any of these million tiny elements shifting or getting lost for the rest of the creation process.


Train tracks securely laid, it was time to move on to the more colorful elements: the train. I started as all trains do: with the locomotive engine (ie, the front car where the conductor sits). This would be made out of wool blend felt in linen, with a series of colorful elements. I started by sketching out a pattern, which I used as a template from which to cut out my felt.


Next up: the wheels. I didn’t want to cut these freehand, because I would drive myself crazy trying to make a geometrically perfect circle. So, I turned to a piece of equipment I don’t think I’ve used since grade school: A compass. Remember these handy little things? You set the circle radius, press the pointy bit into the paper, and draw a perfect circle.
I quickly drew a circle with a diameter of 1.75″ and an inner circle with a diameter of 0.75″. I did a second, smaller version (outer diameter 1.25″). I cut them out and used this as my wheel templates for the rest of the project.


Starting with the front train car, I used my template and quickly cut out 1 large and two small wheels out of the fuchsia felt. I then cut a thin strip of black felt to serve as the coupling rod connect them (seriously, you guys, I learned what SO many parts of a train were called so I could write this blog post. Wikipedia was my best friend).

I also used the template and cut out two half circles (from Kelly green felt) for details and freehand cut out what looked like the steam exhaust at the front of the locomotive. I played with their placement right at the front of the overhead view of the train tracks. Finally., satisfied with my first train car, I pinned it all in place.


The next car on the train was carrying cargo – I would make the car itself out of “planks” of champagne felt and the cargo (which looked like a big pile of soil to me. I won’t tell you what Mr. Dressed called it).
I quickly sketched out a trapezoid pattern, and marked off the gaps between the planks. Using my rotary cutter, I cut out the shapes. Using this as a template, I used the teddy bear felt to cut a shape that approximated a pile of soil, which I pinned in place behind the planks.


I then quickly cut out two wheels on which the cargo car could bounce along – looking at the original, these wheels didn’t appear to have a hole in the center, so I left them solid with plans to add a single sequin to the center later.


In addition to train cars, there were also two overhead power lines dotting the track. I cut one long 1/2″ wide piece of fuchsia felt for the pole, and used some leftover pieces of my 1/4″ black felt strips for the perpendicular insulated cables. I rounded the top of the pole and pinned them in place.


Iext in line looked like a passenger car – essentially a large rectangle with several windows cut out. At this stage, I abandoned the idea of making patterns, as I knew I could just cut freehand and adjust as I went. I cut the rectangle out of the purple rain felt and sketched my windows on with chalk. Once they looked how I wanted, I quickly cut them out.


I then added a curved roof in linen felt and two bouncy mint green wheels – seeing as mint green is one of my favorite colors, I figured it was appropriate, as this is surely the part of the train I would be hanging out in, sipping a cocktail while we trundled along.

The next car looked like some sort of fuel or water tank of some sort, with rounded edges and a ladder up the side. I cut the body of the car out of the fuchsia felt, starting with a large rectangle and then curving the edges.
It’s important to not be so stressed about perfection – the perfectionist in me struggles with this, but looking at the true vintage JLC pieces I have, the small quirks and imperfections in her skirts make me love them even more.


N next, I added the small details using some of my leftover train planks (trimmed to size) and thin strips of the black and felt for details. I finished it with two large black wheels and started to feel like this train was getting ready to pull into the station.


I added one more power line, and then it was onto the last car of the train, carrying lumber. This car had several elements, including the rectangular planks (in teddy bear brown) and the lumber itself, which I cut out of the 3 different pink shades of felt (fuchsia, pink, and some leftover cotton candy pink felt I had from another project). Pink lumber? Yeah, I went with it…


After cutting out 2 carrot shapes and one cylinder, and then I laid them on top of each other so it would look like a pile of cargo, and added the finishing touches of 2 Kelly green wheels.


In addition to the train, this skirt also had a single house resting on her right hip, with a few palm trees swaying in the breeze. I guess the passengers need something to glance at out the window?
I cut out the house first, which consisted of two rectangles of the champagne felt. I then added three arched doorways out of black felt. For the roof, I cut them out of the the fuchsia felt, and curved the top of the taller rectangle to mimic the doorways.


The trees would be pretty straightforward, especially given how much practice I’ve had cutting out foliage for my last few projects. I started by cutting three thin strips of the teddy bear brown felt for the tree trunk, and three circles out of Kelly green.
I then cut out curved triangles from the Kelly green circles, giving the trees a bit of a pinwheel shape. I placed the trees at an angle next to the house.


The last appliqué piece was a train track switching device, or railroad switch. Essentially, these served to guide a train from one track to another. This was simply a quick job of thin strips of black felt, with a black and pink circle overlay.
In the original image, it looks as though the model might be switching the tracks, bringing the cars into a railway junction.

One thing I would really recommend for anyone embarking on these kinds of projects – is to work on them flat (as I mostly do), but to periodically hang it on your dress form (if you don’t have a dress form, drape it around your own waist). This is actually how the skirt will sit in real life, and it allows you to check if any elements look off.
For example, the angle of the house and trees looked fine in a flatlay, but putting it on my dress form made it clear it needed to be minority tweaked. The last thing you want is to do all of this work, only to find when you put it on an element or two just looks wrong.

I don’t know about any of you, but I always fall into the trap at this stage of thinking I’m nearly done. It doesn’t matter how many of these projects I take on, for some reason my brain is tricked into thinking that cutting out all of the applique elements is the hard part and the rest is smooth sailing. Oh Kara….
Yeah, now came the actual hard part: sewing everything on!

My first step was to machine stitch that which could be machine stitched. I have found this to be most appropriate for straight edged pieces – like my cargo cars, the black cables on the power lines, and the sides of the house. These are relatively easy to run through the sewing machine, and would free up time for the fiddlier appliqué pieces.


While I would hand appliqué most things, there were some where I could use fabric glue – this is ideal for some of the smaller elements, or in instances where I wanted edges to match up perfectly. My favorite fabric glue is Aleene’s fabric fusion – it has the bonus of also coming in a handy pen, which is great for being very precise with the glue.


The elements that I would be glueing included the curved top of the passenger car, the doors on the house, and the tiny elements on the fuel car. I worked quickly (this stuff starts to dry in under a minute) and laid those pieces to the side overnight to fully cure.


The next morning, it was time to start to sew these pieces on! I have had a LOT of experience with appliqué, courtesy of my last 12 projects, so I decided to just tackle it head on. My normal setup is to park on the couch with my supplies on the coffee table, queue up some HGTV show I can watch but not really need to be invested in, and just go for it.
Starting at the front and working my way back, I slowly made my way around the skirt. I like to use matching thread and tiny tight backstitches for each element, which makes them virtually invisible from the front.


For each train car, I would stitch on the back elements first, and then lay the next piece on top and stitch that on. While this skirt looks as though the appliqué portion would take forever, given some of my other skirts (like the apple skirt or the fence dress), this was relatively quick.
With the done, I could turn my attention to the finishing touches of sequins (which actually would take forever).


In squinting at the original, it looked as though there were some sparkly elements scattered on the train cars and along the ground as the train rode merrily past. In some of my other JLC skirts, I’ve similarly seen this detail and knew immediately how she tended to use the sequins.
Because of my JLC restoration project, I also knew just how long hand sequins and hand-beading would take. So, I hunkered down for a fairly long process.


My strategy for this was to organize my various sequins and beads into bowls for easy access. Because the beads have only a very narrow hole in the center, I needed my super thin hand beading needles for this. Then, zooming in as much as possible on the original, I would dot on a mark where the sequins would go with my water soluble pen.


It was hard to discern the detail, but it looked as though the sequins were interspersed with a few flowers. Luckily, I had a few felt flowers from Pretty Die Cuts left over from my Windowsill skirt, and several sequin flowers of different colors in my assorted sequin pack. So, marking sequins as dots and flowers as X’s, I start to plug away at my sparkle paint-by-numbers project.

If this is your first sequin party, you start by bringing your needle up through the center of the sequin, followed by a bead. Pulling the thread to the side, bring your needle back down through the hole, slightly to the side of your “up” thread. The bead will secure the sequins in place.


The best advice for this part is just patience – I worked one train car at a time, treating it as a vignette. I’d start by first dotting the sequin pattern with my water soluble pen, and follow up with the beading, following the pattern. Then, move on to the next…. Lather, rinse, repeat about 80 billion times.


I quickly made my way around the skirt, sticking mostly to a color scheme of iridescent pink and silver, with pops of turquoise and hot pink. Being a gal who enjoys her bling, I really loved the effect. In some cases, it looked though the train kicked up glitter as it rolled past, creating a sparkly cloud in its wake.


As a final finishing touch, I dug out a few green leaves from my bag of sequins. I sewed them onto my trees one at a time, interspersing them with regular green sequins. Ahhhh it’s all about the little details…


On the original, the end of the train tracks ended in an adorable, jaunty bow. Using a few leftover strips of black felt, I tied it in a knot, and then used a few small stitches to keep the bow in place. I quickly stitched it onto the skirt, covering the end of my tracks.


With most of the hand work done, next up came the black ruffle detail. My Kona Cotton roll had just arrived, and I quickly stitched 10 of the 2.5 x 44″ strips together at the edges to make one long 440″ strip. Because the circumference of my hem was ~198″, and I would be ruffling the black strip of fabric, I needed some significant yardage.


Once I had my strip, I folded over one edge and created a 1/2″ hem all along one edge. Then, I used my very favorite ruffler foot and quickly stitched in an even series of ruffles along the opposite length.


Then, with right sides together and the ruffle facing upwards towards the top of the skirt, I stitched the to edge of the ruffle to the bottom edge of the trim. Once it was stitched in place, I flipped the ruffle and pressed, which keeps my stitches virtually invisible.


Then came the final finishes, which includes adding the waistband, zipper, and lining. I quickly attached the lining to the waistband of the skirt at 3/8″ and prepped for the zip.


As usual, I went with a lapped zipper here (if you struggle with them, I highly recommend watching Gertie’s AMAZING zipper tutorial). I went with a 9″ polyester zipper in Caribbean blue, which I would stop at the top of the waistband and use clasps to secure the waist tab. I quickly got the zipper in place and moved on to the waistband.


If you’ve seen some of my other JLC-inspired skirts (and look closely at the Nine Leen photograph), you’ll know they have an extra wide waistband, with the rows of parallel stitching I have come to know as JLC’s trademark.
I quickly cut out two long 4″ by 32″ rectangle out of the Aqua cotton. I backed one with interfacing and stitched the two together, pressing the seam flat.


Then, starting from the top of the waistband, I sewed parallel rows of stitching at 0.5″ inches apart (you can see a good trick for keeping these stitches straight in this post). Before I got to the last row of stitching, I stopped – so that I could attach the waistband to my skirt.


With right sides together, I sewed the waistband to the skirt and the lining, and then pressed it upwards. I then topstitched the final row of stitching, securing the lining to the waistband and completing the last of the 1/2″ parallel rows.


Final steps were to finish the lining with a blind stitch, attach the waist claps to the tab of the skirt, and pressing in my custom sewing label, which always feels like such a victory. Claiming her as mine.


When it was complete, it became clear that I needed to pay homage to the iconic photograph that started it all. You should know that when Mr. Dressed and I commit to doing something, we simply go for it. So, we cleared the furniture in our living room one afternoon and got to work to make this happen.
Looking at the original photo, I actually had a few of the skirts featured. For the others, I tried to keep it in the same color family. We laid the circle skirts around and put mine in the center, matching the angle and framing.

Originally, we had planned to have me in the skirt at the center of the photo. But, it didn’t take much time to realize none of the ladies in the original shot had legs! It looked like they were poking through a platform of sorts, which allowed the circle skirts to lay perfectly flat. So, while Mr. D and I are not above building all kinds of contraptions to bring our photoshoots to life, for this to work we ended up turning to ol’ Photoshop.
I assumed the pose in one photo and we superimposed it onto the flatlay of the skirts. And while it’s not perfect, I daresay our attempt to travel back in time for an afternoon was more than a little successful….

I‘m absolutely thrilled with how close I got to the original with this piece. And though the true original may never cross my path, I love that the simple art of trying means that the options are limitless. Where a skirt that once only existed on a page as a work of art, is now in my hands.
The Debut
Mr Dressed and I spent a fair amount time trying to find the perfect place for a photoshoot – there is actually a train museum in Wilmington, but it’s sadly closed due to the pandemic. So, backyard it was!
We just had to use our imagination to imagine the whistle blowing, signaling the train was about to leave the station. The shudder of the cars along the tracks, taking you wherever you needed to go…


I like trains.
I like their rhythm,
and I like the freedom
of being suspended
between two places,
all anxieties of purpose
taken care of:
for this moment
I know where I am going.
Anna Funder, Stasiland


The restlessness and the longing,
like the longing that is in
the whistle of a faraway train.
Except that the longing
isn’t really in the whistle
—it is in you.
Meindert DeJong, The Little Cow and the Turtle


I‘ve never thought much about it before, but there is something about a train that is so rooted in freedom and independence for me. It reminds me of moving to Boston at 18 for college. So excited for the future. Feeling so emboldened and independent to be able to get on the T and go nearly anywhere. Or at the very least, to opposite ends of the city.
I have so many memories of boarding the train that would take me to class when I was running late, take me to the center of the city with friends for an adventure, or carry me home for a visit. The world felt as though it were at my fingertips, with my future only a train ride away.
Here’s to adventures that take us anywhere…
xoxo
Construction Details:
Circle Skirt: Self-drafted
Skirt fabric & Lining: Robert Kaufman Aqua Kona Cotton
Skirt Ruffle: Robert Kaufman Kona Cotton roll in black
Appliqué: Felt from BBD Supplies
Additional notions (zipper, thread, beads, sequins): JoAnn’s
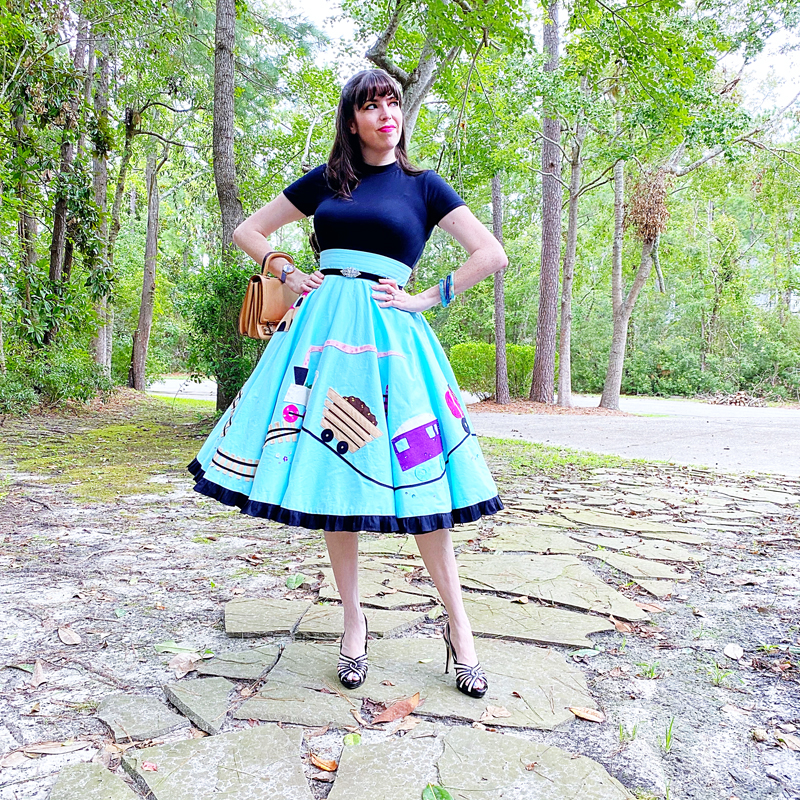
Outfit Details:
Top: Micheline Pitt
Skirt: Made by me!
Bangles: c/o Splendette
Belt: Alannah Hill (similar)
Handbag: Bettina Darling (similar here & here)
Shoes: WHBM (similar here & here)
.
instagram // twitter // facebook // pinterest
.
Any items marked with a “c/o” (courtesy of) a retailer mean I was provided with an item for free in exchange for a review and/or feature on my blog. I always provide my honest opinion of any item I’m reviewing, regardless of whether it was sent to me as a courtesy item or if I purchased it myself. In addition, this post may contain affiliate links. This means that if you click and/or make a purchase through certain links or ads on this site, I may make a commission from that click and/or purchase at no cost to you, which helps with the day-to-day running costs of my blog.