
You know the old cliche, the Grass is Always Greener? Well, never is this more true than when peeping at another vintage lover’s wardrobe. No matter how much you love your closet, your eye can’t help but wander to the next wardrobe over and start gawping at the covetable, lush contents within…
Although I try very hard to be happy for the things I have, you can’t fault a girl for having a wishlist (I mean, huntress gotta hunt!) But, things become stickier ever since I first learned to sew. Now, I can sometimes make my wishlist materialize with a few stitches from my sewing machine. Okay, more like with 525,600 stitches, 65 hours, and a love affair with my seam ripper….


The Inspiration
As you all know by now, a lot of my designs are often based off of a vintage piece I saw once but was never able to acquire. Awhile back I snapped a screenshot of some yardage of amazing fabric sold by Back Room Finds that I had missed out on, showing a vintage border print rose garden behind a brown picket fence, with petals falling to the grassy terrain below. Since my sewing expertise hasn’t yet fully ventured forth into the land of print design, I figured that this fabric would stay squarely in the Want Pile until she magically appeared again on my radar one day.

Photo Credit: Stephanie Canada aka Backroom Finds
But, sometimes an idea will just sort of….percolate in my head. And one day while scrolling through my Want folder for some inspiration, I started to imagine how this beautiful print might look in appliquéd form, standing in sharp relief to a cotton background. I saw rows of 3D roses, dotted with felt bees. I imagined how I might be able to fashion the grass from yardage of felt, planted around the hem of a circle skirt….
Although in hindsight, this skirt would be an INSANE amount of work, mild insanity from isolation coupled with the confidence boosts I’ve had from my recent circle skirt successes made me decided to try to make it a reality…


The Design
A design always starts with a plan and choosing the perfect materials to enact said plan. With the screenshot of the fabric and the design I had mocked up, I knew I would need a blue base the color of sky, and then the perfect hues of green, brown, and blue felt. As usual, I turned to my Kona Cotton Swatch card and the swatches of all of the wool blend felt available at BBD Supplies.
Because it’s summertime, I decided to stick with my old friend: Cotton. In addition, I had decided I’d made enough appliquéd skirts of late, and it was high time to make a dress. To me, nothing says summer like cotton sundresses. I was after a bit of a minty blue shade to remind me of the lazy hazy crazy days of summer. So, I ended up going with Kona Cotton in Sea Glass for the base and Aqua for the lining from Fabric.com.

I would need the perfect three shades of felt, because I wanted to compliment one another without being overwhelming. I started with the roses, which would be the real feature of the dress. The easy part of this decision was where: I went straight to my old standby A Market Collection. They are so amazing to work with and the quality of the flowers are incredible (you can see some previous projects with Amy’s flowers here & here).
With the background on the mintier side of blue, I was after a deep teal shade. I absolutely loved the hue of the Tropical Wave felt – it was a really saturated turquoise, but was also mottled a bit with a deeper blue. I ended up pulling from this shade and using Royal Blue as a complimentary color. Going from my sketch, I needed 3 XL, 4 XXL, and 3 XXXL roses in Tropical Wave. I also got 3 additional XL roses in Royal Blue for some contrast.

Once the flower color was chosen, it was easy to find the right green and brown – I went with 4 yards of Kelly Green felt for the grass and 1 yard of Tahitian Sunset felt for the fence, all from BBD supplies. If you’ve never shopped there before, I’ve found their wool blend felt to be of amazing quality – easy to work with and doesn’t pull apart easily. My skirts have all stood the test of time using this felt, hence why I keep coming back again and again…


To recreate this skirt, you will need:

The Construction
I‘ve made a LOT of circle skirts lately, but since my yellow gingham adventure, I kind of got the dress bug. So, it was time to combine dressmaking and applique!
To start, I needed the bodice upon which to base all of the appliqué fabulousness. Try as I might, I couldn’t find my block anywhere. A block is basically a basic bodice pattern that had been custom-fitted to you, from which you can draft a bodice in nearly any style. I knew it was stuck in one of our lingering unpacked boxes (yes, they still exist), which I would have to tackle another day.
So, instead of digging through boxes, I decided to use the bodice from the Gertie Night & Day Dress, using the size 6 with the C cup (which corresponds to 37 1/8“ bust and 28 1/2” waist finished measurements). This would give me a simple sleeveless bodice with a scoop neck. Because I wanted to add a lot of detail, it was important that the base stay really simple.


I cut the bodice out of the Sea Glass cotton and the lining out of Aqua. I quickly marked and added my darts, pressing them towards the center. I did the same for the back pieces, double checking to be sure everything lined up. I repeated this for the lining and did a quick check for fit.


Because I wanted to add some appliqué detail to the bodice, I didn’t attached the bodice to the lining just yet. Instead, I joined the bodice front to bodice back at the shoulders, pressing the seams flat, but kept the lining to the side (for now). I put the bodice on my dress form, where she awaited the detail that would soon come her way…

I then turned my attention to cutting out the base of the skirt, which would just need to be a simple circle (both for the base in sea glass and the lining in aqua). As most of you know, circle skirts are my jam, so I quickly measured and cut my pieces (one half circle and two quarter circles), joining at the side seams and leaving the back open (where the zipper will eventually reside).
For my measurements (28″ waist), I have found a 4.5″ circle radius at the waist and a 34.5″ radius total length (which gives me a 29″ waist to hem length) suit me perfectly. Very quickly, I had the base upon which to plant my rose garden.


With everything cut, I turned back to planning out the bodice. She would have the least amount of appliqué, but it would need to be placed correctly or else it would throw off the eye. For this design, the main detail would actually be on the back.
One feature of my Garden of Eden dress that I loved was having a vine snake up the front of the dress. I decided I would emulate this idea, but on the back. I started with my disappearing ink pen, which I used to roughly sketch the way the vine would curve from the back left and over, ending at the top right and over, ending in a rose over my right shoulder.


I cut a strip of 1/4″ Kelly Green felt, and laid it over the marking. I pinned a second piece on the left side of the back seam (which I would later matching up once I put in the zipper). Once I was happy with the vine placement, I randomly scattered a series of leaves coming off of the vine, which I pinned in place.


Using my sewing machine, I stitched the vine to the right back and over the shoulder. For this, I just went pretty slowly, working one section at a time and guiding my machine around the curves. I actually far prefer this method to hand sewing, where I (surprisingly) feel I can keep the fabric flatter.


With the vine stitched down, I could now stitch my bodice front to the lining – it would have nearly been impossible to machine stitch a vine over the shoulder before and hide the stitches. I carefully stitched around the neckline and armholes at 3/8″, turning and pressing. I under stitched the lining as far as I was able, which would keep the lining from rolling to the front when worn.
I pinned the bodice to my dress form and turned my attention to the skirt. I stitched up the side seams to create a full circle and started to plan the detail…


I decided to start the skirt appliqué adventure by cutting the lawn, which would be out of my Kelly Green felt. Because I wanted the felt to go around the perimeter of the circle, I would need to similarly cut a circle with a radius of 34.5″, and then remove the inner circle to the width I would want my grass to be (5″). I used this trick before for the snow on my Winter Wonderland skirt and it worked a treat.


Once the full circle was cut, I marked around the perimeter of the circle of green felt 5″ up from the hem all around, and then cut out the inner ring of felt. This left me with a green ring of kelly green felt that would perfectly match the hem of my circle.


Next up was figuring out how to make a ring of felt look like grass. I decided this would be a lot of work, but the best way was to hand cut triangles all around the upper circumference of my felt ring. I did this pretty randomly, some with deeper cuts than others, so it would look more like the randomness of real grass. I have to admit, I laid it out and almost couldn’t believe how realistic it looked. Onto the fence!


Ihe most labor intensive part of this process was going to be the fence I wanted to extend around the perimeter – because I wanted a picket fence, it was going to require a ton of…well…pickets. I cut a few test shapes and ended up cutting them to 7″ tall, with the top 1″ cut into a sharp peak.
Once I had my template, I plunked in front of the tv and cut out pickets out of the Tahitian sunset felt for what felt like forever. Pretty soon, I had a pile of them from which to construct my fence.


One of the big issues with this skirt is that it requires a certain amount of symmetry – because it’s a picket fence and they’re not perfect in real life, I have some leeway. But, you want to keep things fairly evenly spaced and symmetrical, or else the eye will go to any glaring errors immediately.
The best way to tackle this would be to start by placing my pickets at the edges of each of the four quadrants, and slowly adding pickets to the center of each quadrant. Starting at one end would inevitably lead to a spacing problem by the time you got to the other end (which you would only notice when you stepped back).


Adding two pickets to each quadrant worked really well – I ended up with a fence that was pretty evenly spaced around the perimeter. I then measured each one to ensure they were all the same height up from the grass and pinned each picket in place (it literally used every pin I owned. And some I didn’t even know I owned).


With the fence in place, I turned my attention to my rosebushes. To bring these to life, I had ordered precut leaves from BBD Supplies (in two sizes – 2.5″ and 1.75″). This one was going to be labor intensive enough rather than hand cutting all of the leaves as well!
So, leaves in hand, I would just need to cut a series of 1/4″ strips of the Kelly green felt to create the stems to match. I quickly whipped these up using my rotary cutter (and appliqué maven’s best friend).


The next part was more free form – I had the picture of the original fabric up on my laptop for guidance, but essentially slowly worked around the skirt, laying vines in ways that felt organic. I knew I wanted to have a mix of different sized flowers, which meant some rose bushes would be larger than others. Finn, naturally was very forthcoming with his feedback.


As I went, I also played with laying the leaves, mixing up the large and small sizes to make it look more natural. I actually always find this part to be the best, because you can try different things and aren’t limited by anything but imagination.


On my original sketch, I wanted one vine to crawl up the back of the skirt, which would eventually meet with the vine on my bodice that would end over my shoulder. I snaked this up the back, and added a cut offshoot to the vine that would eventually end in a single bud, just waiting to bloom.
I stepped back to check the overall design, making a few tweaks here and there. Something so important with these kinds of projects is that it’s very easy to make changes in the planning stage – but becomes MUCH harder when things are sewn. Even though it can take awhile, it’s worth the time spent to get it right.
Once everything was in place, it was time to take a deep breath and get sewing!


I started by stitching down all of the vines. Working on section at a time, I sewed a straight stitched through the center of each with a matching green thread, using a strong backstitch at the end to secure it.


Once the vines were secure, I could then move onto my fence. Although the fence was complete, because I wanted to vines to grow up behind it, I had to do the vines first and stitch the pickets on top. This was the part I was dreading the most, as I simply knew it would be insanely tedious. Each picket had to be sewn around the entire perimeter – close to the edge but not going over.
Needless to say I made it through the Hamilton soundtrack twice before I was done…


The fence was in place, so I next moved on to the leaves. Although I toyed in the past of hand sewing these, I found from past projects that it’s much faster and more accurate for me to machine sew. Plus, you have the added bonus of the stitching looking line the veins of a leaf.
Working one plant at a time, I stitched each leave on down the center – starting at the base and ending at the tip. The hardest part was simply managing all of the fabric (circle skirts can be cumbersome). But, I went slowly and was able to get through it in an evening.


I did the same to the bodice, stitching down the leaves as they delicately curved over the shoulder, ready and waiting for a rosebud to bloom…


Then, I had to put the finishing touches on my fence. I’m all about the realism, and most picket fences I’ve seen have a cross beam that runs along it’s length, So, I cut out several 1/2″ strips out of the Tahitian Sunset felt, and stitched them all together to create one long piece.


M/dropcap]easuring down 3″ from the tip of my pickets, I created a mark with my disappearing ink pen, which would be my guiding marks for attaching the strip of felt. I pinned it all in place, and quickly attached it with a simple straight stitch, snipping off any excess. I cut all of my lose threads and pinned her onto my dress form to admire for the week…


[dropcap]There’s always the turning point in a project where it starts to look like the idea in your head – waking up to see the rose bushes climbing up the skirt was mine. It gave me a burst of energy to take her over the finish line.
At this point, it was time to attach the bodice to the skirt. Generally, you always want to save the big appliqué (aka, the roses and the grass) until the end. Once you add those elements, it becomes much more cumbersome and therefore harder to machine sew the garment, and there’s a risk of damaging the delicate appliqué trying to maneuver it around a sewing machine. So, I removed the pins holding the grass and set it aside. Then, I pinned the bodice front to the skirt at 5/8″, careful to keep my lining out of the way, and stitched the two together at 5/8″.


With the bodice attached, I turned my attention to the zipper (aka Kara’s Enemy). I decided to go with a 20″ vintage metal zip, to add that small touch of true vintage. Because it can be tricky to get a zip in, I had a strong cup of coffee and a wide open afternoon to tackle the beast. Naturally, this meant it went in with minimal issue! Huh…
Given it went in so easily, I held my breath as I zipped it up – all I would need is my first easy zip in years, only to be thwarted by it being too loose or too snug. Miraculously, I zipped it up and I got that…feeling. You know – the Goldilocks fit. Where it hugs your curves, but still allows you to breathe and you wonder where this dress has been all your life.


In keeping with the machine-sewing theme, I decided to finish off my hem at this stage as well. Because I wouldn’t be hemming the dress as normal (because you don’t hem felt), I needed to add hem tape to the cotton base to prevent fraying over time. I started by running a zig zag stitch around the hem, and quickly sewed in my hem tape. It would be ready and waiting for the felt grass….


So, we officially had a dress! I could then turn my attention to the hand-sewing. I laid the dress out on the floor of the foyer, and placed the flowers around the skirt to confirm that everything was where I wanted it. I pinned the roses in place and got my stitching fingers ready.


Although it wouldn’t be a main feature of the dress, I decided to also add a single rosebud, to remind me there is always still more to bloom. I like adding in tiny features that are just for me…For this, I cut out two petal shapes from my tropical wave felt and a spiked edge piece out of the Kelly Green.
I rolled the first petal into a tube shape, and rolled the second on top of it, creating a petal effect. Then, I stitched them together at the bottom.


I wrapped the green felt around the bottom of the bud, again stitching it in place on my machine. I trimmed the corners so it came to a pointed shape, and pinned it in place on top of my vine.


Now, in looking back over my last few projects, I’ve realized something about myself: I’ve apparently always got to add a critter. Rudolph in my Winter Wonderland skirt, my frog in my Lilypond, Harry the worm in my Apple Picking skirt. Yeah. Self Awareness is a beautiful thing.
So, I embraced this quirk of mine – because this rose garden was calling out for some buzzy bees! I found the absolutely perfect ones at Pretty Die Cuts.

I had a vision for a vine to climb up the back of my dress, ending with a rose over my right shoulder. This is where I wanted a little cluster of bees, intent on pollen hiding in the blooms. I played with their placement and angle, pinning them in place once I was happy.


I took the remaining 6 bees and scattered them around the skirt – resting on petals, gently buzzing up to the fleurs, adding the exact right amount of whimsy to my rose garden.

Then came the tedious part; Appliqué! I was very relieved that I had done a lot of elements on my machine, which made the hand sewing go much more quickly. I started by stitching my bees in place – although it was more fiddly, I preferred the hand sewing to glue to be sure they weren’t going to buzz off any time soon…
I used a combination of white and black thread to match the area of the bee I was securing. Before I knew it, I created a cute little hive.


Then came the far more arduous task of sewing all 15 of my roses. Even though it seems daunting, you quickly find a rhythm. It took a few hours and a few episodes of House Hunters, but I quickly secured the roses to the skirt.


I had finally reached one of the final steps – attaching the grass. I laid the dress out flat on the floor with the skirt in a full circle, and pinned the grass all the way around the perimeter. I then stitched around the bottom of the hem, securing the felt to my hem tape.
I was definitely glad I’d waited until the end to add the grass – not only did it add a lot of bulk, making it difficult to move through my sewing machine, but it also added a serious amount of weight. This beauty was HEAVY…


To secure the top and keep the illusion of grass, I opted to do a blind hand stitch around the top of the green felt to keep it in place. This way, I could keep the visible stitches small, which would keep it secure without a glaring stitch line along the top. I had come way too far to compromise my aesthetic now!


At long last, I had nearly reached the end. The final steps were just finishes – pressing under the lining and attaching it with a slip stitch, putting a hook and eye at the top of the zip, and adding the piece de la resistance: my very own sewing label from Heart of Wonder.


At last, I stretched my sore muscles and stood up from my sewing table. I put her up on my dress form and marveled at how a few pieces of cotton and felt can become something so one of a kind…


I am so thrilled with the end result with this creation. I was particularly excited to have tackled a dress – I feel like I’ve gotten into a solid skirt rhythm, which I can whip up blind. But, it was really fun to challenge myself and test out my rusty bodice-making skills. I was pretty happy to see the skill was tucked away in my mind, just wanting to resurface…
The Debut
These sewing projects have really been my savior these past few months. They allow me to separate from work, separate from the stress of the pandemic, and focus on nothing but creating. No rules to follow, no set guidelines marking my path. The joy in working towards something without knowing the outcome in advance, wondering just when that bud is going to bloom…


A garden is a grand teacher.
It teaches patience and careful watchfulness;
it teaches industry and thrift;
above all it teaches entire trust.
Gertrude Jekyll (2011)


To plant a garden is to believe in tomorrow
Audrey Hepburn


Mr. Dressed and I spent a lazy afternoon wandering out neighborhood, on the lookout for rosebushes and picket fences. My photoshoot locations have definitely been truncated, but I’ve actually enjoyed finding hidden spaces one our street. Places that I may have walked past without thinking twice.
Maybe that’s part of what this whole isolation experience is about. Stopping to notice the small things you may not have noticed before. Finding beauty in a hidden corner. Or in a piece of cotton. Letting nature grow a bit wild and reclaim some of what it lost. Looking wistfully over the fence, where the grass looks so green and lush. But realizing you have everything you need right in your own backyard.
Stay safe, friends. And keep on sewing…
xoxo
Construction Details:
Dress Pattern: Self-drafted
Dress fabric: Robert Kaufman Sea Glass Kona Cotton
Dress Lining: Robert Kaufman Aqua Kona Cotton
Appliqué: Felt in Kelly Green & Tahitian Sunset
Felt Leaves: BBD Supplies
Felt Roses: A Market Collection (XXXL, XXL, and XL)
Felt bees: Pretty Die Cuts
Additional notions (hem tape, thread): JoAnn Fabrics
Outfit Details:
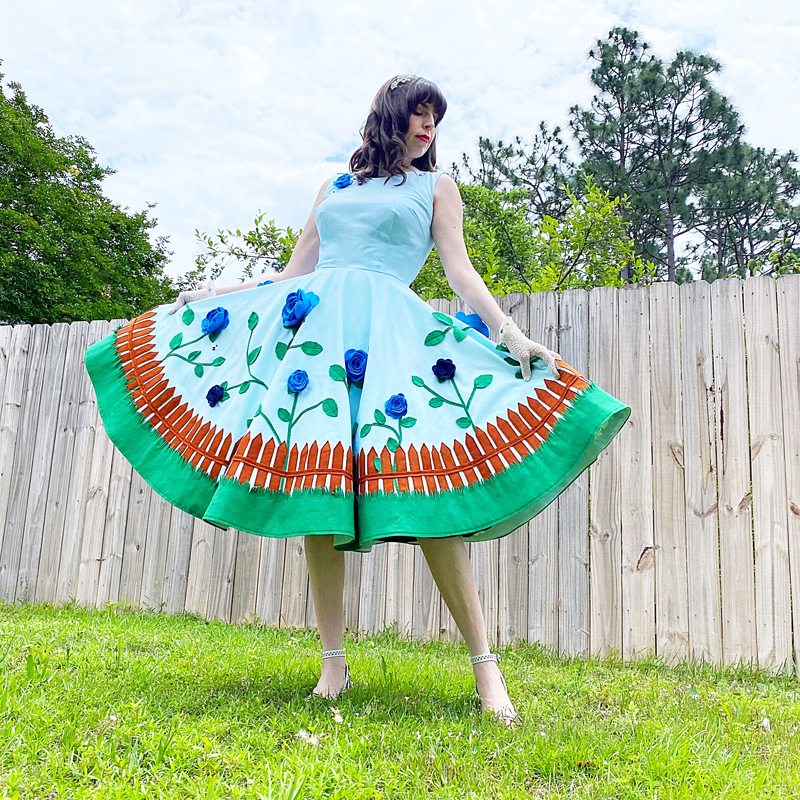
Dress: Made by me!
Necklace: gift, Swarovski (similar)
Gloves: Bettina Darling (similar)
Headband: gift (similar)
Handbag: Peeptoe Australia (similar)
Shoes: Alannah Hill (similar here & here)
.
instagram // twitter // facebook // pinterest
.
Any items marked with a “c/o” (courtesy of) a retailer mean I was provided with an item for free in exchange for a review and/or feature on my blog. I always provide my honest opinion of any item I’m reviewing, regardless of whether it was sent to me as a courtesy item or if I purchased it myself. In addition, this post may contain affiliate links. This means that if you click and/or make a purchase through certain links or ads on this site, I may make a commission from that click and/or purchase at no cost to you, which helps with the day-to-day running costs of my blog.