
I grew up in New England, where differentiated seasons abound. This means we plowed through 2 ft snow drifts in winter, melted in the summer heat, and watched the world bloom around us in spring. But, my favorite season was always fall. One of my most vivid childhood memories was always of that first crisp fall weekend, where my family and I would make a trip to the apple orchards to find the most perfect pie-worthy apples to commemorate autumn.
I remember bundling into our scarves and loading up into the horse-drawn wagon, which would take us deep into the heart of Atkins Apple orchard. My sister and I would then get to climb the apple trees as high as we would dare, filling up our bushels and pecs with more apples than you could imagine. Low hanging fruit just wouldn’t do. We’d head back to the main building to pay for our stash, where they’d be making fresh apple cider and feeding apple cores to the horses. There is something so powerful about that memory – I swear I can still smell the sweet apple mixed with hay.


The very best part of this whole trip, was coming home to the Apple Pie Making Assembly Line. Each year, we would bake what felt like a hundred apple pies (really, it was more like 8. But, I was young and prone to hyperbole…as you’ve probably guessed, not much has changed). Slicing and coring each one, rolling out the dough, making the entire house smell likes apples and cinnamon. To this day I swear my mom’s apple pie is the best there is and I nearly always plead for her to make one whenever I go home.
It’s perhaps no surprise then that apples hold a special place in my heart – and in my closet. I’m forever obsessed with fruit themed anything – from jewelry to bags to fruit-adorned shoes. So, it was only a matter of time before my creative apple juices started flowing and I buckled down to create my apple orchard themed skirt…

The Design
As with all projects, this one started with an idea. Given the state of the world right now in light of the pandemic and the very important protests happening worldwide, I have been feeling very out of control and in need of an outlet. For me, the space where I find control is in channeling stress to the page and then to the fabric.
So, in the middle of a particularly rough week in April, I pushed my laptop aside and grabbed a fresh piece of paper. It’s no surprise in a time of stress I went straight to a peaceful childhood memory, as a new circle skirt started to come to life beneath my pencil strokes. I knew I wanted to create a bushel of fruit toppling over, with a cascade of apples tumbling around the hem, ending as all good apples should: in pie.
So starteth my next sewing adventure…

One of the most important choices you can make when it comes to a sewing project is choosing the right materials. It needs to be of great quality to stand the test of time, and the right balance of colors so it looks like a cohesive design. Luckily, awhile back I invested in the Kona Cotton Swatch card and the swatches of all of the wool blend felt on offer at BBD Supplies. So, armed with a seemingly endless combination of options, I set about to find the perfect match….
For this skirt, I decided to go with a cotton base and felt appliqué for the details. With a lot of my previous projects, I have found this gives me a good drape and weight in the skirt, with the ease of felt for appliqué (which doesn’t fray). For the base skirt, I knew I wanted a pale mint green, a color which I love contrasted against red. I ended up going with Kona Cotton in Sea Mist for the base circle skirt, lined in Mint for my usual pop of underskirt, all from from Jean Marie’s Fabrics (but are currently sold out, but I found some here).
I also knew I wanted to play with print for this design to add some extra visual interest, and found the perfect 1/4″ red gingham for some cute accents (also from Jean Marie’s). Because what says apple picking and picnics better than red gingham?

After the base, the next most important choice was selecting the right shade of cherry red felt for my applies – which I found in the Bright Red wool blend felt from BBD Supplies. Using that as the color to match against, it was then pretty easy to choose the right green for the leaves and brown for the stems. I also opted for a darker brown for my basket (Tahitian Sunset) with a lighter felt (Champagne) for the pie crust. Then, it was just a matter of waiting for all of the supplies to arrive….

If you’re looking to tumble from the apple tree and create a similar skirt, you will need:
- 5 yards of Kona Cotton in Sea Mist for the base from Jean Marie’s Fabrics
- 5 yards of Kona Cotton in Mint for the lining Jean Marie’s Fabrics
- 1 yard red gingham for trim Jean Marie’s Fabrics
- 1 yard wool blend felt in Bright Red for the apples
- 1/2 yard each of wool blend felt in Tahitian Sunset for the basket and stems and Champagne for the pie crust
- 1/4 yard of craft felt in bright green for leaves
- 1 sheet of wool blend felt in linen and white glitter for details
- Misc craft felt in black, brown, and pink for small details (from JoAnn’s)
- Polyester Batting (Poly Fill)
- 9″ polyester zipper in caribbean blue
- Tools: water soluble pen, fabric glue, chalk wheel

The Construction
I started as I always do, with the base circle skirt. I pre-washed all of my fabric to deal with any potential color bleed and shrinkage and quickly measured and cut my circle skirt (I don’t even need to think about how to make a circle skirt any more, but if this is your first, check out this post for a tutorial).
Using my regular measurements of a 28″ waist (4.5″ radius) and 29″ length (34.5″ radius), which I would hem to a final length of 28″, I cut out one half circle and two quarter circles of the Kona Cotton in Sea Mist for the base, so I could have a back zip, but keep the seams at the sides. I also cut out the same in the Kona Cotton in Mint for the lining. I stitched both base and lining together at the side seams to create a full circle and started thinking up the best way to make my apple orchard come to life…


With a base upon which to work, I needed to get all of my elements together. First up: the perfect, crisp apple. I sketched out the rough shape on tracing paper – wanting to keep them looking round and tempting looking. Once I was happy with it, I used that as a stencil to cut out the large apples, and then scaled it down for a smaller sized option. Before I knew it, I had a stack of apples ripe for the pickin’.


Although I wanted mostly whole apples, I decided to also have a few cut in half and cut into slices. Because I just can resist the bling, I cut out an apple shape, slightly smaller than the red felt, using the white glitter felt from BBD Supplies. I did the same for some of my apple slices. I mean…it’s just not a Kara creation without a little (or a lot of) glitter…


I decided to get a little cheeky and imagine some hungry critters (or a vintage huntress) had happened by, so I sketched out a few apples in various stages of munch – all the way from one with a single bite gone to an apple core. Again, I sketched out the shape using my tracing paper, and then used that as a template to cut out the various elements.


Because I didn’t watch stitch lines on these elements (and the glitter felt is really hard to sew anyway), I opted to create my sliced up apples using my favorite fabric glue, Fabric Fusion. I glued it all together and used every coaster in the house to press it in place, leaving them overnight to dry.


As we all know, no apple core is complete without some seeds, I cut a series of teardrop shapes out of black felt and glued them one at a time to my apples. Sometimes, I just can’t handle how cute these things turn out…


While the second round of glue was drying, I set to work to tackle the hardest parts of the skirt – the pie and the basket. I had some ideas on how to achieve these, but in reality sometimes you just have to dive in to see if you’re right. My mom has always been the family baker, but I figured I’d try my own luck with making up the pie first.
I started by sketching out a rough pie shape and pie dish on paper, which I could used as a pattern. Then, taking my silver felt, I carefully cut out the pie “dish.”


Using a scrap piece of baby pink Kona cotton I had in my stash, I cut out the pie oval and set to work to make it resemble something someone might want to eat. The most picturesque apple pies always have a lattice, so first order of business was to cut several 3/4″ strips out of the champagne felt.


Once they were cut, I laid them in a diagonal across the cotton. Pining the felt strips at the top, I used the other strips to lace the felt through in an over-under pattern, keeping the spaces even. After a few minor adjustments, I pinned it all in place, leaving any excess hanging over the edge of the oval.


I went around the outside of the oval and topstitched all of the felt pieces in place. Once it was all secure, I trimmed off the excess felt from the edges, following the shape of the cotton oval. Voila! Instant pie! Okay, not really. Instant pie top…


The best part of any good pie is always the crust. So, using the oval pie top for shape, I cut a circle with a series of hills and valleys out of the champagne felt. And I cut a similar wavy circle from the middle. I laid it over the pie top, pinning it all in place so that it would look like a scrumptious pie crust.
The last step was to place it on top of the pie dish and garnish my dessert with a few of the apple slices I had made earlier. Now, this is starting to look like pie!


Going from my original sketch, I knew I wanted to add a bit of print into this design. And nothing says warm apple pie like red gingham. So, I cut a 36″ x 18″ rectangle out of red gingham, and pressed each of the sides under 1/4″. I laid it out at an angle on the back of my skirt as the perfect picnic blanket and carefully topstitched around the perimeter.


Iwas pretty psyched by how successful the pie turned out, so the next day I felt confident I could tackle the bucket. My main worry was getting the scale right and adding some of the details that always seem easier to achieve in my head.
I started by sketching out a potential bucket, using my apples as a guide for scale. Once I was happy, I cut out the shape of the basket using my red gingham fabric, which would carry the print over from the back. This would be the base on which I would create my woven basket effect.


To complete the 3D effect, I needed to cut the back piece of the bucket. This would allow me to appliqué my apples on top of the back piece, but behind the front, so they would look as though they were tumbling out from the inside of the container.
Using my stencil, I cut another oval out of the red gingham and a second out of the Tahitian Sunset felt. Pressing the gingham under 1/4″, I topstitched the two together. This would essentially be the inside of my bucket. Note: at this stage, I would often leave excess on my pieces, which I would trim later. Much easier to trim than add on felt!


Then it was time to weave my basket. As before, I cut out about a 15 3/4″ strips of felt, this time using the Tahitian Sunset. I laid them out over the red gingham in parallel, spacing them all as evenly as possible. I pinned the strips to the gingham at the bottom, leaving the top free. Then, one strip at a time, I wove it through each piece, using the same under-over method as I had in my pie – but this time keeping them tight together.


I did this multiple times, quickly finding a rhythm to the weaving. I continued all the way up to the top of my “bucket”, using pins to secure all of the strips. Then, I topstitched around the perimeter to keep everything in place and trimmed the excess from the edges.


Next, I cut a trapezoid shape out of the red gingham, about an inch wider than my bucket 2″ from the top. I cut a matching piece out of a scrap of white cotton, which I quickly stitched together and turned so the right sides were facing outward and pressed it so the edges were neat.
With wrong sides together, I stitched the piece to the top of my bucket, so that when I folded it outward, it would look like a piece of fabric coming out of the top. I tested it out with a few spare apples to be sure it would look the way I wanted to. So far, so good….


To finish the edges of the bucket, I cut out four additional pieces of the brown felt – two thin and two wider strips. I glued the side strips down with my fabric glue, covering my stitch marks. Lastly, I glued the curved pieces at the top and the bottom, securing my basket.
If I were to do this skirt over again, I think it would have been better to wait until I had sewn the basket to my skirt before gluing on the trim, where I could have covered up all stitch marks. But, live and learn! I set the basket to the side so I could start to work on the fruit….


I turned my attention next to finishing the applies. Each apple would need a leaf and a stem, which I wanted to attach to the apple itself before appliquéing it to the skirt. I quickly cut out the leaves using the bright green felt, and a series of stems out of brown felt. I hand stitched these on to each apple to give me a bit of control over their placement.
To keep things looking a bit random, I alternated between having leaves on the left or right (no apple is perfect). I also attached leaves and stems to my half-eaten apples. It was starting to look like an apple orchard in my sewing room!


Now that everything was cut, next comes the fun part: appliqué! I started first by playing with placement of my elements – it’s so important to put everything where you think it should go, and step back to assess. It’s a lot easier to make changes at this stage then wait until you’ve already committed hours upon hours to sewing.
I started by finding just the right place for my pie – it sounds crazy, but you need to think about things like weight and what you don’t want to sit on (this is going to be a skirt that functions in real life after all). I knew I wanted the pie to be just about opposite the other heavy element: my basket. So, I placed the pie directly across from the basket on the skirt, and pinned it in place.

Next, I laid out all of the apples to be sure I had the balance right. I worked one section at a time, playing with fruit placement and angle. I tried to give a mix of elements, with splashes of my apple slices and slightly munched apples. Once I was confident in their placement, I pinned each one to secure it.


Once I laid it all out, I had to admit it was missing the small piece of cheekiness that I’ve come to appreciate in my skirts. So I decided that one of my apples was going too be home to the cutest worm in all existence, hanging out behind my basket. I cut the worm out of pink felt, and added some darker pink for stripes.
To make his house, I cut a small moon-shaped hole in the corner of one of my apples to poke the worm through. Then, stitched on two silver eyes to give him an air of mystery. I think his name shall henceforth be Harry.


Oddly enough, at this stage when I stepped back to see how everything was looking, I thought my apples were looking a bit…tomato-esque. So, for the piece de resistance, I had the idea to cut small half moon shapes out of white glitter felt and attached them to the corner of each apple with my fabric glue.
I was pleased to find it gave each apple that characteristic shine and was definitely the finishing touch they needed. There would be no mistaking these as anything but apples!


With everything pinned, it was time to start to commit thread to skirt. I knew the appliqué would take an insanely long time, so the best strategy is to work one element at a time and go carefully around the skirt. Personally, I’ve bound a small, tight backstitch to work best for appliqué and keep everything secure with long time wear.
You basically thread the needle up and bring it down just behind the upwards thread. Your stitches are then virtually invisible from the front.


One might think I was nearing the finish line at this point. But it’s just not a Kara project unless we make things complicated! For any of the projects I do, I like to hone my skills, but I also like to push myself to try something I haven’t done before. And while I’ve done a lot of appliqué, I haven’t played much with giving the pieces themselves a 3D effect. So, for this skirt, I decided to try a bit of batting….

If you’ve never used it before, batting comes in a variety of types, including sheets or loose bunches of fibers. I opted for Poly-Fil for my needs, which can be used as a stuffing for cushions, stuffed animals, or as it happens…apples. It allows the pieces to stand away from the base in sharp relief, giving an extra dimension to the appliqué.
Note I went with 32oz not knowing how much I would need – this ended up being WAY more than was necessary and you could easy get away with 10oz or less for this project.

Given this is something I’ve never done before, I did a few tests and decided the best way to proceed was to appliqué each piece around the perimeter, leaving an opening at the top. Then, I would carefully stuff the inside with a small amount of batting, before closing the opening up fully. I was careful not to overstuff so I didn’t put too much pressure on my stitches.


I worked one apple at a time, carefully making my way around the skirt. In places where I had several apples clustered together, I would start with the backmost apple first, and follow suit with the ones in front. I really loved watching it come to life in my hands – taking it from a simple appliquéd skirt, to one where the scene almost wanted to burst forth from the folds.


With the apples juicy and secure, I then moved onto the bucket, stitching it in place over the apples that I had just sewn and filled with batting. This would give the illusion that the apples were tumbling out of the bucket. I carefully stitched around the perimeter with a dark brown thread to keep my stitches as invisible as possible.
When the main basket was stitched, I played with the shape of the gingham, creating ridges and tucks to give it some dimension and shape. I then tacked it down so it would stay folded over the edge, completing the illusion.


Then, I needed to secure the pie – as this one was made up of multiple elements, it would be a multi-step process. First, I machine stitched the pie dish to the red gingham picnic blanket. I lay the pie top over it, and hand stitched it to the skirt around the perimeter. As a finishing touch, and to cover all of the stitches, I used my fabric glue to press my crust into place.


To finish off my masterpiece, I decided at the last minute that it would be unfair to deny her pockets. I thought it would be an adorable touch to use my leftover gingham fabric – giving a pop of the print every so often peeking from the pocket. I used a pocket pattern from a pattern I already had in my stash (Vogue V8554) and quickly cut and stitched them into place.
If you’ve never sewn pockets before – I do a walk through on this post.


I could breath a sigh of relief at this stage, knowing the bulk of the fiddly work was over – and all that remained was a waistband, hem, and (my Ultimate Nemesis) the zipper.
I started by cutting out two 3″ x 32″ strips from the Sea Mist Kona Cotton, which would be the front and lining to my waistband. I stitched the two pieces together at the top, pressed the seam flat, and then under stitched the lining, folding it in half. I attached it to the skirt with a 3/8″ seam allowance, leaving excess at the edge to create a tab.


Then, I took a 9″ all purpose poly zipper in Caribbean blue, and stitched it into place using a simple lapped zip (I say simple. they never are). Then, I pressed under the hem and the lining, and securing them together with a quick slip stitch.


Finishing touches involved adding clasps to the waist and (my new very favorite step) pressing my very own custom clothing labels from the Heart of Wonder to the inner waistband. I put her on my dress form and stepped back, still in disbelief at this scene come to life.


And just like that, a memory resurfaced. I was right back in those orchards. With the horse drawn carriage and bushels full of fruit. To a house that smelled like apples and cinnamon and a very brief slice of time where apple pie was acceptable for breakfast.
There are a lot of memories we hold onto. Some we wish we could forget, others we want to hold onto forever. This one was just sitting in the back corner of my mind, waiting to resurface right when I needed it most.
The Debut
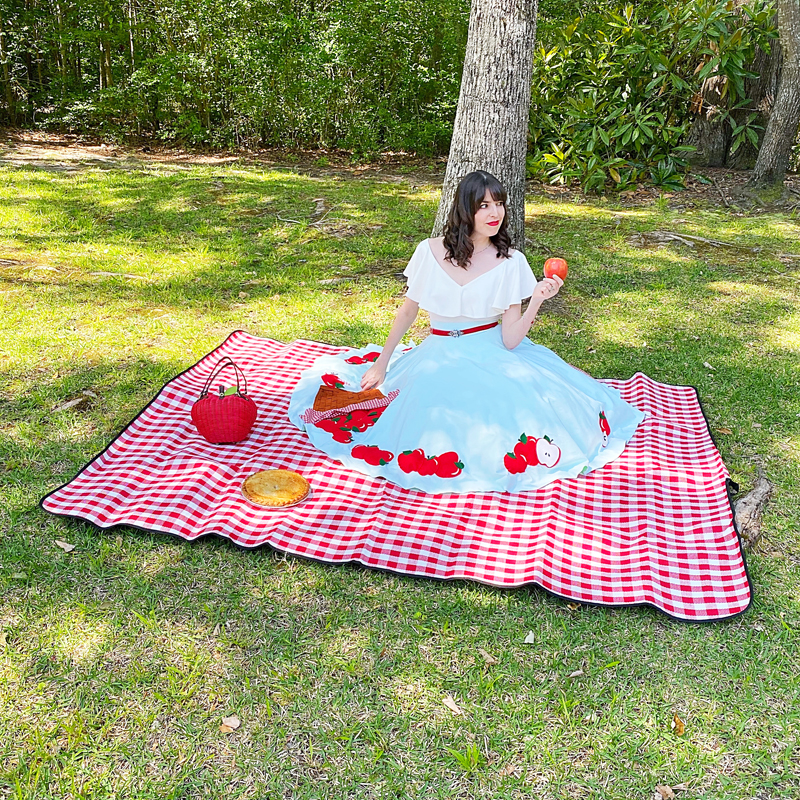
Unfortunately, there aren’t any apple orchards around me to have a real childhood memory reenactment. Even if there had been, with all of this isolation, I wouldn’t have been able to go (though how amazing would it have been to actually pick apples in my apple picking skirt??). So, we decided to have a little picnic in our backyard, complete with pie. Although I’m going to level with you guys. This one came straight from Harris Teeter…. (sorry Mom)


Apple pie totally counts
as a serving of fruit.
Unknown


Why not go out on a limb?
That’s where all the fruit is.
Mark Twain


I will always be grateful for an ability to put something beautiful into the world, especially now. It almost feels like a super power to me, being able to channel stress and helplessness into my own wearable orchard.
I am also working to continue to channel it into resolve. This has and continues to be a very reflective couple of weeks. If you read my thoughts in my last blog post, I think we are no where near the end of this fight. So, whether you are sharing far and wide or fighting behind the scenes, protesting in the street or at the dining table, donating time or energy, or money, keep pushing. Keep fighting for equality. We all must do our part to keep the momentum going for change.
Much like sewing, I’ve learned that activism is not always about doing it perfectly. There will be flaws, mistakes you will make, skills you need to learn. You will need to get better. But, it’s about doing the research and showing up, imperfections and all, and making that first critical stitch. And then another. And another. And not stopping until the garment is complete.
Keep sewing folks…
xoxo
Construction Details:
Circle Skirt: Kona Cotton in Sea Mist (base) + Mint (lining) from Jean Marie’s Fabrics
Trim: Cotton red gingham from Jean Marie’s Fabrics
Applique: Wool blend felt in Bright Red, Tahitian Sunset, & Champagne from BBD Supplies
Details: Wool blend white glitter felt and craft felt in bright green
Additional notions (zipper, needles, glue, thread): JoAnn Fabrics
Outfit Details:
Top: Unique Vintage
Skirt: Made by me!
Necklace: Swarovski (similar)
Belt: Alannah Hill (similar)
Handbag: Ollie & Nic (similar here & here)
Shoes: Betsey Johnson (similar)
.
instagram // twitter // facebook // pinterest
.
Any items marked with a “c/o” (courtesy of) a retailer mean I was provided with an item for free in exchange for a review and/or feature on my blog. I always provide my honest opinion of any item I’m reviewing, regardless of whether it was sent to me as a courtesy item or if I purchased it myself. In addition, this post may contain affiliate links. This means that if you click and/or make a purchase through certain links or ads on this site, I may make a commission from that click and/or purchase at no cost to you, which helps with the day-to-day running costs of my blog.