
As much as I’m a gal who likes to take risks now and then, there are always certain old favorites I come back to. It’s no surprise why, no matter how far I stray, you’ll see me inching back to circle skirts, nipped waists, border prints. I mean, tried and true exists for a reason, and there are a lot of cases where one just shouldn’t mess with perfection. And nothing says perfection like the perfect appliqué skirt…
Awhile back, I shared an amazing Lillie Rubin set, acquired from Two Old Beans. She was part of the estate of a woman named Virginia, who’s wardrobe must have swelled with beauty and sass and one-of-a-kind garments. She was swirling in pink and roses, perfection personified whether you wore these pieces together or separately.
A year or so later, I stumbled across her darker, moodier sister. This version was made by the iconic Juli Lynne Charlot, with scattered scarlet roses set against a background of inky black velvet. I love everything about these two pieces – the placement of the roses, the wide waistband, and the sweetness of the pink in stark contrast to the sexiness of the black…


Original Post: A Love Letter to Virginia From Birmingham

Original Post: Gather Ye Rosebuds While Ye May
The Inspiration
Now, I happen to know there are several colorways of this set scattered around the world – I’ve seen photos of a cream/yellow and a white, but I’m sure there are others. Although I’ve never spied it in person, I’ve had a photo of a snow white version saved to my Pinterest since I first knew pinning was a thing: originally sold by Timeless Vixen, she looked pristine and innocent in her spotless perfection. But I never was able to get my hands on her. Yeah, you know where this is going…

Given all of this social distancing of late, I’ve been dusting off my looooong list of Projects to Tackle One Day. Well, 2.5 months at home meant that day was today! I knew it was time to bring the third sister into the fold, completing the trifecta of rose appliquéd perfection….

The Design
This piece wouldn’t need much in the way of new design – like I said, we don’t mess with perfection. My plan was to use my existing skirts as a template, and essentially recreate it in white.
Because we’re heading into warmer weather, I decided to stay away from felt or velvet or other heavy fabrics. I turned to my old friend, Kona Cotton, settling on white for the base and a pearl pink lining.

I went back to the amazing A Market Collection for my roses, which I knew for past projects would be exactly what I needed. Going off of the original, I would need 5 total roses in red for this skirt, and decided to use the XXL sized roses (3.5″ diameter) closer to the top, and the XXXL sized roses (4″ diameter) closer to the hem. I also would need a 6th rose to go at the center of the bustier.

I also decided to go with two different shades of green for the leaves – I played with a few different options that I had in my stash, but in the end thought the perfect mix was craft felt in Kelly green from JoAnn Fabrics & apple green from Online Fabric Store, leftover from my Garden of Eden and Daffodil skirt creations, which would work perfectly.
If you’re ever struggling to pick a color, it may sound odd, but the best thing to do is to lay each side by side and take a photo. Our eye can sometimes make better decisions from photos. I can often waffle for AGES looking at swatches in person…but there’s something about seeing a photo of it that always seals the deal for me.


To stay true to the original design, I wanted to add some detail to the leaves by sewing on “veins” to the leaves using embroidery thread. Looking at my two original skirts, it added a bit of extra depth and dimension to the leaves, as if even the foliage had her own secrets. I ordered 6-strand DMC embroidery thread (size 5) in colors 319, 368, 367, and was ready to get to work!

To recreate this skirt, you will need:

The Construction
This beauty would begin as a white circle skirt base. I pre-washed the cotton fabric quickly and cut my circle skirt (If this is your first circle skirt rodeo, check out this post for a tutorial).
Using my regular measurements of a 28″ waist (4.5″ radius) and 29″ length (34.5″ radius), which I would hem to a final length of 28″, I cut out one half circle and two quarter circles of the Kona Cotton in White for the base, and repeated it again in Peal Pink for the lining. For now, I left the pieces separate, to reduce the fabric I would have to run through my sewing machine during the first stages of appliqué.


I like to start by getting all of my materials together – because my roses were already done, I just needed to organize all of my vines and leaves. After consulting my original JLC skirt and cutting out a few test leaves, I decided on the right size and shape and got to work. I quickly cut out two piles of each color in two sizes (2″ and 2.5″) using my Olfa rotary cutter (which will become your best friend for things like this).
This is always the part of a project where I really wonder if I should invest in a Cricut – given how many projects of this nature I have done and will no doubt do in the future, it might be a worthy investment. I never want to lose the tactile quality of my projects – I really do enjoy every part of the creation process. But GAWD would this puppy save a lot of time! Do any of you have one? Have you found it to work as well as they claim?? Enquiring minds want to know…


Once the materials were cut, the next step was to settle on the placement of the vines. Because I had my existing skirts to go off of, there would be less uncertainty. I laid out my original JLC on the floor and sketched the swoops of the vines onto my white base using my chalk wheel. One of the greatest things about working with chalk is that, if it’s not perfect when you step back, you can brush it off and start again.


Working from the sketched vines, I placed my leaves at an angle up each one. I alternated between light and dark and large and small, keeping things organized but still fairly random. I created clusters of leaves where I would eventually appliqué my roses. After a small bit of tweaking, I pinned all of the leaves in place.


I then cut multiple 1/4″ strips of the bright green craft felt, which I laid over my chalk marks as the stems to the vines. For this, the best advice I have is to keep the vine longer than you need, pin it down, and cut to length after you’ve sewn – it’s much easier to remove the excess than add on if you lose a bit of length on the curve when you stitch.


With the vines and leaves in place, I took to the sewing machine! After my Garden of Eden dress, I knew the best way to secure everything would be to machine stitch them in place. As my half circle and quarter circle weren’t sewn together yet, I also wouldn’t have too much fabric to have to manipulate.

I started with the vines – the trick here is to save the longest vines until the end. I sewed down all of the small vines first, and then I was able to sew the long vines over them, so they would look as if they are coming from the center stem.


Once the vines were secure, I worked one leaf at a time to sew them down, starting with the base and stitching upward to the tip of the leave. It holds it in place and looks like a vein of the leaf (though I would be getting snazzy with these veins shortly).


After the leaves and vines were sewn, I also decided it was time to stitch the side seams together, because from this point forward it would be mostly hand sewing until I had to put a zip and a waistband in (I know – can you stand the excitement??)


As I said above, one feature about the original Lillie Rubin and Juli Lynne Charlot pieces that I love, is the added veins hand sewn onto the leaves. I had purchase six strand embroidery thread in a few different shades of green to try to recreate this effect. Because these threads are quite thick, you will definitely need a hand needle with a very large eye.


For each leaf, I took two strands of embroidery thread of two different colors. I threaded them both through my hand needle (which took some doing – I found it worked best to thread them through one at a time).
I then tied a knot at one end, and brought my hand needle up through the base of a leaf. Depending on the size of the leaf (large or small) I would bring the needle down halfway (for the 2″ leaves) or 1/3″ of the way (for the 2.5″ leaves) up the leaf, ending my last stitch at the tip.


I then created a series of angular veins, pulling the needle up near the center line and back down through the leaf towards the edge. I repeated this all the down the leaf, usually with two or three veins coming off of the center.
This part was pretty time consuming, considering I had over 60 leaves to do. But, as with most of my hand appliqué, I just find a good show to stream on Hulu and then go for it!


Next up, came a bit of trim for the hem. Although I didn’t see a trim in the original photos of the white version, both of my others had it and I really like the finish it provides. So, I cut several 1″ strips of the bright green felt, which I sewed together to create one long strip to go around my 216″ hem circumference.


Amethod I have found to work well for attaching the trim is to stitch it to the top of the skirt first and then roll the hem and press under. To do this, I put the right side of the felt strip onto the right side of the skirt. I sewed all the way around the hem at 1/2″ hem allowance, keeping the edge of the trim flush with the edge of the skirt hem.


Then, I flipped and pressed the hem under, which creates a good clean finish without any visible stitch marks. Because I planned to line it, I could cover the excess on the underside with the lining. However, you can always trim it off if it bothers you.


Because the roses are quite delicate, I decided to add the waistband and lining at this stage, rather than trying to wrestle the skirt through a sewing machine with the roses attached. I started by attaching the lining to the skirt at 3/8″ and sewing up the back seam, leaving 9″ from the waist open for my zipper.


I went with a lapped zipper here, which I’m getting much more comfortable with after watching Gertie’s AMAZING zipper tutorial (Seriously. Changed my life). I went with a 9″ polyester zipper in white, which I would stop at the top of the waistband and use clasps to secure the waist tab. I quickly got the zipper in place and moved on to the waistband.


In keeping true to the originals, I knew I wanted an extra wide waistband with the rows of stitching I have come to know as JLC’s trademark. I quickly cut on long 4″ by 32″ rectangle out of the white cotton and a second out of the pink. I backed the white with interfacing and stitched the two together, pressing the seam flat.


Then, starting from the top of the waistband, I sewed parallel rows of stitching at 0.5″ inches apart. I’ve shared this trick before, but I found a good hack for keeping things straight is to tape a flat edged guide at the correct measurement (like a piece of cardboard). The waistband is so wide, you will only be able to use your built-in guides for the first two rows.
This allows you to measure everything, tape down your new guide, and follow it all along the waistband. Then, move the guide 1/2″ away and stitch again. Before I got to the last row of stitching, I stopped – so that I could attach the waistband to my skirt.


With right sides together, I sewed the waistband to the skirt and the lining, and then pressed it upwards. I then topstitched the final row of stitching, securing the lining to the waistband and completing the last of the 1/2″ parallel rows.


Then, it was a matter of pinning and placing the roses, and stitching them all securely in place. I laid them out on the skirt, keeping my smaller ones closer to the waist and the largest roses lower down.
Working one at a time, I appliquéd each rose, working around the perimeter and then coming towards the center, bringing my thread up through several petals and back down again in a small, invisible backstitch.


This is usually the part of the process where I rejoice in being just about done – but I had another step to recreating the original, which you may remember had a matching bodice.
I toyed with the idea of creating a bodice, but realized that (again) you don’t mess with perfection. I already owned the White Bustier of Dreams, made by the incomparable Alexandra of California. Since I already had the bustier, she would just need the rose detail, which I could easily make as a brooch that could be put on and taken off.

I started by cutting a small circle of white felt that I had in my stash, and two more of the 2.5″ long leaves, which I stitched onto the felt at a right angle to one another. Using the same method as before, I sewed on the vein detail using the 6-strand embroidery thread.


I then took two small brooch pins (like these), and sewed them on either side of the felt circle – this would allow me to invisibly secure it to my bodice, completing the illusion that it was meant to be there all along. as an added bonus, it could be a snazzy brooch to wear with another outfit if I so desired.


Then, I appliquéd an XXL sized rose over the leaves, trimming off any excess felt that was visible from the top. I pinned it onto the upper bust of my Alexandra of California bustier, and it looked pretty darn near exact to the original!


I spent the next evening doing the finishes – securing the hem with a slip stitch, adding waist clasps, and carefully pressing in my custom labels from Heart of Wonder, which always makes a piece feel truly mine.


I almost cried when I finished, she was just so pretty. I laid it side by side to the two vintage originals, and was beyond proud to see that they looked as though they all belonged together…


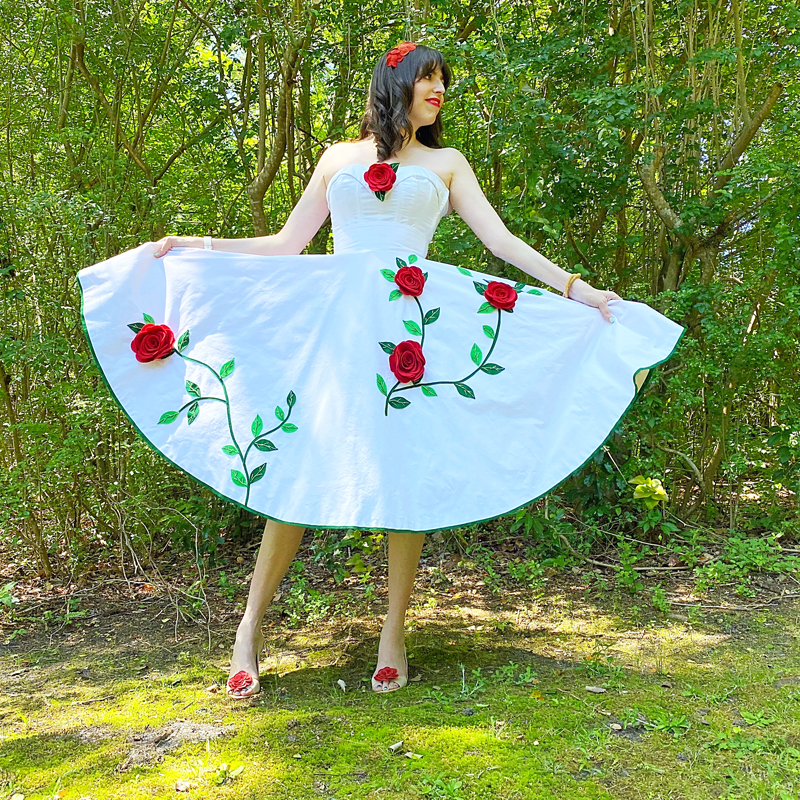
The Debut
It doesn’t matter how many times I do it (especially these past few months), I never get tired of taking a new creation out for a spin – even if that spin has to happen in my own backyard. There is so much satisfaction in bringing a garment to life. In knowing that your wishlist is never too far out of reach with some ingenuity and a good show to stream on Hulu….


The rose is a rose
from the time it is a seed
to the time it dies.
Within it, at all times,
it contains its whole potential.
It seems to be constantly
in the process of change:
Yet at each state,
at each moment,
it is perfectly all right as it is.
Paulo Coelho


Although we are in the dead of summer, I have to admit my heart still lingers back in Spring. Back when all of this isolation began and the world felt as though it paused. Summers are normally full of warm summer nights, BBQs with friends, and dinners out downtown by the Riverwalk. They are brimming with house parties and strolls along the beach and ice cold beers on a friend’s newly finished deck.
While this new reality we have found ourselves in is frustrating (to say the least), I still think it’s so necessary. Looking at the data, there are spikes of cases in cities that opened too quickly, and my deep desire for summer parties where this dress could make her debut are simply not worth the risk. So, homebound we are, at least for the foreseeable future.
But that sure doesn’t mean my roses aren’t blooming…
xoxo
Construction Details:
Circle Skirt: Self-drafted
Skirt fabric: Robert Kaufman White Kona Cotton
Skirt Lining: Robert Kaufman Pearl Pink Kona Cotton
Appliqué: Felt in Kelly green & apple green
Felt Roses: XXXL and XXL in Red from A Market Collection
Additional notions (zipper, thread): JoAnn’s
Outfit Details:
Bustier: Alexandra of California + custom brooch (made by me)
Skirt: Made by me!
Headband: Anthropologie (similar)
Handbag: vintage, Bettina Darling (similar here & here)
Shoes: Katy Perry Collections, sold out (similar)
.
instagram // twitter // facebook // pinterest
.
Any items marked with a “c/o” (courtesy of) a retailer mean I was provided with an item for free in exchange for a review and/or feature on my blog. I always provide my honest opinion of any item I’m reviewing, regardless of whether it was sent to me as a courtesy item or if I purchased it myself. In addition, this post may contain affiliate links. This means that if you click and/or make a purchase through certain links or ads on this site, I may make a commission from that click and/or purchase at no cost to you, which helps with the day-to-day running costs of my blog.