
Like most vintage-loving ladies, I have a sewing and tailoring pile that goes up to the sky. If you’ve been collecting vintage for a certain number of years, you come to learn that with great beauty comes great responsibility: a vintage wardrobe requires a lot of care. Ripped seams, unravelling hems. Learning to sew was definitely one of the best skills I ever gained in terms of managing the garments I love so much. But, over time that skill can become a curse, only to turn around one day to find I’ve collected pieces that “just need a little nip and tuck,” leading to about 8 million hours of nipping and tucking. And who has a spare 8 million hours lying around?
Although I try my hardest not to add to that sewing pile of mine (which never seems to get any smaller), there are certain pieces that have a magic about them. I often default to a “leave no man behind” kind of mentality when I see a beautiful garment that has been loved to death, and I swear they whisper to me that I alone can save them. More and more lately I’ve been trying to resist this urge, so that I may one day see the end of my endless Sewing To Do List. But, best laid plans and all….


The Original
While scrolling through Instagram several months ago, I came across a post by Golyester, showing this most stunning Juli Lynne Charlot novelty circle skirt. I’d seen photos of the original on Pinterest – it’s a stunning Parisian scene, against a backdrop of pale blue.
Looking at the original, she had definitely had more than a twirl or two around the dance floor. Stained and worn, she was speckled with moth holes and undoubtedly had a few stories to tell. It broke my heart to see such a stunning, covetable skirt in such a state. But, at closer inspection I could see that the appliqué itself – the true genius behind JLC’s artistry – was actually in good shape.

I messaged Golyester to see what could be done – like me, she believed that the appliqué could be salvaged, and was looking for the right person to undertake the challenge. Although mere minutes before I was imagining the very real possibility of my sewing pile toppling over and smothering me one of these days, all that flew out the window when I realized I could bring this skirt back to life.

The Restoration
Before I knew it, she was whisking her way to me from LA and I was faced with a very real challenge: how to preserve the integrity of the original, while bringing this into a wearable state?
Looking her over, it was very clear that the base skirt wasn’t salvageable. There were too many holes and stains: at the hem, on the waistband, and really throughout the the entire skirt, as if a band of angry squirrels decided to take out years of anger over their disenfranchisement on 1950’s vintage. It also looked as though she may have been significantly taken in at once stage – both on the sides and at the top – as laid flat it wasn’t a full circle (which is what JLC is known for) and part of the Eiffel Tower was chopped off at her peak.

Even through the damage, I could see how stunning she was, with different parts of the skirt representing a different Parisian scene. From the street cafe with its red and white striped awning, to the Eiffel Tower, to a band of Prefecture de Police. She just had a certain je ne sais quoi about her, and I was determined that this wouldn’t be her last stroll down the Champs-Élysées…


After triage, I knew there was only one way forward: I would need to cut a new base circle skirt, carefully remove the appliqué from the original and re-attach them to the new base one at a time, taking care to preserve their placement and detail.

Step 1 was finding just the right felt, which meant heading straight to BBD Supplies (which was my go-to for my last felt circle skirt project). I went back and forth with five different color options – none were exactly a match to the original (which was admittedly very faded and worn and difficult to discern anyway). So, I decided to go with a color that I thought would work, knowing it would be a bit of a departure from the true vintage piece.

- Robin’s egg blue
- Ice grey
- Blue Snow
- Columbia blue
- Love Bug Blue
After ordering several swatches and laying them side by side, I ended up going with 5 yards of wool blend felt in blue snow (#3 above) – a lighter sky blue that the details would really pop against.
If you’re going to embark on a similar recovery process, the items you’ll need are:
- 5 yards of wool blend felt in blue snow
- Appliqué, removed and reattached from the original skirt from Golyester
- 1 yard of 3″ cream grosgrain ribbon
- Matching thread for the various elements
- A LOT OF PATIENCE!


As usual, all projects like this start with the base. I cut a half circle and two quarter circles out of the blue snow felt to start. I cut it to a 28″ waist (4.5″ radius) and 28″ length (33.5″ radius). If you haven’t done a circle skirt before, see this post for a detailed walk through.
I absolutely fell in love with working with wool blend felt during the creation of my winter wonderland skirt – it has a beautiful weight and drape, and also requires no hemming! Bonus….


Thanks to some extensive research (a.k.a. 5 minutes on Pinterest), I also found a pristine version of the same skirt that someone had pinned. This really helped to visualize how she had looked before the alterations had been made to my skirt. So working from my damaged version and the Pinterest photos, I knew not only what had become of her, but how she would look once I restored her to her former glory…


With the base done relatively quickly and photos of the pristine version on hand, the next step was carefully removing each appliqué. The best advice I can say at this stage is to take a TON of photos of the original before you start to remove things. What will seem easy to remember, will quickly fly out of your mind during the recreation. So, I started by taking photos of each element, one by one.
Once I was satisfied that I had preserved the original to digital, I then had to take a deep breath and start cutting. Working one piece at a time, I snipped the strings through the back of the skirt, and carefully detached each felt element. To keep myself organized, I kept a small bowl for each vignette, so I could keep track of the leaves, sequins, and beads. When I would go to re-appliqué them to the new base, I wouldn’t have to scramble around to know which beads went with which scene.


I have to say – JLC used some SERIOUSLY good quality felt in her skirts. Even 70 years old and these felt pieces held together with very little damage from the removal process. The only minor issues came in removing the very thin pieces in the clouds and Eiffel Tower – many of which had small moth holes and disintegrated a bit with even the slightest pull.
But, all things considered, I was able to preserve the integrity of most of the appliqué pieces – a small miracle in my book. I worked one vignette at a time, transferring the pieces to my new base. I carefully consulted the original and the pristine version of the skirt I found photos of on Pinterest to get the placement right. It was a long process – and naturally, Finn was as helpful as ever….


Once I had the major elements in place, I had to admit the white pieces looked…well…not really all that white. I knew they had lived a full life and had turned some of that sass and gossip into a dull yellow tinge. So, next order of business was to soak each piece to see if we couldn’t bring them back to their former glory.
For this, I added a tablespoon of Retro Clean to Tupperware containers full of warm water, and soaked the felt overnight. Again, I kept the elements that went into each vignette in a separate container to avoid the chaos that can come from an overwhelming pile of tiny details…

Although the process didn’t make them as white as white can be, the overnight soak helped tremendously and most of the vintage dinginess was gone.

After they were dry, I laid everything back onto my new base of felt, so I could step back and assess. Going back and forth from my photos to the new skirt, I tweaked and moved pieces ever so slightly until it felt as close to the original as possible. Once I was happy with it, I pinned it all in place. So starteth the longest week of my life, where I became nothing more than an appliquéing machine.
The best way to start with these kinds of projects is to appliqué all of the large elements first, and then add on finer and finer details. Because I was going to stay true to the original, most of these pieces needed to be hand sewn instead of machine stitched. The few machine stitched elements (the Eiffel Tower, some of the straight poles, etc.) went rather quickly, but the rest definitely made me have an appreciation for couturiers everywhere….

First up, I wanted to tackle the elements that would be machine stitched – which wasn’t much. After my last experience, I knew how bulky felt was, which can be difficult to maneuver through a sewing machine. I started with the Eiffel Tower, keeping the needle in the down position and working my way carefully up the curves.
I did find that stitching felt on felt took some patience. The feed dogs of my sewing machine struggled to run smoothly and I had to guide the fabric forward. It made it tricky around the curves especially. After attempting to machine stitch one of the clouds, I gave up and realized those tight curves would need to be hand stitched….


The only way into the pool is just to jump with both feet – so on to the appliqué! Like any good gardener, I started by planting my trees. Since there were three of them, I could get into an easy rhythm pretty quickly. I flicked on my trusty Project Runway re-runs (seriously – how did Mondo NOT win Season 8?!?) and worked through one branch at a time.


Then, I added the teal leaves one at a time, keeping their placement random but balanced. For this, I threaded through the middle of the felt, and tacked each leaf down one at a time. Unfortunately, so endeth my Sunday at this point, so she had to sit and wait for a week of teaching mayhem before I could get back to her.


Finally, I had an entire weekend to really rock this thing out. I started with what appeared to be a screen, with a jaunty chapeau’d gentleman behind it (seriously…I still have no idea what it actually is. Any thoughts??).
I machine stitched the poles onto the teal curtain and then hand stitched each piece to my new base, matching my thread to the felt element. The only thing to keep a close eye on at this stage was that some elements were layered, so I needed to be sure to stitch the back piece first and the others on top.
UPDATE: Thanks to my readers and some brilliant ladies on Facebook, I’ve come to learn that the man behind the curtain is probably in a pissoir or pissotière. And it is apparently exactly what it sounds like – a semi-private public urinal! They were pretty popular in France in the mid 1800’s, and were installed to discourage the public from peeing on buildings. I didn’t think it was possible to love this skirt more. But, knowing the sense of humor JLC has makes me realize we could have definitely had a cocktail or three together….


With one scene done, I moved on to the cafe – this one had many more elements involved, many of which were teeny tiny. But, so long as you work one piece at a time, it actually going pretty quickly. I stitched down all of the furniture first – using backstitches and matching thread.


Next, I set to work on my waiter. Slipping his jacket back on and tweaking his adorable little mustache, balancing a tray of precariously placed items on one hand. I finished the scene by adding the red and white awning, to shade the diners while sipping their cafe au lait (or, let’s be honest, beaucoup de vin). I so appreciated the perfect balance of color in the design – made mostly of black and white but with the perfect pops of red and teal…


Fueled by more coffee, it was on to the Paresian Po-Po! As with the cafe, there were a lot of elements to contend with. I started with the police car, securing it in place first with the series of beads along the side. Because they were so narrow, this is where my super thin beading needles came in handy….


Then, working one piece at a time, I completed the scene. I added the bouncy wheels, a driver to steer the ship, and the Po-Po chasing on foot. I watched the French version of Riggs and Murtaugh come to life, ready to serve and protect.


I then moved on to tackling the clouds in the sky. As I said above, I tried to machine stitch these. But, in the end, after wrestling and unpicking so many times, I came to the conclusion that hand stitching was best.
The clouds were made of a very thin white felt, some of which fell apart when I tried to remove them. So, although I couldn’t add back all of the original clouds as fluffy as they once were, I stayed as true to the original shape of the clouds as possible.


There were a few additional minor touches – which included the parallel bars on the Eiffel Tower. Learning from my cloud mistake, I decided to hand stitch these too…


I was pretty excited when all of the larger pieces were in place – I thought I was nearly done, with only the fine elements to go. But again, here’s another episode of Kara Gets A Lesson In How Long Details Take. Turns out, sequins and beading takes FOREVER…

Iirst up came the foliage, where each tree bloomed with a series of cream flowers, dotted with a sequin and bead at the center of each one.
I was so very grateful I had kept all of these elements separated from the start – it made it very easy to go from tree to tree, knowing exactly what flowers and sequins belonged with what. I also stitched on the scatters of flowers that looked as if they had fallen from the tree like a sakura storm…


Then came the sequins. Ohhhhh the horror of the SEQUINS. Now don’t get me wrong, I love me some bling…but good god this takes so long to stitch! The only small blessing came in the fact that it was very easy to follow the original design – although I also had the photos to go off of, the indent of the original sequins was still on the original pieces. So, I could follow the impressions in the felt and made my way through each scene, one color at a time. My fingers quickly became pincushions, but I battled sagely on….


If you’ve never sewn on sequins before, the easiest way to do it is to bring your needle up through where you want the center of your sequins to be. Then, thread the sequins on the needle, followed by a single bead. Go back through the hole in the sequins (careful to be slightly to the side of your original needle hole in the felt. Voila! The bead holds the sequin in place and you have instant bling. Now do this 8 million more times…..


Upon closer examination of the original, it looked as though a few details were missing from my skirt, likely from the tailoring process. Firstly, there was a French flag at the top of the Eiffel Tower, which I would need to recreate from some of my own felt. This was pretty simple to do, using equal strips of red, white, and teal.


I also noticed that the original JLC had a trimmed edge around the hem – with very thin strips of black and white. This is another detail JLC is known for, and I have this hem treatment on several of my other skirts of hers. Because I was very committed to restoring this piece to the true original, I cut out several long strips of 3/4″ wide white and black felt, and stitched them together. I offset them by 1/4″, so the black felt would peak out below the cream.


Then, I stitched the strips around the circumference of my hem, so that the white peeked out at 1/4″. This part took a surprisingly long time – my circle skirt has a hem circumference of ~210 inches (what can I say, this girl likes it full), which required a LOT of strips. But, after it was attached, I was really happy I’d put the effort in. It really added a nice finish to the skirt. I’ll definitely keep that detail in mind for future projects.


At long last, though, the appliquéd details were done! My back ached and my fingers were beaten and bruised, but I was thrilled with how it turned out. This is always the part of a project where you get to step back and admire how all of those little elements work together seamlessly to create a full garment.
The last steps here was adding a waistband and sewing in a zipper. However, this would be no simple task. Juli Lynne Charlot was not known for a simple waistband – this gal loved them wide, sturdy, and detailed. A feature I love about her skirts is a signature spaced stitching in rows all around the skirt. Measuring from the original, I would need a 4″ wide waistband with 6 rows of parallel stitching, backed by a 3″ grosgrain ribbon.


I cut the waistband strip and, after consulting the original, saw that the waistband was topstitched on, with the grosgrain attached by the parallel rows of stitching. So, working one row at a time, starting from the top, I attached the grosgrain to the felt strip, spacing the rows of stitching 1/2″ apart, with my last row of stitching made to attach the waistband to the bottom of the skirt.

One hack I’ve used for this type of work is to find a piece of cardboard you can use as a straight edge. If something you’re measuring goes beyond the standard 1/2″ or 5/8″ on your sewing machine footplate, you can easily extend this and get perfect stitches every time. I find the cardboard packets for sewing needles works brilliantly. I would measure 1/2″ away from my previous stitch line, and tape down the packet to give me a straight edge to follow as I worked my way along the waistband.


Waistband in place, I put in my lapped zipper. Because the zip in the original skirt was damaged beyond repair and missing teeth, I went to my collection and found a vintage metal J&P Coats 9″ white zipper. For these kids of projects, I very much try to stay true to the originals and have a stash of true vintage metals zips for just this occasion….
Then, I measured down from the waistline to where the zipper teeth would end, and stitched up the back seam below this mark. Then, I pressed under the left side 1/2″, stitching it to the zipper, close to the teeth. I pressed under the other side 5/8″ and (because zippers are my nemesis and NEVER straight) made a series of marks 1/2″ from the lapped edge as a guide for my stitches. Following my marks, I was able to get the zip in on one try (cue choir of angels!)


Last were the finishes – including adding the waist clasps, sewing down seam edges, and reattaching the JLC label. Because this was one project that I felt was a true merger of the hands of Juli Lynne Charlot and myself, I also added something a little extra (which would also prevent someone in the future from thinking this was a true JLC original).


In my last sewing post, I shared my custom white glitter sewing labels, made by The Heart of Wonder. I got a little emotional as I pulled one out as the final step in this crazy process. I carefully attached my name below Juli Lynne Charlot’s iconic label, forever bonded in time.


And voila – she was done! I set her up on my dress form and marveled at the French scene before me. This was my first true Restoration Project – beyond the cleaning and mending that goes with any vintage collection. I did my best to pay homage to her creator, staying true to design and technique. I hope I did her proud.


I‘m ecstatic with how it turned out, and even happier I decided to accept the challenge that was bringing this piece back to life. Knowing that it may have ended up in a landfill, but instead has ended up a part of my story. And maybe another woman’s story after me. And so on and so forth as we add new stories and chapters and dance floors….
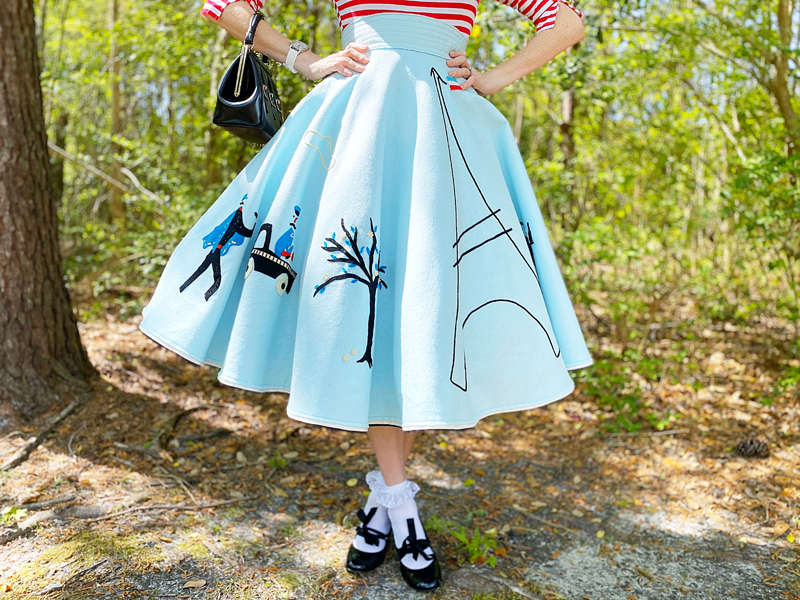
The Debut
The only thing that would do for this skirt’s first debut was a trip to a Parisian cafe. I had it all planned. Location scouted, perfect cappuccino photo in my mind’s eye. And then…coronavirus. Yeah… backyard it is!
This situation has been unlike anything many of us have experienced. But to borrow something one of my students said, we are not stuck at home. We are safe at home. And even though I’ve just crossed the 6 week threshold of sheltering in place, I am so grateful to have this opportunity to be safe and to keep others safe. So, I can’t visit my favorite cafe or go to the movies or see my students close their notebooks for the last time this semester. But, I am safe. And now, that’s all that matters.
And Paris will always be there….


We’ll always have Paris…
Casablanca


It’s so easy after a project like this to forget the pain and effort that went into it – but I will always have this post to remember it by. This was definitely one of my longer projects. Given that I wanted to honor the way JLC created her pieces and that each element was hand-stitched, the overall time logged for this was well over 64 hours (spread out over many, many weekends). If I had machine stitched, I’m sure it would have cut that down by a good 12 hours. But, I like to appreciate the original effort made for a garment like this – and preserving this piece of history definitely meant respecting the past.
In our day and age, I think the instinct is always to wear out and buy new. Important professions like cobblers, tailors, and seamstresses are getting harder and harder to find, so fervent is our quest for shiny and pristine. But I loved finding this garment – rescuing her from the depths of despair. Not making her shiny and new, but allowing her to not be defined by her flaws.
Because old and obsolete? Ce n’est pas la même chose…
xoxo
Construction Details:
New Circle Skirt: Self drafted
Original damaged skirt (from which I saved the appliqué): Golyester
Skirt fabric: Wool blend felt in “blue snow” from BBD Supplies
Grosgrain Ribbon: Hairbow Supplies etc.
Additional notions (beads, craft felt, glue): JoAnn Fabrics
Outfit Details:
Top: Unique Vintage (similar)
Skirt: Made by me!
Scarf: vintage (similar)
Beret: gift (similar)
Handbag: vintage, Bettina Darling (similar here & here)
Socks: Amazon
Shoes: Steve Madden (similar here & here)
.
instagram // twitter // facebook // pinterest
.
Any items marked with a “c/o” (courtesy of) a retailer mean I was provided with an item for free in exchange for a review and/or feature on my blog. I always provide my honest opinion of any item I’m reviewing, regardless of whether it was sent to me as a courtesy item or if I purchased it myself. In addition, this post may contain affiliate links. This means that if you click and/or make a purchase through certain links or ads on this site, I may make a commission from that click and/or purchase at no cost to you, which helps with the day-to-day running costs of my blog.