
There are some sewing projects I feel I can do on auto-pilot – I barely have to think about drafting a circle skirt or creating a complex vignette out of felt pieces. But, while I love my comfort zone, I’m always itching to try new techniques. Even if they fail spectacularly, the scientist in me has a relentless need to find something new to learn.
One area of sewing where I have less confidence is in pattern drafting or pattern adjustment. I was never formally trained, and outside of sewing classes with Sewanista, haven’t traversed that particular path on my own very much. But, I’ve discovered that understanding the logic of garment construction is actually about the first 80 steps. Once you understand the curves and edges, the geometry behind molding fabric to the body, the possibilities for pattern adjustment and drafting are pretty limitless….


The Design
Awhile back I came across the pattern for Butterick B6211 and immediately fell in love with the unique bodice design. Done in a walk-away style, the bodice has an overlay that cups the bust in two petals, with a full circle that could contrast or not) to a simple underlay. I read several reviews for the pattern and saw a few finished pieces – it seemed this one had some issues. Primarily, it seemed there was a lot of difficulty in getting the bodice to lay flat.
Upon closer inspection of the pattern itself, I saw that the dress was a pull on style – with an elastic piece that clips at the back waist and the bodice petals buttoned in place, putting most of the fit strain on the buttons. In my view, this style design expects your body to do most of the work. As I like my dress to carry the load when it comes to fit, I started to imagine the adjustments I could make to preserve the beautiful bodice design, but provide a more fitted silhouette….

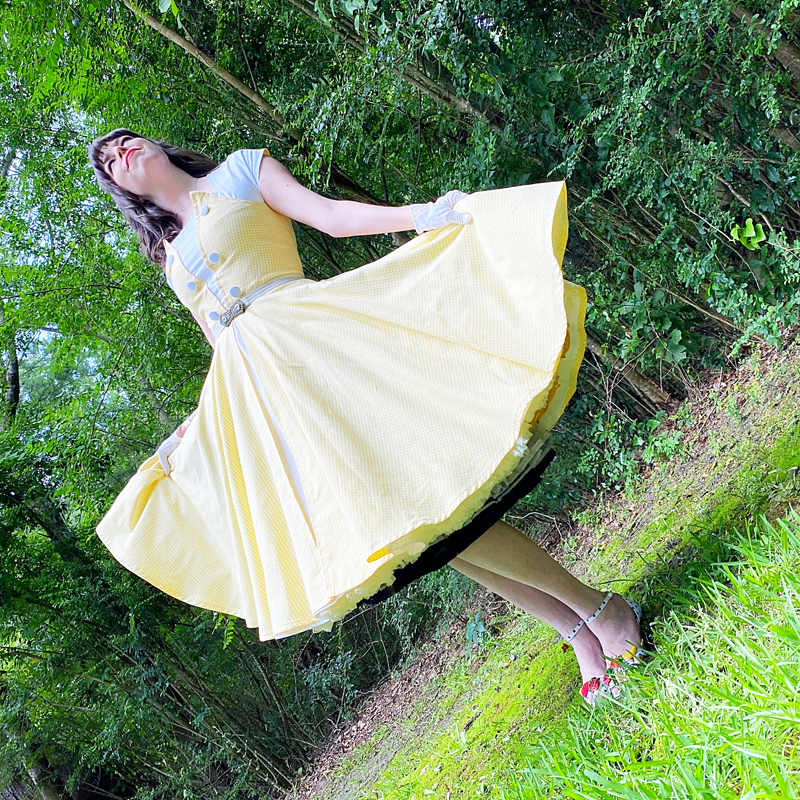
Although I love to put my own spin on my garments, the minute I saw the pattern cover with the yellow gingham and white version of the dress, I was hooked. I simply couldn’t imagine a garment more summery than that one, and set about to gather the materials to recreate it.
I decided to go with white Kona Cotton for the underlay dress – given the North Carolina heat, I knew a breathable cotton was my only option. I also found the perfect yellow cotton gingham at AA Cotton Creations – a light breezy 1/8″ check that evokes lazy summer days drinking lemonade.

I also wanted white covered buttons for the bodice – they wouldn’t be functional, but I loved the polished look they give the dress. I found the perfect 1″ covered buttons with a shank-back (to sew on) at Best Value Buttons. They arrived in record time and would be the perfect finishing touch…

To tackle this dress, you will need:

The Pattern Adjustments
While I was waiting for the fabric to arrive, I started to tackle the pattern adjustments. For me, this meant eliminating the pull on style and securing the bodice overlay to the underlay so that you wouldn’t pull at the buttons while you moved (as bodies tend to do). I also wanted both the underlay and overlay skirt to be a full circle – cause you can’t keep this girl from her crinolines. Step 1 is always assessing the pattern, which consists of 7 pieces:
- Front neck interfacing (#1)
- Front (#2) – henceforth called the bodice underlay
- Front facing (#3)
- Back neck interfacing (#4)
- Bodice (#5) – henceforth called the bodiceoverlay
- Skirt (#6)
- Belt (#7) – optional


So, I wanted keep a lot of the shape integrity (love that petal bust overlay), but make a few necessary changes to make it more my style. I started by tracing the bodice underlay and bodice overlay onto my craft paper, taking care to transfer all of the darts and markings.
If you’ve never adjusted a pattern before – I highly recommend starting by transferring the pattern, and then making adjustments to your craft paper. You can cut it up and add pieces and still keep the original in tact. I personally keep a roll of butcher paper on hand for this exact purpose.


I knew the most major change I would be making would be adding a back zip and removing the elastic altogether. To do this, I had to make a few bodice adjustments – in the original, the bodice overlay was one piece, which would pull overhead and attached to the underlay at the front (with buttons).
I started by cutting the overlay into two pieces instead of on the fold – with the opening at the center back – and adding the additional seam allowance required for a zipper. Because I’m also hopelessly tall, I added an extra 1″ to the bodice length. I didn’t find this pattern to run particularly short in the waist, but knowing my body, I almost always have to make this adjustment so I tend to do it automatically before starting a project. Now, the dress would still button over the front (with faux buttons), but the fit would come from the zip.

The original underlay piece was one long shift style dress (see pattern piece #3 above). I knew I would need to separate these pieces into a bodice and a skirt – I wanted to do away with the shift style skirt entirely, and would draft a simple circle skirt out of the white Kona Cotton. The bodice would take a bit more work.
There are two ways to do this: either working from the shift dress pattern (#3), cutting it off at the waistline plus 5/8″ seam allowance, or by using the front facing (#3) and adding 5/8′ seam allowance to the bottom. Both will get you to the same result. I opted to work from pattern piece #3. On the original pattern, there was a line remarking the waistline. So, I cut the underlay bodice straight across at the waist, adding 5/8′ to the bottom for seam allowance. To match my overlay, I also lengthened the bodice by 1″ to take into account my Amazonian proportions.

I knew I would need to make several toile’s to be sure the changes I was going to make to this pattern would work. I used some excess cotton I had in my stash, and was pretty pleased to see that my first pass actually was decent! I had to lose a bit of excess fabric at the waist (but my bust to waist ratio is definitely bust-heavy) and we were off to the races!


The Construction
Because I was pretty happy with my toile, I could bravely move on to….bum bum bum…actual fabric! This part always terrifies me (even more so if the fabric is vintage). I decided to start where I was most comfortable – making the skirt. This would be pretty straightforward. I would just need one made out of white cotton and one out of yellow gingham. The only difference here would be the white would be my usual 1 half circle + 2 quarter circles, but the yellow gingham would need two half circles (to allow for the split at the front).
For this, I quickly cut the waist radius at 4.5″ and the hem radius to 33.5″ (as usual, see this post for a more detailed tutorial on circle skirts and the wonderful world of geometry behind them!).


I quickly repeated this for the white – but splitting the second half circle into two quarters, allowing me to have side seams but an opening for a zipper at the back. I quickly sewed up the side seams and set the skirts to the side for now….


With the skirt complete, there was no avoiding the hard part any longer. It was time to tackle the bodice. Bodices can be quite tricky, and I knew this one would be particularly challenging. However, another benefit of making a toile is it gives you a trial run for odd techniques that may arise in your sewing.
I started by cutting out my pattern pieces for the bodice overlay and underlay (one set each for the dress and the lining), careful to transfer marks for darts and buttons. As above, this meant the underlay was cut on the fold (and was a single piece), but I added a back seam to the bodice overlay (where the zipper would go). I also cut out the facings for both bodice pieces using medium-weight interfacing.


Once cut, I set to work putting in all of the darts. I will warn you, this pattern has a LOT of darting. I’ve always struggled with darts, but learned a great hack recently from the lovely Sewanista that has changed my dart game for good.
On my sewing table, I took painter’s tape and made two lanes on either side of the foot, leading up to my needle. This effectively gave me straight lanes to follow from the base to the tip of the dart, and helped keep me from curving just at the end to meet the end of my dart.


With this handy new trick, I zipped through my darts in record time, tied off the loose threads at the tip, and pressed them all flat and towards the center. It’s amazing how these small tricks can make a world of difference in sewing methods that have given me trouble in the past…


Once my darts were in place, I also pressed my facings onto the wrong side of the bodice under- and overlay for stabilization.


I repeated these steps for the lining for both pieces and, with right sides together, stitched lining to front, turning them to the front and pressing. To make sure things were looking as expected, I checked the Bodice Underlay and Overlay on my dress dorm and was relieved to see that so far, so good…


The pattern then instructs you to stitch together the Bodice Overlay and Underlay at the shoulders – this will essentially make the bodice one piece that will look like a super hero with wings. Keeping the linings out of the way, I stitched the shoulder seams at 5/8″. I then pressed under the lining seam allowance at the shoulders, pinning them in place, which I would hand stitch closed at the end.


After trying it on and making minor adjustments to placement, I needed to add my buttonholes next – although they would simply be decorative, I still wanted to have the holes and button detail for a bit of added pizazz.
I measured and marked out the distance for each buttonhole, and carefully added each one using my buttonhole setting on Bernina. I carefully snipped open the center, and my soon-to-be faux buttonholes would be ready for the soon-to-be faux buttons!


The next step required a full deviation from the original pattern – I wanted to topstitch the bodice overlay to the underlay all the way to the underarms. This would keep everything in place, and not rely on buttons straining to get the required fit.
For this step, I pinned the bodice onto myself, matching up my markings. Once I was absolutely sure the pieces were where I wanted them, I carefully stitched a 3/8″ seam up each side of the overlay petal, securing the overlay and underlay together.


At this stage, I also decided to sew on my faux buttons – which I found at Best Value Buttons. I wanted to stitch them to the bodice underlay but not the lining. Working one button at a time, I brought my needle up through the underlay fabric and through the buttonhole, looped it through the shank at the button back, and down through the buttonhole again.
I repeated this several times for each button until it felt secure, and then did this for each of my buttonholes. Voila! The cute effect of buttons without any pulling.


Although it seems like forever ago now, remember that early on in this process, I had modified the original pattern from a sheath underlay dress with a circle skirt overlay, to a two-layered circle skirt. I would keep the slit at the front of the yellow gingham layer, allowing the white to peak through when I walked.
So, I took my two half circles of gingham fabric and pressed the front edge of both of my gingham half circles under 5/8″ and topstitched. This would essentially be the front of the dress. I left the back edges raw (which would eventually be stitched up into my zipper).


I also quickly sewed together the side seams of my white circle skirt, creating a full circle underlay (also open at the back for now). I basted the gingham overlay onto the white underlay at the waist, meeting the two half circles at the center front.


Next up came attaching the bodice to the skirt. The best advice I can say at this stage is to pin from the center front first, matching up where the bodice petals meet to where the half circles of the skirt meet. Once they matched, I pinned outwards from center front towards the back, and stitched them together at 5/8″ (keeping the lining out of the way).


The time has come to face my enemy: The zipper. But, after watching Gertie’s Zipper Tutorial, I have to say I find them to be a whole lot easier that they were before (it’s all about the order of pinning. Mind. Blown). I quickly stitched up the back seam of my circle skirt, and pressed my 22″ dress zip.
Using my zipper foot, I inserted the zipper as a simple lapped zip, and was pretty amazed at myself for getting it in on the first try.


Last came finishes – hemming the dress and closing up the lining (and all of my stitches) with a slip stitch to secure my bodice lining to the seam allowance. I pressed in one of my custom labels and was pretty darned proud of how this cutie turned out….


Given the current state of the world, I knew that when this beauty made her debut, we would very likely be continuing to battle the pandemic. So, I naturally had to make a matching face mask out of the leftover fabric.
I’ve used a fairly simply tutorial for this (which you can see in detail here). I cut a simple trapezoid shape out of my fabric (8.25″ at the top, 7.25″ at the bottom, and 7.5″ high), interfacing the gingham piece.


W ith wrong sides together, I sewed the top and bottom seams, turned to the right side and pressed. Then, I stitched three parallel rows of stitches across the mask, and pressed them into pleats.
Using a handy hack a friend of mine suggested, I sewed in paper fasteners as a makeshift nose plate, allowing me to mold the mask around my nose. For ear loops, I went back to my childhood and sewed in two loom loops (remember those things??), covering both sides with bias strips (2.25″ x 8.5″) to keep it all in place.


Even though I was a bit intimidated, I was really happy with how the changes to this pattern turned out. As is true of all projects, if I were to make it again I would probably make a few minor adjustments. In particular, I would have added more cup room in the bodice underlay. But, all in all, given how well this one turned out, I can guarantee this won’t be my last pattern adjustment.
Actually…considering how much isolation we’re experiencing, it probably won’t be my last pattern adjustment this month…
The Debut


To be creative
is to let little pieces
of your heart go
and place them
into each project you make


This has definitely been an odd week – struggling to stay motivated and trying to push through this odd new version of normal. I guess it’s no surprise I’m clinging more and more tightly to my sewing projects. It certainly doesn’t take a Psych degree to realize I am embracing things I can control, when everything else in the world feels like a big bowl of chaos soup. Because with each new stitch, each new pressed seam, I can feel myself breathing in the calm.
The truth is, no one has any sort of control right now (sharp intake of breath by my fellow control freaks out there! I feel you). We can’t change the world as easily as we can change a pattern. But, much like a sewing project, sometimes the only way through is to take a deep breath and move forward, one stitch at a time. And accept that life will always be a mix of success and setbacks, no matter what you’re working on or what pandemic you’ve found yourself smack on the middle of.
Don’t worry. We’ve got this. And when you don’t, just keep sewing….
xoxo
Construction Details:
Dress: Modified from Butterick B6211
Underdress fabric: Robert Kaufman White Kona Cotton
Overdress fabric: Yellow Cotton Gingham
6 x 1″ white covered buttons from Best Value Buttons
Additional notions (zipper, thread): Joann’s
Outfit Details:
Dress: Made by me!
Belt: Alannah Hill (similar)
Necklace: Swarovski
Gloves: c/o The Dress Form (similar)
Handbag: Gift, Slyfield & Sime (similar here & here)
Shoes: Betsey Johnson
.
instagram // twitter // facebook // pinterest
.
Any items marked with a “c/o” (courtesy of) a retailer mean I was provided with an item for free in exchange for a review and/or feature on my blog. I always provide my honest opinion of any item I’m reviewing, regardless of whether it was sent to me as a courtesy item or if I purchased it myself. In addition, this post may contain affiliate links. This means that if you click and/or make a purchase through certain links or ads on this site, I may make a commission from that click and/or purchase at no cost to you, which helps with the day-to-day running costs of my blog.