
I’m sure we’ve all had the experience of seeing a piece that is just so perfect in its simplicity. One that stands tall and proud without all of the bells and whistles of print and sparkle. Now, as someone who is all about the extra, it takes a garment that is truly exquisite for all that it’s not to catch my eye. But such was the case when I spotted the most spectacular vintage Lanvin skirt….
If you’ve been following the blog for awhile (or, let’s be honest, even if this is your first visit), it won’t take a discerning eye to notice I am all about the color, the pattern, the shine. Border prints and prong set rhinestones are my jam. I made a light-up Christmas skirt for the holidays and rock it proudly. So, is it even possible for me to go monochrome? Read on….


The Inspiration
I was browsing one of my vintage favorites many moons ago, Crush Vintage. Several pieces had been listed, each more whimsical than the last. But, the one that caught my eye was the most perfect 1970’s skirt by designer Lanvin – all curves and edges in a stark black and white, which almost looked like waves crashing around her hem.
Unfortunately, by the time I checked the budget and came back, she had been scooped up by another discerning vintage huntress. Just as well, as the 24.5″ waist of the original was never gonna happen. But, by now you can imagine where this is going….

Photo via: Crush Vintage
The Design
For this piece, I knew I wanted to steer a bit away from my normal Kona Cotton or Felt base. I decided to go with a cotton twill – if you’ve never heard of twill before, it has a very tight weave (and has what appears to be diagonal lines on the fabric face). The end result is a thicker, sturdier fabric that I thought would hold the double layered weight well.
I found the perfect 60″ 100% cotton twill from APC Fabrics on Etsy. I opted for 4 yards of the black and 4 yards of the white – which I would layer to create the wave effect in the original vintage skirt.

To recreate this skirt, you will need:

The Construction
With the fabric in hand, I soldiered on to see if I could approximate the stark black and white Lanvin perfection. To do this, I would need to cut out two circle skirts – one out of the black and one out of the white drill, which I could then stitch together.
So, I drafted two circle skirts to my waist circumference (4.5″ radius = 28″ finished waist) and my ideal hem length of 28.5″ (30″ + 4.5″ = 34.5″ outer radius, including a 0.5″ waist and 1″ hem allowance). Because I hate side zips, I cut out one half circle and two quarter circles out of each color.


Then, I stitched each set up at the side seams and up the back seam, leaving a 9″ gap for the zipper. If you aren’t as familiar with the geometry behind making a circle skirt, check out this post for a more detailed walk through. I ended up with one perfect circle skirt out of the black twill, and one out of the white.


To get the wave effect, I knew I would need to layer the two circles on top of each other and effectively “cut out” the design. I started by matching the side seams of the two fabrics, and layered the black circle on top of the white. Once everything was in alignment, I pinned them together.


Once they were pinned, I turned to my trusty chalk wheel. This is one of my favorite tools when I’m drawing a pattern on a skirt. Chalk is ideal because if you make a mistake, you can just brush it away. To keep things reasonably symmetrical, I made markings 14″ and 5″ from the hem of my skirt – this would (roughly) represent the crest and trough of the waves.
If you don’t do this step, things can very quickly go awry as you move around the circumference, and you might be left with an off-balance pattern.


With my marks in place and an eye on a photo of the original for guidance, I used my chalk wheel and started to draw organic shapes. I tried to keep things even, but random…with some larger waves and some smaller, swooping and crashing around the hem.


After every quarter of the skirt or so, I would step back and check the print (luckily the white chalk really stood out on the black). After a few minor adjustments, I was pretty happy with it. Off to the sewing machine!

I‘m not really sure of the “right” way to do this (if there even is such a thing), but I decided to sew my two layers of twill together over the lines I had drawn using a tight zig zag stitch. This has two benefits:
- It secures my two layers together and
- A zig zag stitch naturally prevents fabric fraying, which will become important when I cut away parts of the fabric.

Following my chalk lines, I worked slowly around the hem with a zig zag stitch. I recommend keeping the needle down as you go – on tight curves, you sometimes want to pivot the fabric slightly (it can be hard to navigate around the tip of the wave). Once, I got the hang of it, this part went reasonably quickly.
Mr. Dressed kindly installed a tv in my sewing room, so I now get to binge on the Great British Baking Show while I sew. It definitely makes tasks like these zip by!


At this stage, I had a two layered skirt, with the black over the white. This means that if I cut away any of the black, I’ll reveal white twill below. So, starting up from the hem, I cut up vertically as close as I could to the zig zag stitch as possible, without cutting the stitches.


Then, working in sections, I cut carefully along the edge of the stitch line, working slowly around the curved edges with my scissors as close to the stitch line as possible. I cut away sections of the black fabric, ultimately creating a wave pattern in the negative space.
I would advise using really sharp scissors here: ragged edges are very hard to hide when you’re working with such a stark contrast.


After the first pass, I cleaned up any ragged edges as carefully as possible (I found sharp nail scissors to be really useful here!). Then, even though the zig-zag stitch would prevent fraying, I worked around the entire cut edge with Fray Check as an extra precaution.


Next up: the hem. To keep things simple, I went with a simple rolled hem here. I pressed up the white edge 1/2″, and the rolled it a second time, stitching it down with white thread on my machine.


I was pretty excited at this point to see it start to come together. And we’d reached the final stretch: a zipper and a waistband. I went with a 9″ back lapped here (as usual, I always recommend watching Gertie’s zipper tutorial to get up to speed on how to put one of these babies in). I sewed the lining to the skirt first, and then quickly got the zipper in place.


Moving onto the waistband, I cut two long 3″ x 32″ rectangles out of the black cotton twill. I backed one piece with interfacing and stitched the waistband and waistband lining together, pressing the seam flat.


With right sides together, I sewed the waistband to the skirt and the lining, and then pressed it upwards. I then secured the waistband lining to the inside of the skirt with a slipstitch.


Then, for the piece de la resistance, I added a clasp on the waist tab and carefully pressed in my custom (GLITTER) labels from Heart of Wonder. I get such a dopamine burst at this stage in the process, because it means another project is complete!


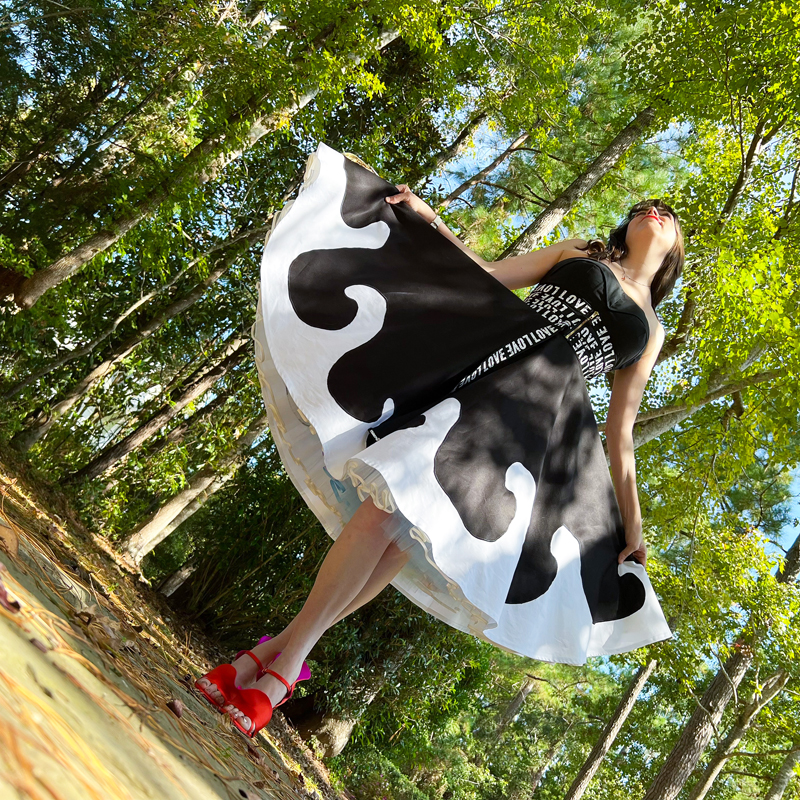
As I love to do, I put the finished piece on my dress form and got to admire her over the next week every time I went upstairs. I have to say, for a girl who loves color, this was a rapid departure for me. This skirt sat in such stark contrast to the rest of my wardrobe. But, this project serves as a good reminder that change is good.


The Debut
I think it’s good to push yourself outside of the norm every once in awhile…even if it’s something simple. Try a food you’ve always been a bit wary of, venture to an outdoor cafe and have lunch on your own, introduce a bit of black and white into a wardrobe bursting with color. You just never know where it may lead…


Black and white creates a strange dreamscape that color never can.
Jack Antonoff


Shortly after I finished this skirt, I was working with a production team who wanted to feature some of my research in a documentary. Among many of the varied details that would go into the shoot, one aspect was to avoid busy prints and lots of color. Rustling through my wardrobe that evening, I lamented to no one in particular: My closet is chock full of print and severely lacking in solids. What can I say? I’m just a gal who loves prints.
But then I walked into my sewing room. And there she was. So perfect in her two-toned simplicity. Not clamoring for attention, but certainly not fading into the background. And she looked ready for her close-up.
So, if you want to see this skirt in action – keep an eye on Shark Week 2022!
xoxo
Construction Details:
Skirt: self-drafted
Fabric : 4 yards each of cotton drill in white and black from APC Fabrics
Additional notions (zipper, thread): JoAnn’s
Outfit Details:
Bustier: c/o Alexandra of California
Skirt: Made by me!
Belt: Kew Craft Design
Handbag: gift (similar)
Shoes: Sophia Webster (similar here & here)
Lip Color: Rogue Red
.
instagram // twitter // facebook // pinterest
.
Any items marked with a “c/o” (courtesy of) a retailer mean I was provided with an item for free in exchange for a review and/or feature on my blog. I always provide my honest opinion of any item I’m reviewing, regardless of whether it was sent to me as a courtesy item or if I purchased it myself. In addition, this post may contain affiliate links. This means that if you click and/or make a purchase through certain links or ads on this site, I may make a commission from that click and/or purchase at no cost to you, which helps with the day-to-day running costs of my blog.