
You know when you see someone – either while scrolling IG or walking past you in the street – and they’re wearing something that stops you in your tracks? Where you can almost feel yourself start to salivate and it’s taking everything in your being not to chase them down and demand to know where they got it? I mean, I’m sure we’ve all experienced that special sartorial greener-pastures lust, where you truly believe for a minute that life would be perfect if only you could find that garment. Yeah well, what happens if the woman in question you’ve walked past who was wearing something that made you do a double take is Barbie….?
I have been feeling seriously emboldened this past year, adding more and more ambitious projects to my To Do list and (miraculously as far as I’m concerned) having them turn out well enough to be worn with pride. I’ve definitely been staying safe in my circle skirt appliqué bubble (getting pretty ambitious within that bubble, for sure). Let’s be honest, everything north of the waist has all sorts of curves and valleys that presents a bit more of a fit challenge. But, I decided it was time to dabble in something slightly more challenging and bring a dress I only spied in photos to life…


The Inspiration
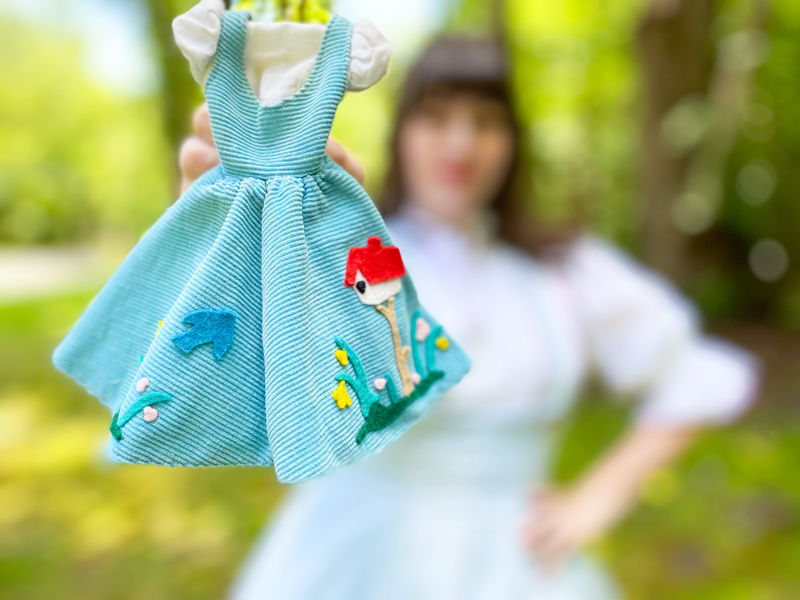
While scrolling around Pinterest one afternoon, I came across a photo of an original 1960’s Barbie. She was wearing the cutest corduroy jumper, dotted with flowers and a bird swooping towards a birdhouse. I was completely smitten with the appliqué (natch), but absolutely loved to see it on something other than a simple circle skirt.


A bit of digging and I found ads for the original (as well as her male counterpart, sold separately). The ensemble was released from 1960-1964 by Mattel and is called “Friday Nite Date.” The set came complete with a corduroy jumper and a white puff sleeves underdress. If you were lucky enough to snag the whole set, she also came with a black tray and filled glasses, which look to me to be root beer floats (for sipping through a straw and staring deeply into your plastic beau’s eyes).


I managed to track down one of the original dresses on eBay and it was every bit as cute as it appeared in the ad photos. I guess it should come as no surprise that one of Toyland’s most fashionable ladies also has a penchant for appliqué. But, I saw no reason why she should have all the fun.
There was only one thing for it – to the sewing machine!

The Design
The first step for recreating this was to find the right pattern. I wanted to stick with the high-waisted suspender skirt. I found several that could be viable options, but then I spotted Simplicity 1733 and it was perfect – gored skirt, high waist, with suspender straps. I was only able to find a copy of it in a 26″ waist, but I knew I could easily grade up the pattern.


P attern in hand, next up was the fabric. For this, I decided to go on the hunt for a fine-wale corduroy. I sort of loved the idea of using a somewhat industrial fabric for something so girly. But, keeping the wale really small would mean the skirt would still have movement and drape. I found a beautiful sky blue corduroy at Field of Fabrics (size 21 wale); before you could say, “do you take Visa?” the fabric was bought and 5 yards were on their way to me…

W hile I waited for the fabric and the pattern to arrive, I got my applique materials together, which would be a wool blend felt. Luckily, having made so many applique pieces of late, I knew immediately where to turn: BBD Supplies.
The design would have daffodils and tulips growing from some greenery, with a birdhouse to complete the look. After hemming and hawing over my swatch card for the right complimentary colors, I opted for felt in baby pink, cotton candy, old gold, and yellow for the flowers, evergreen and kelly green for the grass and stems, and bright red, champagne, and black for the birdhouse and other details.


With my materials set, it was time to get sewing! If you feel a similar hankering to bring Barbie into your closet, you will need:

The Construction
Even through I can make circle skirts in my sleep at this point, it would be a nice departure to tackle a paneled skirt. Plus, having to grade this one up would flex some of my pattern drafting skills. So, I grabbed the pattern pieces, making sure each one was present and accounted for, and brought out my trusty roll of butcher paper.


With making changes to any pattern (but especially vintage patterns), I always start by tracing the original patterns and adjusting my traced pattern (to keep the original in tact).


The skirt itself consists of 8 panels (ie, 16 seams), and I needed an extra 2″ at the waist – so, with an existing waist of 26″, I needed to add 1/4″ to one side of each panel (8 * 1/4 = 2). I also added a bit of length to the bodice (tall girl problems) and we were ready to rock!
To make life easier for myself, I decided to just grade up the upper part of each pattern – the skirt portion of the gore was pretty much the same across all pieces, so could save myself a ton of time (and butcher paper) and just include the full length on one pattern piece, which I would then use as the base for all of the others.


Once I had the patterns set and ready to go, I got to work cutting out each of the panels. I also cut out the matching facing and interfacing to give a bit of xtra structure to the waist part of the skirt.


Now that everything was cut out, I sewed in the darts and stitched each of the 8 panels together one by one, leaving the back seam open for the inevitable zipper and leaving a gap between the two dots for the buttons (which would be added later).


I was so excited to see it start to take shape! But, I put it on the dress form and….errr….it just wasn’t full enough. I’m sure a mere mortal would look at it and see a full skirt. But I am no mere mortal and if I can’t fit at least two crinolines under there, it’s just never going to make me happy.
I’m definitely one of those people who can get tricked from the photo on the pattern envelope, which looked like the full, flouncy skirt of my dreams. Once she was stitched together, I realized that the reality was actually less than a half circle. Well, that simply wouldn’t do…

Because I had already drafted up the waist, I needed a way to make the skirt fuller without adding any inches to the waist. I decided the only option was to add in some gussets to the seams. A gusset is basically a panel of fabric added to a seam to enlarge it. I would add a triangle, so the waist wouldn’t expand, but the hem would.


I cut out large triangular piece of fabric and opened up two of the side front seams. After reinforcing the seam at the top, I inserted the panels underneath and pinned them into place. I topstitched the panels into place, taking care not to let the fabric bunch.


I started by adding a gusset to two of the seams. I put her on my dress form…and she still wasn’t full enough! Back to the gusset drawing board, I added two more panels.
Yeah, you can see where this is going. Like Golydylocks, I was looking for a skirt that was just right for my two-crinoline minimum dreams. So, yet another set of gussets was added to two more of the seams. Basically I lathered, rinsed, and repeated until there were gussets in all of the seams.
Now we were getting somewhere! Finally, my crinolines had some room to swish and sway.


Now that we had a full enough skirt, I could get on with finishing the dress. This cutie needed a facing and suspender straps. I started by cutting out the straps, pressing it in half, and stitching closed two of the three sides.


Once stitched, I pulled out one of my favorite tools: it’s called a Quick Turn and is exactly what I need to turn through tricky straps. You push the plastic tube into the tube of fabric. Using the wooden dowel, you push against the sewn edge, flipping the fabric to the right. Then, press carefully flat. Instant straps! I pinned them in place and prepped the facing.


After attaching the interfacing, I sewed the facing pieces together at the side seams. I attached it to the base of the jumper, taking care to match dots and seams and secure the straps in place.


Then, I under stitched the facing and pressed the seams flat. If you’ve never under stitched, you basically press the seam allowance towards the facing, and stitch very close to the seam. This makes for a very clean seam edge when you press it down.


With everything together, I then add to add the button details to the suspender straps. I started by choosing my buttons: luckily, I had some large 1″ diameter tan buttons already in my stash.

Using my disappearing ink pen, I used the gaps in the waistband portion of the bodice and drew on button holes into the facing. I then sewed on buttonholes, opening the center with my seam ripper.


Then, I measured the right strap length for my height. Once I was happy with the fit, I matched up the buttonhole with the edge of my straps, and sewed the two buttons in place onto the straps. These would then go behind the waistband, with the button securing the straps in place through both the jumper and the facing.


Once they were stitched, I pushed the buttons though the button holes, securing the straps to the jumper. It was finally starting to take shape!

I wanted to finish off the jumper before going any further – which would require a zip and a hem. I started by putting in a 14″ white lapped zipper (see Gertie’s tutorial here if you struggle with zips. You’ll than me later).


With the zip in place, I pressed up the hem allowance and quickly stitched it in place with a blind hem stitch. This was the only time I grumbled to myself about how full I made the skirt. My blind hems take FOREVER. But, with the base dress complete, I could get down to some serious applique!


There is nothing better to me than laying out a blank canvas of fabric and getting to flex my creative muscles. When I put the jumper on the floor, I saw only possibilities.

I decided to start with the base greenery, out of the evergreen felt. Keeping the Barbie dress close to follow the shapes, I drew out the greenery with my trusty chalk wheel (which is great for this, because you can brush away lines if you make a mistake or want to adjust things slightly).


I cut out the left and right base greenery with my rotary cutter, and put them into place on the jumper. They would be the foundation I would then build the two vignettes from.


Working on the right vignette first, the next steps were to design and cut the birdhouse and flowers. I started with the branch that the birdhouse would rest upon, from champagne felt. For the next few steps, my trusty Cricut would be doing a lot of the heavy lifting…


I then worked on the birdhouse. For this, I deviated slightly from the original Barbie, making it with a bit more dimension. I had some scraps of felt in my stash, and cut the house out of a mix of silver grey and linen felt, with a red roof and some extra glam edging out of red metallic felt. I also cut out a bird door of the black felt, which I sat atop the tree.


I turned my attention to the flowers next, starting with the stems. Working from the original dress, I mimics the shapes out of the Kelly green felt and set them in place – with 4 total on the right side.


Then, flower time! From the dress, they looked like a mix daffodils and tulips to me. So, I took a bit of poetic license here and decided to run with it. I wanted to make them out of a mix of light and dark yellow and light and dark pink.
Starting with the daffodils first, I found the perfect shape in Design Space (cut file #MD72998).


Then, I cut the buds/tulips out of the same two-tone felt, with a mix of the pink and yellow versions to play with. I kept the darker color at the back, with the lighter of the two colors layered on top.


Pretty thrilled with how the right vignette turned out, I followed the same steps for the left, starting with the stems and then adding in the flowers, keeping the colors random, but balanced.


Now that everything was in the right place, I had to get through the parts of the appliqué that would need glueing, before I would sew it all on. For this I use my favorite fabric glue Aleene’s Fabric Fusion, and set to work putting the daffodil and tulip pieces together.


After the flowers were glued, I set them aside and turned my attention to the birdhouse. This was made up of a few more elements, but I worked one piece at a time, working from the back forwards and building up the 3-dimensionality.


With all of the major greenery where I needed them to be, and the flowers drying, it was time to start appliqué! This is the part of the process I find so therapeutic. It requires next to no thought, and just the rhythmic up and down of a needle as you bring a new piece to life.
I put the jumper up on my dress form to confirm the placement of the pieces, and we were off!


There are many different ways to appliqué – my personal preference is to keep the stitches as invisible as possible. For this, I like to use tight, tiny backstitches. You essentially bring your needle up through the fabric and felt, quite close to the edge of the felt. Then, bring the needle back down just behind your original stitch. Then, continue this around the perimeter of the piece.


Once I completed the greenery, I repeated the process for the tree using a matching tan thread. I worked my way around the branch’s perimeter until it was secure.


Now that the base was secure and the glue was dry, I could add the color back into the scene. I put all of the flowers back in their places, and worked my way from bud to bud, stitching them in place.


I followed the same procedure with the birdhouse, using a matching red thread and stitching all around the perimeter. Becuase the major elements were glued in place, I could keep the stitching to the edges, which looked a lot cleaner.


The original Barbie dress also had a turquoise bird flying off from the left vignette (probably heading homeward to her bird condo after a long day in v-formation). So, after playing with a couple of different bird shaped options, I settled for a flying bird in blue bayou, with linen and cinnamon accents in wool blend felt (which I had in my collection).
I sewed the bird in place, and stepped back to admire my handwork…


At this stage, one might think I was done. I had done what I set out to do, which was to recreate the Barbie jumper down to a T. But…we’ve met right??
The big blank space on the back was bothering me a bit… and I had an idea on how to jazz it up.

In keeping with the theme, I decided to have a flock of birds zooming across the back, on their way to a bird party hosted in the birdhouse on the front. I found a series of birds in Cricut Design Space, which I cut out of black felt (with a few out of the blue bayou to match the bird on the front).

I placed the birds in an arc, flying upwards from the hem, curving around the back and up over the left hip. I kept the line low so that I would be able to sit and not damage the birds.


Once they were in place, I checked how they would look when worn by putting it up on my dress form. I made a few minor tweaks, and then got to work securing them in place.

Because there were so many detailed edges, I decided to go with fabric glue over hand-sewing for these. Turning back to my favorite fabric glue, I worked one bird at a time and glued each piece in place.


And just like that, Barbie was brought to life! I loved the jumper style and the mix of colors. And I was pretty thrilled with the extra oomph I brought to the back with my flock of birds, heading off towards the horizon.


The Debut
Birds have always represented freedom for me. The freedom to take to the skies and fly off towards new adventures, with the past getting smaller and smaller in aerial view. I guess it’s no surprise I’m sewing garments inspired by freedom lately, given that my birdcage currently extends to the edge of our property line thanks to the current state of the pandemic. But, I’m keeping my wings flexed and ready. Because the skies are calling me home…


She decided to free herself,
dance into the wind,
create a new language.
And birds fluttered around her,
writing “yes” in the sky.
Monique Duval


I‘m now a couple of week’s into the semester, and things are going pretty much as you would expect. A bunch of 18-20 year olds in dorm rooms after feeling locked up for about a year? Yeah…definitely a recipe for good decisions. Our case numbers are climbing and I am preparing myself to be fully online for the rest of the semester.
If I’m being honest, I’ve been feeling a bit doll-like lately, going through the motions while others pull the strings. I know we are all dealing with various degrees of isolation-stress, Zoom fatigue, and a lack of control in the middle of a seemingly never-ending pandemic, but I am more emotionally spent than I ever thought possible. I would appreciate someone moving my arms and legs forward, because it’s getting harder and harder to move my own towards yet another Groundhog Day-esque oblivion.
I guess I’m just a Barbie girl, in a Barbie world….
xoxo
Construction Details:
Pattern (modified): Simplicity 1733
Jumper fabric : 4 yards of glacier blue size 21 corduroy from Field of Fabrics
Appliqué: Felt from BBD Supplies
Shapes cut on my Cricut Maker
Additional notions (zipper, thread): JoAnn’s
Outfit Details:
Top: Vita Vintage Store (similar here & here)
Suspender skirt: Made by me!
Handbag: Guess, sold out (similar)
Shoes: Miz Mooz (similar here & here)
.
instagram // twitter // facebook // pinterest
.
Any items marked with a “c/o” (courtesy of) a retailer mean I was provided with an item for free in exchange for a review and/or feature on my blog. I always provide my honest opinion of any item I’m reviewing, regardless of whether it was sent to me as a courtesy item or if I purchased it myself. In addition, this post may contain affiliate links. This means that if you click and/or make a purchase through certain links or ads on this site, I may make a commission from that click and/or purchase at no cost to you, which helps with the day-to-day running costs of my blog.