
I know for most of us, 2021 was a bit of a dumpster fire. It can be a relief when that calendar flips to the next year, feeling as if we are shaking off all that’s happened and moving forward, refreshed into a new year’s renaissance. But, even as I took that step forward, I did so with some trepidation for what 2022 might bring. After all, they say you should stay with the devil you know…
No matter how hard 2021 was (and what fresh horrors 2022 may bring), there will always be things to look forward to. A quiet stroll through my neighborhood. A Valentine’s Day dinner with my beloved. For me, this also means shaking off the cobwebs and cooking up new sewing projects. I’ve had quite a few ideas on the back burner for awhile – some half-started, some in a bizarre nebulous idea form. But, it just takes that moment when inspiration strikes, and we’re off to the races again.


The Inspiration
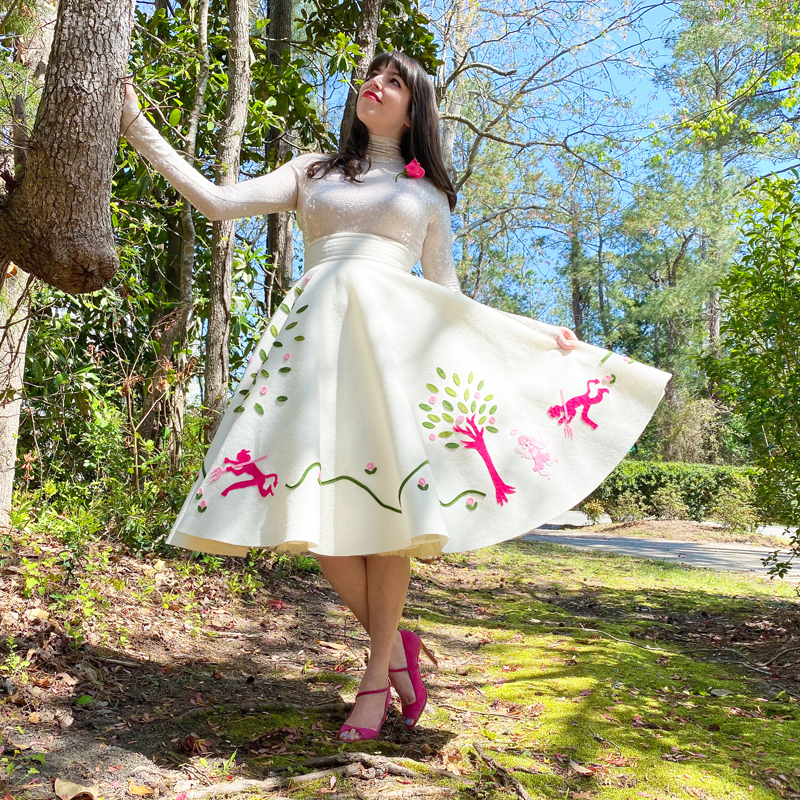
Awhile back, I spotted a photo on BWV Pinterest of a Juli Lynne Charlot piece. This wasn’t like any JLC I’d seen before – it told a story around the hem, of a wily devil chasing Cupid. Round and round they went, with Cupid diving behind trees and losing his halo in the process. Then, the story concludes with Cupid having the last laugh, chasing the devil back from whence he came.
I was so charmed by it – the story, the color scheme. I squirreled it away in the back of my mind (and on my “I Dream of Vintage” Pinterest Board), until the lovely Amy (my fellow appliqué Queen) decided to make one of her own. Her creation completely reinvigorated my intrigue with the piece, which I thought would make the perfect skirt for Valentine’s Day.

As with the McCall’s #1541 skirt, Amy generously shared the pattern pieces she used to create her characters – even going so far as to mail them around the globe and tuck some UK chocolates into the parcel. I can’t even tell you how lovely it is to have someone who shares my passion for recreating these amazing pieces – she saved me HOURS of time zooming in and squinting at the original, trying to get the shapes right.

The Design
So, with Amy’s patterns in hand, I set to work gathering all of my materials and finding my ideal color scheme. I wanted to stick true to the original, in pinks and greens on a cream background, but knew I had to get the right pinks and greens.
For the base, I went to an old standby: the Felt Store. I’ve found, particularly for my lighter color bases, I prefer to use 100% wool felt (you can see my Bees Knees and Falling Leaves skirts). Although you don’t get the bevy of color choices as you do with wool blend felt, it is a bit thicker and therefore a bit less see-through (and more robust to handle my regular twirling).
Because I didn’t want a bright white, nor a yellow-tinted cream, their “natural” shade was perfect – a lovely, soft white with a decent thickness that would hold its shape beautifully.


For the applique pieces, I turned to another old standby: BBD Supplies. Their wool blend felt is amazing and, having long ago purchased their swatch card, I knew there would be no guesswork when it came to finalizing my color scheme. I went with wool blend felt in grassy meadows and moss for the leaves and stems, and pink sweetness, cotton candy, and peony for the flowers, trees, and characters.


Then, because Amy had so kindly sent me the pattern pieces, I was able to quickly snap photos of them and import them as .svgs into Design Space (which is the software Cricut uses to cut shapes). With all of the elements in place, before you could say “The Devil Wears Prada,” another skirt was underway!

Have a hankering to recreate your own Angel & Devil skirt? You will need:

The Construction
All sewing projects start the same: with a base. For me, this is usually a circle skirt onto which I shall lavishly pile all of my appliqué. I quickly drafted a circle skirt to to my waist circumference (4.5″ radius = 28″ finished waist) and my ideal hem length (28″ + 4.5″ = 32.5″ outer radius).
Using those measurements, I cut out one half circle and two quarter circles out of the cream felt and stitched them up at the side seams and up the back seam, leaving a 9″ gap for the zipper. If you aren’t as familiar with the geometry behind making a circle skirt, check out this post for a more detailed walk through.


With the circle skirt done, it was time to put Cricut to work. As I have waxed poetic about so many times, I am really in love with this little machine. It still blows my mind that I used to cut all of my appliqué elements by hand – now, with a few clicks of a mouse, Cricut cuts it all out for me while I recaffeinate. It really is a wonderful relationship… (is there any day better then Valentine’s Day to celebrate it?)

Working one color at a time, Cricut merrily made short work out of the shapes I needed – which amounted to three vignettes that would dot around the hem, joined together with a green vine and a scattering of flowers. Starting with the pink shades, I got my trees, flowers, Cupids, and devils cut and ready.


Then, I loaded up the greens – these would be for the leaves of the tree and flowers, providing a perfect contrast to all of that pink. Going from the original (and photos Amy sent me), I would need about 30 flower bases and about 50 leaves in moss and grassy meadows.


With all of the elements on hand, I turned to building up the skirt. I decided to start with the trees, which would really set the scene for each vignette and ultimately be the three pieces that would ground the rest of the design. I didn’t want them to be perfectly equidistant from each other – but I wanted to create a balance.


Once the tree placement felt organic, I turned my attention to the green vines that would connect each scene to the next. For this, I cut several long 1/4″ strips of the grassy meadows felt using my rotary cutter. For this, I kind of just eyeballed it – you don’t have to stress about being too precise.


Once I had a decent amount of yardage, I worked my way around the hem, curving and swooping the vine from tree to tree. In a weird way, the shape of the green vines felt almost like music, as if I was adding a soundtrack that the Cupid and Devil were twirling their escape dance to.


With these grounding elements in place, I hung it on my dress form to be sure I was happy with how everything was laying. Then, because curves love to wiggle and move and get jostled out of place (despite all of the pins in the world), I wanted to stitch down the vines before going any further. I machine sewed these down, working carefully around the curves.


With hatches battened and vines secure, I started to build the scenes. Starting with each of the devils in their vignette, I put each of the three in their proper places, either at the trailing edge of the vine or starting one off.


The next part of the scene would take a bit more work – the Cupids were all a bit more detailed than their devilish counterparts. Each one needed to be constructed out of multiple components, which were currently a tangle of felt arms, legs, wings, and clothing. Armed with my trusty favorite fabric glue, I set to work putting these angels together…


For each angel, I started with the base figure, and worked with one element at a time. I would add the glue and press the item carefully into place, adding wings, hair, and smaller details.


One Cupid got a special finishing touch, as for her extra feature I added a horn for when she gets her revenge. It ends up being one of my favorite parts of the scene: to show she may be an angel, but is Not To Be Messed with.


I repeated the process for the second Cupid, who was mid-jog, almost as if she was about to take flight. Working quickly with my fabric glue, she got her own floppy dress, bouncy curls, and was ready to rumble.


Something I found rather hilarious was the expression one of the Cupid’s had. Clearly early on, before she got sassy, Cupid was running her little halo off. To try to approximate an expression of utmost concern (not the easiest thing to do with felt, I assure you), I cut out tiny eyes with wide pupils, and a rather surprised looking mouth, which I hand-cut and glued into place.


As a finishing touch, I cut out a halo for each of the angels. This was just an oval of felt that I hand cut the center out of. Some would be worn, some would be lost, and some would be discarded in favor her her devilish side….


After the glue was dry, my angels were ready to be added to their respective scenes. I placed each one around the skirt, including the second vignette where she ducked behind a tree, out of sight….


Next up, each Devil (and one sassy Cupid) gets a pitch fork! For, you know, stabbing purposes. As I had already cut the shapes out on my Cricut, I only had to add them in place, ready to do their owner’s bidding.


With the vignettes done, it was time to add the details. For what is a garden chase, without a garden? These would be dotted along the green lines. So, I worked my way around the skirt, placing my leaves everywhere I planed to have a bud.


Then, each set of leaves got a bloom – out of the cotton candy felt, also cut on my Cricut. I scattered the flowers all around, giving a cheerful quality to a sinister chase scene. Once I was happy with them, I pinned it all in place.


So beginneth the appliqué! This would be a multi-step process, as I knew I wanted to use the act of sewing the flowers and leaves in place as an actually detail to the skirt. I had some spare pink sequins and beads in my stash, which I would use to attach each flower.


For each bloom, I would bring my needle up through the center and add a sequin. Then, I added a pink bead to my needle, to secure the sequin in place. I brought my needle down through the center of the sequin, taking care to catch a stitch of fabric. Then, I repeated the process for each bud, all the way around the skirt.


For the leaves, I wanted to use green thread to attach them, using long, visible stitches. This would give the appearance of a vein in the leaf, which was a feature of the original I loved. For each leaf, I brought the needle up at the outer tip of the leaf and down towards the center, repeating for the other side.


Then, it was time to get the trees, Cupid, and her fiendish friend secured to the skirt. For general applique, I like to use matching thread and secure each piece with tiny, tight backstitches (which makes them reasonably invisible). I started with the Cupids, using a light pink thread.


Next, I moved on to the Devils and the tree, which would use a darker pink thread. Starting with the Devils, I quickly worked my way around the perimeter of each shape. The best trick I have here is to keep the skirt as taut as possible – which keeps the appliqué from bunching.


Then, I attached each tree to the skirt. Because these had a lot of branches, it took a fair amount of time. But, I just love the detail hand-appliqué provides (though I use fabric glue when needed, I really prefer the look of hand-stitching)


Speaking of fabric glue, there are a few places where it really comes in handy! In particular, when you have tiny elements, hand stitching can actually damage them rather than affix them to your skirt. Case in point: my halos. So, I used fabric glue to secure these in place – both atop Cupid’s head, and hanging on a tree as she sailed passed….


While I was at a turning point in the skirt, where the end was in sight, there was still one rather large feature to add: leaves to the trees! I took my two-toned leaves, cut out of the grassy meadows and moss-hued felt, and added them to each tree, creating three full, healthy trees.


Then, I dotted a few flowers throughout the branches, giving the effect of a tree in bloom. It really helped to tie the pink and green together and kept things cohesive.


With one tree done, I moved on to the next two and repeated the process: adding a mix of the leaves, keeping the colors random but balanced, and finishing off with the pink flowers. I stepped back, made a few minor tweaks, and then pinned everything in place.


To sew the leaves and flowers in place, I used the same techniques that I had for the flowers dotted along the garden path. For the leaves, I used long stitches to create the “veins”, starting at the outer tip of the leaf, and bringing the needle down at the center.


Similarly, I used sequins and beads to secure each flower. As before, I brought the needle up through the center for the flower, added a sequin and a bead, and then brought my needle down slightly to the side of the thread. I worked my way from tree to tree, adding sparkle as I went.


And suddenly I was ready for the waistband! I cut two 4″ x 32″ strips out of my cream felt, and a matching strip out of medium-weight interfacing. I pressed the interfacing to the back of the felt to prevent distortion.


I sewed the waistband to the lining and pressed the seam allowance to the inside, and sewed along the edge of the seam, before pressing it flat.


Then, starting from the top of the waistband, I sewed parallel rows of stitching at 0.5″ inches apart. I’ve shared this trick before, but a good hack for keeping things straight is to tape a flat edged guide at the correct measurement (like a piece of cardboard or, in my case, my pack of sewing needles). Before I got to the last row of stitching, I stopped – so that I could attach the waistband to my skirt.


Before I could sew the waistband to the skirt, it was time to tackle The Zipper. Luckily, I’ve done so many of these over the last year that it went in with minimal issue. The main challenge here was just the bulkiness of the felt. But, going slowly, I was able to keep my stitches (mostly) straight.


Once the zip was in, I added the waistband to the skirt at a 5/8″ seam allowance. I then topstitched the final row of stitching, securing the lining to the waistband and completing the last of the 1/2″ parallel rows.

I spent the evening doing the finishes – I added two waist clasps and carefully pressed in my custom (GLITTER) labels from Heart of Wonder. When I put her on my dress form, she literally looked like a wink in skirt form, she was just that cheeky…


The Debut
Safe to say, I have been needing a bit of extra whimsy in my life these days, and this skirt fits the bill perfectly. A little bit sweet, a little bit sassy, with a wink that all of Juli Lynne Charlot skirts seem to share. As someone who appreciates her style with a side of quirk, I’m pretty sure I’ve found my annual Valentine’s Day outfit. (or, you know, Tuesday outfit…)


Better the devil you know
than the devil you don’t
Barchester Towers by Anthony Trollope, 1857


I know people have mixed feelings about Valentine’s Day, ranging from a full embrace to downright distain. I have definitely always been one to embrace the holiday, single or coupled up. I kind of like a day that reminds me to take a cue from Cupid and shoot a few love arrows too and fro. So, whether this is Valentine’s or Galentine’s or just another Monday for you, here’s sending some love out into the Universe.
Because life has gotten even crazier than usual, with grants and teaching and Monday evening meetings, Mr. Dressed and I have decided to push our celebration to the weekend (in marriage, you have the power to move time and defy modern calendars. It comes in handy). But, I can definitely say, regardless of the date, I will be filling this week with love and gratitude.
And just a dash of cheekiness…
xoxo
Construction Details:
Circle Skirt: Self-drafted
Skirt fabric : 100% wool felt from The Felt Store
Appliqué: Felt from BBD Supplies
Sequins: Amazon
Additional notions (zipper, thread): JoAnn’s
Outfit Details:
Top: Express (similar)
Skirt: Made by me!
Brooch: vintage (similar)
Handbag: gift, Looks Like Summer
Shoes: Versace, thrifted (similar here)
.
instagram // twitter // facebook // pinterest
.
Any items marked with a “c/o” (courtesy of) a retailer mean I was provided with an item for free in exchange for a review and/or feature on my blog. I always provide my honest opinion of any item I’m reviewing, regardless of whether it was sent to me as a courtesy item or if I purchased it myself. In addition, this post may contain affiliate links. This means that if you click and/or make a purchase through certain links or ads on this site, I may make a commission from that click and/or purchase at no cost to you, which helps with the day-to-day running costs of my blog.