
When I was young, my sister and I would go away to camp every summer for a week of morning calisthenics, capture the flag, and (to this day) some of the best food I’ve ever eaten (I think food just tastes better outdoors). This one summer, my sister was assigned to be counselor for the same cabin I was assigned to. And, while you might think chaos would ensue, I think it was one of the most magical weeks of camp I could ever remember. We had that perfect combination of people bunking up to our cabin, where everyone got along and we could be our truest selves. Those girls and I have long since drifted and I’m not sure where many of them are in their lives, but I think you could say “Cabin 5” to any one of us and we would smile in a way that only we would understand.
Something I remember so clearly was the songs we would bellow as we cavorted amongst the trees on the way to the shower room or tucked up together by the fire at night. One my sister taught us was a hilarious dance to the Archies “Sugar, Sugar,” where you sort of dance around like a deranged bumble bee and literally “pour a little sugar on it” from your imaginary jar of honey. I mean, you really haven’t lived unless you’ve been 15, shaking your stinger like a Bombus and singing at the top of your lungs with a group of girls who are feeling similarly unabashed, where you couldn’t imagine ever feeling that perfect sense of belonging again.


I‘m sure it’s the case for all of us, but I’m been missing my family like crazy in the last year. Because my family doesn’t live near us, with the pandemic blocking our path to travel, it’s been a long year of FaceTime. So, I’ve definitely found myself clinging to things that bring up those memories. Whether it’s lighting a pumpkin spiced candle that smells like my mom’s house, dusting off the blue horse my niece gave to Mr. Dressed (that holds a special place of honor in his office), or re-watching Buffy the Vampire Slayer and remembering my sister driving home from college once a week so we could watch together (and bawl our eyes out when Angel died. Still gets me…), I’ve found big and small ways to feel like they’re with me.
So, while going about my day with my iTunes on random, the first few bars of Sugar, Sugar started to play. And, without even realizing the motor memory that takes over my body sometimes, I did the full dance in my sewing room, shimmying and shaking like a deranged bumble bee in perfect precision with the music. And almost immediately afterwards, I sat down and sketched out this skirt. To pay homage to a golden summer when I felt free and ready to take on the world.

The Design
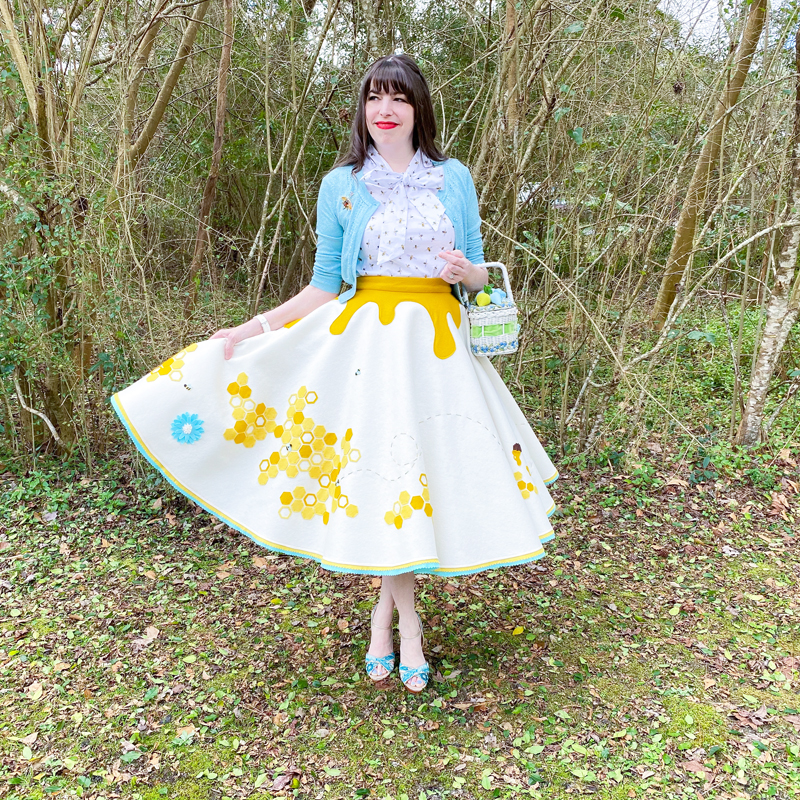
For this creation, I wanted a piece that felt whimsical, but also felt as if it were dripping in honey. Like you were capturing a moment in time, with bees scurrying to and fro. While I’ve been excited by the vintage pieces I’ve been able to recreate lately, I’ve been getting more and more excited about my original designs. Bringing something to life that once only existed in my head is definitely a COVID-earned skill that I plan to carry with me for a long time.
So, with my plan set, I need to first gather my materials. I knew I wanted the color story to be creams and yellow with a dash of turquoise. I also had some leftover water lilies from my lily pad skirt, which I planned to use and intersperse with some flowers I would make myself…

Because the base would be a cream felt, I opted for a 100% wool. I wanted it to be as opaque as possible, and 100% wool holds up really well to the wear and tear that I tend to put my wardrobe through.
I recently discovered The Felt Store for my Be Mine and Falling Leaves skirts. I also snagged swatches of all of their colors on my last order, and their cream shade was perfect – one the warmer side of white with a decent thickness that would keep my knickers from view.

For the accents, I turned to my very favorite Etsy shop for wool blend felt: BBD Supplies. From them, I scooped up 1 yard of wool blend felt in old gold (which I would use for the honey accents) and 1/2 yard in mellow yellow, cinnamon, and teddy bear brown for the honeycomb, beehive, and tree.


Now, with equipment in hand, all I needed to do was bring my vision to life. If you want to bring your own version to life, you will need:

The Construction
Ahhhh the beginning of a new sewing project always starts with fresh yardage and a good old fashioned finger flex. I quickly drafted a circle skirt to to my waist circumference (4.5″ radius = 28″ finished waist) and my ideal hem length (28″ + 4.5″ = 32.5″ outer radius).
Using those measurements, I cut out one half circle and two quarter circles out of the cream felt and stitched them up at the side seams and up the back seam, leaving a 9″ gap for the zipper. If you aren’t as familiar with the geometry behind making a circle skirt, check out this post for a more detailed walk through.


I got a little addicted to cool waistline details after the carousel skirt, and I had a vision for this piece to have a waist feature that would look as if honey were literally dripping down from it. I opted to create this out of the old gold felt – a deep yellow hue that wasn’t too bright.

I started with two 16″ x 36″ wide rectangles that I measured and cut a waistband out of (exactly as above – with a 4.5″ radius). I stitched the side seams of the rectangle together and then laid this over my cream base skirt, pinning it in place so it wouldn’t slide around.


Then, using my chalk wheel (you guys remember Burt, right??), I started to draw organic dripping shapes all around the perimeter. I wasn’t following any sort of design here and was sort of just going with it. I wanted some drips to be longer and some shorter, so it would look true to the honey I was trying to emulate.


One of the beauties of chalk is that, if you make a mistake, you can just brush it off and start again. So, once the chalk outlines looked how I wanted them, I cut out my shapes in one continuous piece, which would overlay onto the waist perfectly. Ahhhh I love when a plan comes together…


With the honey set, the next most important element was going to be my honeycomb. For this, I was going to build it out of a ton of hexagon shapes. I really love building large scenes out of tiny elements, and this would give me the freedom to just place shapes and see where it would take me.
As most of you know by now, my Cricut Maker is my favorite ever toy for these kinds of projects. She is particularly helpful when I have to cut out a million multiples of something (like about 800,000 hexagons perhaps?).


I decided to cut my hexagons out of two colors (old gold and mellow yellow) and in two sizes (1.5″ and 1″ diameter). I also opted to create some that were solid and some that were outlines to the hexagons, to give the honeycomb some additional dimension. I cut about 50 of each, knowing I could cut more later if needed.

Then, I just started playing with their placement, mixing and matching the colors. For the largest honeycomb, I stuck with the 1.5″ diameter hexagons and just placed them one at a time, letting the shapes sort of dictate where I would go with it. Every so often, I would step back and check it to make sure it didn’t look odd or misshapen.


Iwanted to have a large honeycomb element on one side, with smaller pieces at various places around the skirt. I built a few small honeycombs with my 1″ hexagons, adding some continuity to the design.
Once I was happy with how it was looking, I pinned each piece in place (which pretty much took up every pin I owned. Stock up if you plan to tackle this one people…)


Whenever I do a feature element on one side of a skirt, I like to do a second feature element on the back on the opposite side to sort of balance it out. This is where I decided I would have a beehive. To start with, I took some yardage of my Teddy Bear Brown felt, and designed a tree branch that my beehive would hang from. Cricut made quick work of this and cut it out in no time.


Then, I cut out some leaves out of the grassy meadows felt, which I placed on the tree. I wanted the branch to sort of be floating in space, to oddly ground my beehive and give those busy bees a home base to return to.


Once the branch was set, I designed my beehive. For this, I let Cricut cut out a series of ovals of varying sizes of the Cinnamon felt, from which I would build my 3D beehive, fat in the center and narrowing at the top and the base.


Then, to give the bees a way to get in and out, I cut out an oval out of the teddy bear brown felt, and pinned it in place. I have to admit, I surprised myself a bit by how real it looked!

Starting from the bottom, I added a bit of fabric glue on the top edge of the oval, and pressed the layer on top of it to keep it all secure. Then, working one layer at a time, I repeated this process all the way to the top.


Then, I added some glue to the back of the entry way, and pressed it slightly off center on the shape. I worked pretty quickly, and had a beehive in no time!


On one of the small honeycombs, I also decided to add a honey wand that would look as though it were dripping honey onto the wax. For this, I cut a spoon shape out of the cinnamon felt, and added accents with the teddy bear brown felt. I also let Cricut cut out some honey drips for me out of old gold.

Then, because the pieces were so fiddly, I once again turned to my trusty fabric glue and secured all of the elements together. I personally love to use this handy pen, which gives me a lot of control over the amount of glue that comes out and where it goes. Then, I let it dry for a few hours before putting it in place on my skirt, just above the honeycomb.


Then, becuase what’s a honey wand without a jar of honey, I decided to create a small vignette on the back right side, which was (at the moment) looking a little bare.
I found an existing .svg on Design Space (#M1A700321), and let Cricut do her thing with felt in blue snow for the jar, cinnamon and teddy bear brown for the lid, and old gold for the honey.

As with the honey wand, I decided to glue the elements together on the earlier side, so that I could make sure I didn’t lose the many, many tiny pieces that were going into this skirt. Also, to be honest, I was pretty much out of pins and needed a new solution! So, working with my fabric glue, I layered each element on and left it to dry.


I then placed it on the lower right side of the back skirt and built another small honeycomb out of my 1″ hexagons. Dare I say it was starting to look quite magical….

I had always had a vision for this skirt to have some pops of blues. Even though it’s a bit of an unorthodox color combination, I just love mustard and turquoise together. So, I decided to bring this element in with some flowers that I would scatter around the skirt strategically, bringing some much needed pollen to the bees and a much needed breath amongst all of that yellow.
I opted to create my flowers using a mix of the blue snow, alluring aqua, and fresh linen felt for the petals, and fresh linen, mellow yellow, and alluring aqua for the centers. After hunting a bit on Cricut Design Space, I found some daisy-esque shapes that I would layer to create a 3D effect. I started by cutting out three layers of petals, with one smaller than the other two.


Once they were all cut out, I would place a dot of glue at the center, and press the set of petals on top of it, taking care to offset the petals slightly. I repeated it for the top (smaller) layer, keeping pressure on it until the glue dried.


For the centers, I used a rolled petal technique. After cutting out my shapes on Cricut, I would place a line of glue along the bottom edge, and carefully roll the felt. I repeated this with another piece of felt, until I had a flat base on one side and a full, 3D pistil on the other.


I did this several times in multiple colors, until I could mix and match my flowers. After adding some glue to the base, I would press my pistil to the center of the flowers, creating a pretty flower garden. I have to say, I was more than a little obsessed with how the blue popped against the yellow…
Although I worked out where I would place them on the skirt, I set the flowers to the side for the time being so they didn’t get smushed in all of the work I still had left to do…


Now, I ask you, what’s a honey skirt without some buzzy bees?? No honey skirt I would ever make, that’s for sure! I once again turned to Cricut. Of course, this was the week she threw a bit of a hissy fit and refused to cut anything for me (Luckily, Cricut customer service is amazing and they were able to sort it out. But I was Cricut-less for a couple of weeks….which is about 40 years in COVID-years).
So, although they weren’t perfectly identical, I started by cutting out their bodies out of the mellow yellow felt, plus a circle which I would attach to the head. Even though they were fiddly, it was kind of nice to get stuck into cutting felt by hand again!

I also cut out some stripes out of the black felt. Then, I would dot a bead of glue on the head and add the black felt circle, and a line of glue on the body, where one by one I added my stripes.


In keeping with the “pops of blue” theme, I then cut a series of teardrop shaped swings out of the blue snow felt. Then, working one bee at a time, I dotted on some fabric glue and carefully added a wing. I mixed it up, so some bees were overhead and some were side on.


It was definitely a bit fiddly and time-consuming (and I highly recommend investing in some round ended tweezers!), but I loved my group of adorable bees once they were done. Leaving most of my elements to the side for the time being, I knew it was time to tackle the task of applique.

First up, there were about 8 zillion hexagons on this skirt that each needed to be hand stitched. Using yellow thread, I first stitched on all of my solid hexagons, using tiny tight backstitches. I kept them evenly spaced, with about 6 stitches per hexagon, one in each corner.
For this process, I recommend working on a flat surface – I wanted to be sure that the hexagons were spaced (relatively) evenly apart, and would check the position before I sewed on each one.


For the outlines of hexagons, I knew this was a job for the fabric glue. Even though I could have sewed them, I felt the glue would mean I was less likely to tear one of the shapes. Plus, I could be very precise in my placement.
Working one piece at a time, I added glue all around the perimeter of the hexagon. Then, I would pick it up by one of the edges, and carefully press it into place. One I had done this for all of the hexagons, I put coasters on top (to provide some pressure) and let them dry overnight.


Next up, I appliquéd on the tree branch using some matching dark brown thread. I used the same technique here, which is to bring the needle up, and back down behind that stitch, keeping them very tight and small (which makes them nearly invisible).


I quickly moved through all of the elements, which included stitching on the beehive, my honey jar, and honey wand. Given how time consuming the hexagons were, this took practically no time at all…


I had an idea at the start of this design to not only add bees, but to add on some whimsical flight patterns as well. I decided to use some gold 6-strand embroidery thread for this, and create the patterns with wide, visible stitches. Using my disappearing ink pen, I first drew on the flight patterns at various places around the skirt.


Then, I threaded a large needle (you’ll need one with a big eye) and then worked my way around the patterns I had drawn, keeping my stitches wide and as evenly spaced as possible.


Then, I got to work placing my bees around the skirt – putting them at the end of the flight path and placing them strategically on the honeycomb and zipping to and from the hive. I was glad I made a bunch – because they went surprisingly quickly.


Once I was happy with their placement, I quickly stitched the bees in place – I used matching thread and secured them one at a time with backstitches.


At this stage, I decided it was time to sew on the honey drips at the waist. I opted to machine stitch, thinking it would go more quickly and wanting to make sure it was super secure. I started at the waist, and then worked on attaching each of the drips.
In hindsight (and if I had to do it again), I would probably hand sew. It was really hard to keep the stitching straight, as some of the drips had pretty tight curves. But, I took it slowly and managed to make it work.


And suddenly I was ready for the waistband! I cut one strip out of my old gold felt, a second out of a yellow cotton I had in my stash, and final out of interfacing. I pressed the interfacing to the back of the felt to prevent distortion.


Isewed the waistband to the lining and pressed the seam allowance to the inside, and sewed along the edge of the seam, before pressing it flat. I pinned the edges together and set it to the side for the time being.


Iefore I could sew the waistband to the skirt, it was time to tackle The Zipper. Luckily, I’ve done so many of these over the last year that it went in with minimal issue. The main challenge here was just the bulkiness of the felt (both the base plus the dipping honey detail was a fair amount of bulk). But, going slowly, I was able to keep my stitches (mostly) straight.


Once the zip was in, I added the waistband to the skirt at a 5/8″ seam allowance. I pressed the lining under on the inside, and pinned it in place. Then, using a slip stitch, I secured it to the waistband and added a waist clasp.


If you’ve been following me for awhile, you’ll know I am a big fan of the hem trim. I opted to use some JLC inspiration and create a double hem of scallops, using the mellow yellow and alluring aqua felt..

I started by cutting a series of 1″ strips of felt in both colors. Personally, I find a rotary cutter to be the best tool for this. It zips through the felt without a second thought.


I sewed them together end to end at 1/4″ to create one long strip of each color. Once all of the strips were connected, I then pressed the seams flat.


Once I had a longe enough strip to go fully around the circumference of my skirt, I trimmed one edge at ~1/4″ with my scalloped scissors to create a scalloped edge.


To attach the trim, I started by sewing the two strips together to start, and then placed it under the hem of my skirt so that only the scallops were peaking out. Working around the perimeter, I stitched it down at a narrow 1/4″ stitch.


As a final step, I had to sew on the flowers! I gathered my garden together, and put them in place on the skirt. The goal is, as ever, to keep them looking random but intentional, mixing the placement of colors and sizes. Once I was happy with their placement, I pinned them to the skirt.


Then, I worked one at a time and stitched them in place. To keep the 3D quality, I would securely stitch the center of the flower to the skirt, and then did a few small stitches on the bottom series of petals.


I put her on my dress form and marveled at the details. Somehow, at the end of a project, I always instantly forget the pin-pricked fingers and the sore back and just appreciate this thing that came about from an idea in my head. I don’t like to play favorites with my creations, but this latest one is seriously the bees knees…


The Debut
I‘ve been a very busy bee these last few weeks. Even though I have vowed to say yes to fewer things, I agreed to teach a summer class. I agreed thinking enrollment would be low (it wasn’t) and that the work wouldn’t be too onerous because it was online (it totally was). But, thankfully, today I am giving them the final exam and have big plans to be a slug for a few days. Even worker bees need a vaca….


To make a prairie it takes a clover and one bee,
One clover, and a bee,
And revery.
The revery alone will do,
If bees are few.
Emily Dickinson, The Complete Poems of Emily Dickinson


I‘ve learned a few things about bees these last few weeks. They are absolutely critical to life as we know it, and many species are considered social insects, whereby the good of the hive is more important than the good of the individual (studies actually have shown that increasing the reproductive output of others increases their own fitness). And so many of us have lived the last year with that philosophy, making sacrifices for the good of the whole. Knowing that, in protecting others, we are protecting ourselves. Of course, the hive only functions if we all are committed to the community, which sadly does not seem to be the case in every arena I’ve seen so far.
Like any good worker bee, we are gearing up for the fall semester. All guidance from On High says we will be back face to face, and I’m more than a little nervous about it. News about spiking numbers, lack of mask mandates, and “the honor system” have had me on edge most of the summer. But, even then I felt in control, as Mr. Dressed and I continued to stay socially distant for the most part and restricted our minimal socializing to outdoor activities. But, knowing that I am heading back to so much uncertainty without any control is unnerving to say the least.
Bee safe everyone….
xoxo
Construction Details:
Circle Skirt: Self-drafted
Skirt fabric: 100% wool felt from The Felt Store
Appliqué: Felt from BBD Supplies
Metallic Embroidery Thread in dark gold
Additional notions (zipper, thread): JoAnn’s
Outfit Details:
Top: Retrolicious via Modern Millie
Cardigan: Review Australia (similar)
Brooch: The Wonder Shop (similar)
Skirt: Made by me!
Handbag: Disco Beauty (similar here)
Shoes: Valentino, thrifted (similar here & here)
.
instagram // twitter // facebook // pinterest
.
Any items marked with a “c/o” (courtesy of) a retailer mean I was provided with an item for free in exchange for a review and/or feature on my blog. I always provide my honest opinion of any item I’m reviewing, regardless of whether it was sent to me as a courtesy item or if I purchased it myself. In addition, this post may contain affiliate links. This means that if you click and/or make a purchase through certain links or ads on this site, I may make a commission from that click and/or purchase at no cost to you, which helps with the day-to-day running costs of my blog.