
One of my most vivid childhood memories is of autumn. My grandmother had this massive maple tree in her backyard and every fall we would bundle into the car to her house to help her rake the leaves. I remember there were so many that I could stand almost knee deep in what had fallen to the ground. We would spend the afternoon raking them into even greater piles, jumping into the crisp signs of autumn with abandon. I remember moving them one pile at a time over the fence into the wooded area behind her yard.
It’s been a very long time since I’ve seen what I consider “autumn.” Sure, I’ve felt summer give up her fight and found my way to my sweaters again each year. But it’s been a long time since I’ve seen the roadside burst into fiery flames of color. It’s been even longer since I had to pick up a rake and help to wash the season away…..


The Inspiration
As is the case with most of my creations, they tend to commemorate something meaningful. A beautiful vintage piece I only ever got a glimpse of. A memory of something poignant. A challenge I just couldn’t seem to let go of.
My grandmother passed away several years ago now. I haven’t been back to her home or visited the infamous maple tree in her backyard in as long, as it was sold and is another family’s responsibility now to rake those leaves into great big piles. But, I just have to close my eyes and be immediately transported back: to the sound of leaves crunching underfoot and giggles of children hiding beneath the piles.
And so I decided to sew that tree with her cascade of leaves falling down. To remind me that while every season passes to the next, that leaf pile is never really all that far away….


The Design
With the inspiration in my head, I started putting pencil to paper to sketch out my idea. I knew I wanted a tree in full autumnal bloom, with leaves finding their way to the ground. I wanted leaf piles and color and seasons changing. I needed something that simply felt like fall….

As per usual, Step 1 of any sewing project is to gather my materials. I wanted the base to be cream in tone, with details of yellows, oranges, burgundies, and browns. While I usually use wool blend felt for these kinds of projects, because the base would be cream (which already struggles with opacity), I wanted it to be a bit more substantial.
Luckily, I found the perfect material at The Felt Store (appropriately named, no?). They offer 100% wool felt in a range of colors. Although I usually like to get swatches of colors first, I was too eager to get started. So, I bought 4 yards of cream, crossed my fingers, and hoped for the best!

Luckily, the felt arrived and was perfect. A light cream with warm undertones. With the base done, the next step would be the leaves. For the larger leaves, I turned to my standby: BBD supplies. They sell precut leaves in color bundles, and offered the perfect selection of tattered leaves in packs of 36. I opted for 2 in Sunflower Fields and 1 pack in Autumn Harvest, plus additional 12 x 18 sheets in matching grandma’s garnet, pumpkin spice, eternal sunshine, reets relish, cocoa, and yellow.
I really wanted the drama to come from the burst of vibrant color in this piece rather than glitz or sparkle (I know, who I am I?), so I stuck purely with standard felt and rested the urge to buy any glitter felt.


If you saw my last sewing post, you will also know I’ve recently added a magical little gizmo into my sewing universe: The Cricut Maker. Although she was acquired a bit into this sewing project, it is a game changer in terms of making my crazy sewing visions a reality.
What I find particularly useful (especially for this project) is when you need a lot of replicates of the same shape. Enter a crazy autumnal landscape with a sudden need for extra leaves, and we were off on yet another appliqué adventure….


So, should you also be feeling the nostalgic pull of autumn and wanted to take a crack at creating this skirt, you will need:

The Construction
All good circle skirts start with a base. I pretty much can make one blindfolded at this stage, so I quickly folded my felt in half and measured to my waist circumference (4.5″ radius = 28″ finished waist) and my ideal hem length (28.5″). Using those measurements, I cut out one half circle and two quarter circles out of the cream felt and stitched them up at the side seams and up the back seam, leaving a 9″ gap for the zipper.
I always feel like I sound like a broken record every time I write out this part of the process. But I realize that not everyone knows the geometry behind making a circle skirt and it may be useful to know! If this is your first time drafting a circle skirt, check out this post for a more detailed walk through.


With the base in place, my next task was to figure out the focal point: the tree. I wanted it positioned off to the side and be completely festooned in miniature versions of my large leaves.
For this, I turned to the magic of google. I found a clip art photo that would be perfect to emulate. Using Photoshop, I traced the tree pattern and created an .svg (which I could size to my liking in Cricut Design Space).


I quickly rolled out my felt in Teddy Bear brown onto my Cricut mat. Figuring out the right sizing based on my skirt length, I knew I wanted the tree itself to be about 21″ high and 14.5″ wide. Unfortunately, this is just on the side of too large for Cricut to cut on one go (even with the 12 x 24″ mat). So, I cut it in two pieces – knowing I could hide the seam later with leaves.


Next, I started to play with the tattered leaves from BBD Supplies – working with a range of different colors and shapes. But, as I was placing them around the skirt, I realized I was missing something really important: maple leaves. It just wouldn’t be my grandmother’s backyard without the maple leaves swirling around my ankles.


So, to Cricut I went! In Design Space, I found an .svg file of a maple leaf (#M8D20EB7), which I could easily cut in multiple sizes. I decided on four: two larger sizes: 3.1″ x 3.25″ and 2.5″ x 2.6″; and two mini versions at 1.6″ x 1.5″ and 1.1″ x 1.25″, which I had Cricut cut out of a range of different autumnal colors.


I also wanted to have miniature versions of my tattered leaves to add to my tree. So, I found similar shapes to my existing leaves and set Cricut on a cutting journey over a few days while I buckled down to grade midterm exams.
For those who might want to tackle this project with their Maker: the mini leaves are very detailed and take several hours to cut out. Best to set it up and let it be. A watched Cricut never finishes…


The next bit was the fun part: getting to play with placing leaves! This part was fully free form. Although I had a rough plan of attack, I really just let inspiration guide me. I scattered the leaves around the hem like a border print, careful to have a balance of shapes, sizes, and colors.


A skirt commemorating autumn would be incomplete without a leaf pile, so I found the perfect spot and constructed the pile by carefully layering leaves on top of one another. I could almost imagine hiding underneath them as a kid, giggling and impressed with my own stealth, certain that no one knew where I was…


To add a bit of dimension, I wanted to make a park bench to sit beneath the tree, should a passerby want to take in the foliage. In scrolling through Cricut Access, I found the perfect shape (#M2F121). I cut it out in two layers – one in Cinnamon with wood grain cutouts, and a solid one in Teddy Bear Brown that would show through to the layer below.


Ahenever I create my skirts in flat lay, I’m always very cognizant of the need for balance. If you have a large detail on one side, you almost always want to create something to balance it out radially opposite. This is true visually in design, but is also true of appliqué: large pieces will add weight and can pull a skirt down on one side. So, adding a detail on the opposite side balances it out so the skirt doesn’t deform over time.
For this, I decided that balance would come from pumpkins. When we were kids, we would travel to the actual pumpkin patch every Halloween and get to choose and cut out our own pumpkins off the vine. There was something so magical about hunting for the perfect gourd amidst the rows. I swore each year I somehow always found the best one….

I went with two slightly different shapes for my pumpkins. Like the bench, I would use a layering effect to add depth to the design. I cut the back of the pumpkins out of copper and the tops from hallow’s eve and dark orange felt – both of which (#M3C6A7 and #M199C0CEC) I found in Cricut Access.
FYI – when I bought my Maker, I opted for the monthly subscription to Cricut Access (which gives you unlimited use of images from the design library), and it has been more than worth it for me. I know it’s not for everyone, but I personally love having full access to all the shapes I could ever need. Given the number of skirts I’ve been cranking out, it is definitely used regularly…


I decided to add a bit of extra pizazz and also put Cricut to work cutting some curling vines which would stick out behind the pumpkin. I had some extra grassy meadows felt in my stash and Cricut zipped through it in no time.


Now, I ask you: what is a leaf pile without a rake? Following my layering theme, I let Cricut do the work, and cut the rake head out of blue snow and the handle from cinnamon felt using the image #MEFBAF. I leaned my rake against the tree, as if we had just taken a break from all of our hard work…


Finally – the time had come to leaf-i-fy my tree! I’d been really looking forward to this part. There’s always one part of a project for me that I always know will add the magic, and this was it.
Using the image I had found earlier for my tree as inspiration, I worked free form and placed my mini-leaves at random. I was careful to space out shape and color, but really didn’t follow any set path. I kept adding until it felt that I had achieved the shape and vibe I was going for.


I then took my leftover mini leaves and scattered them around the skirt – falling from the tree, swirling up from the leaf pile – as if a crisp breeze had carried them merrily onwards and around the hem.


Feeling pretty chuffed with the overall design, I set to work pinning it all in place and starting the process of attaching the pieces to the skirt. While I knew I was going to appliqué a large majority of the leaves, there were key elements where my very favorite fabric glue was going to come into play. I personally love Aleene’s Fabric Fusion and always buy multiples of the version that comes in a fine tip pen – perfect for this kind of work.
I started with my rake, and ran a bead of glue along the handle, pressing the blue and brown felt pieces together.


I did the same for the park bench – adding glue to the dark brown felt and layering the cinnamon felt on top, careful to ensure the edges lined up and no glue was leaking over the sides.


I also glued my pumpkin layers together. Working one piece at a time, I added glue around the edges and carefully pressed them into place. I set all of the piece aside to dry and turned my attention to the Big Cahoona: my maple tree.


While I do love me some appliqué, I am also a mere mortal and knew there was no WAY to hand appliqué all of those mini leaves and have a chance to finishing this before 2022. Plus, the mini leaves had a lot of small details, which would almost certainly fall apart with too much handling (and a needle coming up and down several times).
So, I decided that my fabric glue would save the day. Working one leaf at a time, I added a bit of glue to the back, careful to drag my pen tip out to the edge of the leaves. I would press it in place, and quickly move onto the next. I tried to work in sections so that I could keep track of which leaves I had glued and which still needed to be done.


As is my favorite trick, once everything was glued, I let them dry underneath every coaster we own, which would add subtle pressure and allow the glue to set with the felt pieces laying fully flat. My coasters have never failed me yet!

I have to say – I wasn’t wrong about the tree adding the magic. It was BURSTING with joy and color when I hung her up on my dress form to get a look at how the overall design was sitting. There was something so vibrant and yet peaceful about that scene, as if you could imagine the leaves falling and swirling lazily down to the ground….

With the big tree done, I had a LOT of hand sewing in my future. The best thing to do is just grin and bear it and get to work. Because I knew hand sewing all of those leaves was going to be a beast, I tackled it in stages each night while the Mister and I were watching tv. I was able to get through about 1/8th of the skirt each night, which actually went far more quickly than I thought it would.
I started with the tree – using brown thread I quickly secured the trunk and branched using a tiny tight backstitch.


Next: the zillion leaves. I lined up my matching thread along the coffee table and stitched and snipped, stitched and snipped. The most deceptive was the pile of leaves – why oh why did I stack so many of the darned things?! But, the effect was definitely worth it.
Although it is quite monotonous, I always find hand sewing to be so calming. And being able to put in the work on a piece like this will always be the reason why I love it even more in the end….


Once the leaves were done, I quickly turned my attention to adhering the pumpkins. Compared to the fiddlyness of the leaves, these were a breeze and I quickly stitched them in place.


Because the pumpkin vines were so thin, I opted to use my fabric glue once again instead of hand-sewing them. I had already stitched the ends under the pumpkins, which held them in place. Lifting up one side, I would dot my glue along the vine and, careful to keep its shape, pressed each into place.


I did the same for the rake – I ran a line of glue along the handle and pressed it down. Once that was secure, I lifted up the rake head and lined each of the rake tines with glue, and carefully laid them onto the felt.


Last up was my park bench, which I opted to sew down using the backstitch technique. I had placed it on an angle, giving some forced perspective to the skirt and the world that lay just within.


My hands pinpricked and sore, I was finally done with the hand sewing and glueing. I’m always a bit in awe at this stage – after I laid her out and looked at the zillion tiny details, I (not for the first time) wondered where I get these crazy ideas and how on earth I manage to see them through without going mad…

Last up came the details that are required to make it wearable! I started with the zipper – taking a 9″ all purpose zip, I quickly sewed her in using a standard lapped zip. The felt can be quite thick – so take your time at this stage and use a lot of pins to keep things from sliding around…


Then, I cut one 3″ x 32″ rectangle out of the felt, a matching one out of white Kona Cotton (for the waistband lining), and a layer of fusible interfacing. I pressed the interfacing to the waistband and stitched the band to the lining along the inner edge and pressed the seam flat.


For a bit of extra zha-zha-zhu, I decided to add three parallel lines of stitches to the waistband. I love the detail, and also find it adds a bit of stability at the waist (which is helpful because felt can stretch).

I finished by stitching the waistband to to the skirt at 0.5″, pressing the waist seam upwards. I folded the lining of the waistband down and pinned it in place, securing it by hand with a quick slipstitch.


One of the most glorious features of felt is that it requires no hemming. So, all I had to do was quickly stitch on two clasps at the waist and press in one of my custom sewing labels. And behold, my autumn wonderland was complete!


Even though it’s now December and autumn is heading down the well worn path away from me, I loved that this skirt brought fall back to my sewing room in all of its fiery glory. As if it just wasn’t ready to let go yet. If I’m being honest, I’m kind of glad she isn’t. It’s nice to know that we don’t have to let go of things until we’re good and ready.
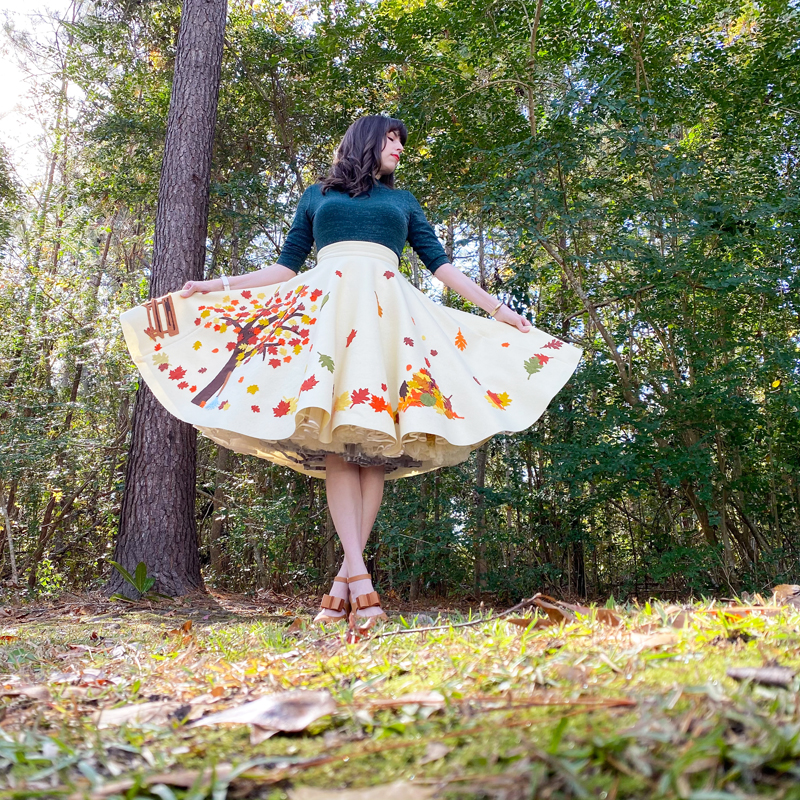
The Debut
North Carolina doesn’t see autumn in much the same way as I remember from my childhood. We have greenery throughout much of the year and even though the trees definitely drop bucketloads of leaves, the reds and golds and oranges don’t spark alight my treetops.
So, I suppose I’ll have to let this skirt do the job instead….


Autumn shows us how
beautiful it is
to let things go.
Dodinsky


Autumn leaves don’t fall,
they fly.
They take their time
and wander on this
their only chance to soar.
Delia Owens


There are certain garments that will always tell a story – not just the story of how it was designed and made, but the story of where her inspiration came from. I know my Mimere would have loved this skirt. She was always my cheerleader, applauding everything I ever did, and I’m sad that I hadn’t yet caught the sewing bug when she was still with us.
But, she is still with me in every memory from my childhood. Laughing alongside us as we throw leaves into the air or swing away merrily on the swing set next to that old maple tree. Letting us bury our pet turtles in her backyard and keeping a straight face while my sister played taps on her kazoo at the reptile funeral. Keeping a steady supply of sugar cereal in her pantry that I wasn’t allowed to eat at home. Sending me hand-written letters every week when I lived overseas. And always being that someone who was endlessly, unconditionally happy to see me.
So, I will keep her safely tucked in the folds of this skirt. Hidden in every stitch and brought to life with even the smallest rustle of petticoats. And whenever I need to see her, I know she’ll be there. Sitting on the park bench, ready with moon pies and a story about the latest ballgame. Ready to love me the way that only a grandmother can.
I will hold our tree safe and secure in this skirt. And someday I will meet you there.
xoxo
Construction Details:
Circle Skirt: Self-drafted
Skirt fabric: 100% wool felt from The Felt Store
Large leaves & felt: from BBD Supplies
Other appliqué cut on my: Cricut Maker
Additional notions (zipper, thread): JoAnn’s
Outfit Details:
Top: Vivien of Holloway
Skirt: Made by me!
Bracelet: Hollie Point (similar)
Handbag: boutique in Melbourne (similar)
Shoes: Shelly’s London (similar here & here)
.
instagram // twitter // facebook // pinterest
.
Any items marked with a “c/o” (courtesy of) a retailer mean I was provided with an item for free in exchange for a review and/or feature on my blog. I always provide my honest opinion of any item I’m reviewing, regardless of whether it was sent to me as a courtesy item or if I purchased it myself. In addition, this post may contain affiliate links. This means that if you click and/or make a purchase through certain links or ads on this site, I may make a commission from that click and/or purchase at no cost to you, which helps with the day-to-day running costs of my blog.