
Valentine’s Day comes but once a year. While a lot of people bemoan the holiday, I must admit I love a world that gets dipped in pink and glitter for a day. I’ve always considered it a day to celebrate love. Romantic love usually gets all of the credit, but just as important is love for family, friends, pets, careers, and – most importantly – yourself.
It’s no surprise that Valentine’s Day provided the inspiration for my latest make. I’ve had Simplicity 4784 pattern in my sewing room for ages, ready for the mood to strike. When the new calendar ticked over the 2021, bringing with it the dawn of (hopefully) good things on the horizon, February 14th started looming and I knew it was high time to bring this beauty to life.


The Plan
With all of the social distancing happening around the world, I’ve definitely been tapping into my IG community more than ever. Social media can certainly have its downsides, but I am forever grateful for the community I’ve found there and the endless inspiration and joy that comes flooding through my feed, despite how dark things are for so many people right now.
As part of a generation that is still a bit bowled over by how much we connect with people via tiny little screens these days, I’m in awe of some of the friendships I’ve built with people who I’ve actually never met. One who I have found myself endlessly grateful for is the incomparable Miss Hero Holliday. Just as lovely as her wardrobe is enviable, Amy and I have bonded over a love of full skirts and ambitious sewing projects that leave our fingers like pincushions. We zip ideas and inspiration back and forth, cheer one another on, and offer suggestions and encouragement, even when there are still about 50,000 sequins to go on a project. She also has a fab vintage fashion blog where she shares her sartorial adventures.
Squarely in the category of “above and beyond,” Amy has even kindly sent me pattern pieces for skirts she’s made to save me the trouble of having to trace them myself. I am continually in awe of her creativity and ambition – and it usually makes me push even harder for my next project to succeed.

So, a few months ago we hatched a plan: given we both love appliqué circle skirts and have made quite a few that are twins of one another’s now…what if we tried a simultaneous sewing project? We knew that Simplicity 4784 was exactly the right one: we both had the pattern and, with Valentine’s about a month away, knew we wouldn’t have go too crazy to get it done in time…
And so began my first cross-oceanic sewing adventure! Each of us opted to go with a different color scheme – very befitting our personalities, I must say – but twin skirts were ready to be born from a pile of felt and creativity once again.
Be sure to also check out Miss Hero Holliday’s blog for her creation process!

The Design
Since I was working from the Simplicity pattern for the majority of this design, the main decision I had to make was settling on a color scheme. I actually went back and forth on my colors for this one, toying between going traditional or something a bit more unique. It ended up coming down to a red and blue version or a pink and navy.
Something about the pink and navy just spoke to me. So, decision made, I turned to my swatch card to find just the right shades…

First stop: Materials. Over the past several projects, I have really fallen in love with using 100% wool felt from The Felt Store for the base. It’s 1.2mm thick and has a beautiful weight and drape, and can hold up to the workout I tend to give my clothing (not to mention the appliqué that was about to befall its surface).
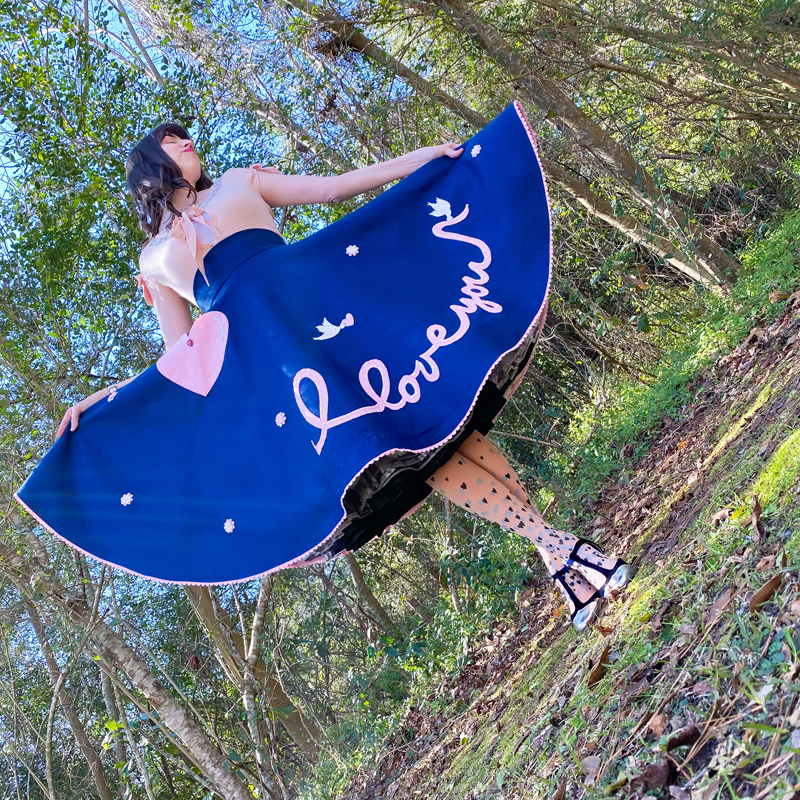
In looking at my swatches, the midnight blue shade was absolutely perfect. A deep, rich navy-esque color that was definitely still on the bluer side without being too dark.

Next up came the perfect accent colors for my applique, which would come from my go-to BBD Supplies. I found that their pink shade popped perfectly against the midnight blue, and would be what I would use for the main appliqué pieces, including the text along the hem. I also scooped up a few extra sheets in fresh linen, raspberry sorbet, and cotton candy, which I would use for my accent colors.


Feeling like creating this skirt for yourself? You will need:

The Construction
Ahhhh the beginning of a new sewing project always starts with fresh yardage and unbridled anticipation. Although Simplicity 4784 came with a pattern for the circle skirt itself, I’ve drafted so many of them to my perfect measurements I didn’t use it. Instead, I quickly drafted one to to my waist circumference (4.5″ radius = 28″ finished waist) and my ideal hem length (28″ + 4.5″ = 32.5″ outer radius).
Using those measurements, I cut out one half circle and two quarter circles out of the midnight blue felt and stitched them up at the side seams and up the back seam, leaving a 9″ gap for the zipper. If you aren’t as familiar with the geometry behind making a circle skirt, check out this post for a more detailed walk through.


With the base sorted, I turned my attention to my trusty Cricut Maker. For those who haven’t heard of Cricut before, it’s an automated cutting machine. Although you can use her for all kinds of crafts and woodcutting, I primarily use mine to cut out appliqué. She zips through felt like butter and saves me a ton of time with hand cutting.
To prep for cutting on Cricut, I snapped photos of most of the appliqué pattern pieces and traced each one in Photoshop. I imported the images into the software that comes with Cricut (called Design Space). Once checking measurements were accurate to the original pattern, I let Cricut do her thing!


The one piece where I ended up not using my Cricut was in the scripted lettering. The Cricut mat is limited in size (12 x 24″ max) and I really didn’t want to cut my font anywhere, which was meant to be in a long continuous script. But, I also didn’t want to cut into my pattern – I prefer to trace so I can use multiple times.

So, I laid out my pink felt on the table, with the pattern piece on top of it. I slid my transfer paper underneath and, working one section at a time, traced the script with my wheel. This left a faint dotted line on top of the felt, which I could cut by hand with my rotary cutter.


Following my traced line, I cut out the letters freehand at a spacing of about 1/2″ width on either side of the trace. I kind of just took a deep breath and went with it, working slowly around the curves and not getting too belt out of shape if things weren’t perfect.


With the script looking pretty fab (if I do say so myself), I cleaned up a few edges, flipped it to the right side, and then laid it out on my circle skirt. I wanted it reasonably close to the hem, legible from the front but curving back to the side.


One of my favorite features of this pattern was an adorable heart-shaped pocket on the right hip. This is definitely where Cricut came in handy. I rolled the pink felt onto my fabric grip mat and let her do her thing.


The pattern also called for some white doves, who were swooping around and holding the script in place, and a scattering of flowers around the full perimeter of the skirt. I decided to cut the doves out of fresh linen felt, and do the flowers in a mix of linen and pink, which I planned to layer on top of each other.
Cricut made short work of cutting out these shapes. I set the flowers aside for the time being, and placed the doves in their resting place on the skirt.


Although it wasn’t in the original design, I didn’t love the fact that the back of the skirt had very little detail to it. I decided to add a little bit of “me” in the piece, which would take the form of a series of hearts floating up the back right. I could use a few different pinks here for contrast, and it would balance out the script on the front left.
I quickly prepped the hearts of different sizes, added in pink versions of my flowers to the queue, and put Cricut to work cutting everything out of a mix of pink, raspberry sorbet, and cotton candy colored felt.


At the back of the skirt, I simply scattered them as if they were floating up towards the waistline, alternating heart sizes and colors. I had toyed with the idea of using glitter felt for some of these, but resisted. Never fear, there shall be glitter…but it’s going to come a bit later….


I then turned my attention to my flowers, which I would create out of layered pieces of the linen and pink felt. Some would have linen on the bottom and pink on top, and others would be the reverse. I wanted to have 6 of each, which I quickly put together.
Keeping them fairly random, I scattered them around the skirt. I loved the 3D quality they added to the piece….


Now that everything was cut and in place, I geared up for a loooooooong stretch of hand sewing. I made a few minor adjustments to the placement of the pieces, and then pinned it all in place.


Firstly, I decided to machine sew down the heart pocket – I could have hand-sewn it, but I really wanted it to be secure, given I would have my hand in and out of it and would hopefully be keeping all sorts of goodies in it from time to time.
Using a matching pink thread, I quickly sewed along the perimeter and stitched it in place, leaving an opening at the top.


Then, I turned my attention to my flowers. I started by attaching them to my skirt with an x-stitch through the center. But, I knew I wanted to add a bit of extra sparkle to these. So, I brought my needle up through the center of the flower and then added a sequins on top, securing it in place with a bead. I repeated this for all 12 flowers, until they were secure.


With the flowers done, it was time to get to work securing the other elements. I started with the letters, working around the perimeter and using a tight backstitch. The most important thing here is keeping the base skirt as flat and taught as possible. I tend to drape it over my knees on the couch, which I’ve always found to work well.


I finished with a few of the smaller elements – the small heart and any flowers that looked like they could use a bit of extra securing. I also added the small detail of a grey beak to each of the the doves, using my my favorite fabric glue, Aleene’s Fabric fusion. I dotted the glue on the front of the head, and added a small triangle for my beak.


Once the beaks were dry, I needed to get the doves onto the skirt. Because of the small edges of the wings on the doves, I opted to use my fabric glue to secure them. I dotted the glue on the back of each piece, taking care to drag the glue out to the tips of the wings. I carefully pressed them in place on the skirt and let them dry overnight.


With most of the other elements secure, I moved on to the hearts at the back. I followed my same method and quickly stitched around the perimeter of each one, securing it to the skirt.


Once they were secure, I decided to add a bit of extra sparkle in the form of a twinkle on the corner of each. I started with my disappearing ink pen, and draw an arc where I would eventually sew my sequins. I then dug into my stash and found some iridescent sequins, which were perfect….


For this sequin effect, I brought my needle up at one edge of my drawn line, and threaded the sequins onto the thread. I brought the thread down on the back side of the first sequins. Then, I would bring the thread up again, this time at the front edge of the sequins.
After I threaded a new sequin on, I brought that thread down in the center of the sequins before. I continued this in along the line, which creates a very secure line of sequins that aren’t going to budge.


I repeated this for each of my hearts, and very soon I had a lovely bunch of juicy hearts with their sparkly shine, floating up the back edge of the skirt…


Back when Amy and I were devising this project, we both knew we wanted to COMMIT to the sparkle. So, because I was still in a pretty sparkly mood (and somehow not soured on sequins after the wave skirt adventure – coming soon), I wanted to add some sequins to the scripted lettering.
Digging into my stash of assorted sequins, I found I had the perfect 6mm baby pink cup sequins with a bit of iridescence.

For these, I decided to use beads to secure the sequins (as I did with my flowers), just to add a bit of extra sparkle (yes, I’m addicted. I’m looking into it….). But, all this really requires is patience. I would bring the thread up, add the sequins, add the bead, and bring down back through the center, slightly to the side of my original thread.


Then, lather rinse repeat. After the wave skirt, I was pleasantly surprised to see how quickly I zipped all of them on. And I LOVED the effect. It was a bit tricky to capture in a photo, but it was casting sparkles all around my sewing room…


And suddenly I was ready for the waistband! This pattern came with a beautiful curved waistband, which I realized I had never tackled before. I quickly traced the pattern onto my craft paper (cause you’d better believe I would be doing a similar waistband in the future!).


I cut one strip out of my midnight blue felt, a second out of a blue cotton I had in my stash, and final out of interfacing. I pressed the interfacing to the back of the felt to prevent distortion.


Isewed the waistband to the lining and trimmed the seam allowance down. Because it was a curved edge, I created a series of notches along the seam allowance.


I pressed the seam allowance to the inside, and sewed along the edge of the seam, before pressing it flat. I pinned the edges together and set it to the side for the time being.
Before I could sew it to the skirt, it was time to tackle The Zipper. Luckily, I’ve done so many of these over the last year that it went in with minimal issue. The main challenge here was just the bulkiness of the felt. But, going slowly, I was able to keep my stitches (mostly) straight.


Once the zip was in, I added the waistband to the skirt at a 5/8″ seam allowance. I pressed the lining under on the inside, and pinned it in place. Then, using a slip stitch, I secured it to the waistband, added two waist clasps, and then pressed one of my custom clothing labels in place…


If you’ve been following me for awhile, you’ll know I am never one to let something lie. Not to mention that Amy and I were messaging about our progress, and she was adding the most adorable scallop trim to her version of our skirt. So, with my skirt inches away from the Done Pile, I brought it back to my sewing machine and hunkered down to create some trim!

In the past, I’ve cut strips of felt and used my scalloped scissors to create a scalloped edge. But, for this I decided to see how well Cricut could tackle cutting out this trim. If it worked, it would definitely save me a TON of time for future projects…
In design Space, I set a 1″ wide strip, with a series of scallops along one edge at 0.5″ diameter. I made them as long as Cricut would cut (22″) and pressed Go…


Wheeeeee it worked! Cricut made such quick work of this task, I almost didn’t have time to rethread my machine in anticipation of sewing my strips together. Have I said how much I love this machine lately??
With the strips done, I sewed them together to create one long strip, and pressed the seams flat.


To attach the trim, I simply placed it under the hem of my skirt so that only the scallops were peaking out. Working around he perimeter, I stitched it down at a narrow 1/4″ stitch.


I has also wanted to add a snap to the heart shaped pocket to keep it from flopping open. I loved the idea, but worried about my stitches showing on the pocket (it would drive the perfectionist in me crrrrrazy). Amy had the cute suggestion of adding a heart shaped button over the snap – it would hide the stitches and serve as a faux button.
I found the perfect sparkly heart shaped buttons from One Stop Stitched, which I quickly stitched over my snap. And poof! The illusion was complete!


I was OH so happy I decided to add those extra details. I’ve definitely learned that sewing across the ocean with someone else can only make a project better – even just discussing ideas and sharing progress kept me so excited about this project (and we’re already planning our next joint project! Stay tuned…) I hope you check out Amy’s blog to see how she brought her version of this skirt to life!
Now, if only one day Amy and I could actually meet in person and twirl in our twin skirts….

The Debut
Amy and I were both ridiculously proud of ourselves for getting our skirts done ahead of schedule. I put the finishing touches on mine with about 6 days to spare. However, the sky decided to laugh uproariously at my futile planning and rained buckets for about two weeks straight.
So, a little bit late for Valentine’s Day, but I still felt all loved up when I slipped her on and zipped her up. Because you know what they say: Love is patient, love is kind….


The only thing we never get enough of is love…


…and the only thing we never give enough of is love


If you haven’t been able to tell, my plate is more than a little full lately. This always happens mid-semester, but I feel like I’m in a very (somewhat self inflicted) spiral. All I can do each day is tackle what I need for that day…tomorrow is next-day-Kara’s problem. Remind me never to develop a new course, edit a book, and write two huge grants at the same time again…
But, on the plus side…there are always stolen moments that can collectively be put together to make something like this skirt. To remind me to stop and be grateful. To tell my husband I love him. To appreciate the coffees put before me, the moments when my cat jumps in my lap, the Zoom call where I get to connect across the miles.
Sending you love, wherever you may be…
xoxo
Construction Details:
Pattern: Simplicity 4784
Circle Skirt: Self-drafted
Base skirt: 100% wool felt in Midnight Blue from The Felt Store
Appliqué: Felt from BBD Supplies
Cup sequins: Amazon
Additional notions (zipper, thread): JoAnn’s
See Amy’s skirt creation process here!
Outfit Details:
Cardigan: Alannah Hill (similar)
Skirt: Made by me!
Necklace: gift (similar)
Tights: Queen of Hearts, sold out (similar)
Handbag: vintage (similar)
Shoes: Modcloth (similar here & here)
.
instagram // twitter // facebook // pinterest
.
Any items marked with a “c/o” (courtesy of) a retailer mean I was provided with an item for free in exchange for a review and/or feature on my blog. I always provide my honest opinion of any item I’m reviewing, regardless of whether it was sent to me as a courtesy item or if I purchased it myself. In addition, this post may contain affiliate links. This means that if you click and/or make a purchase through certain links or ads on this site, I may make a commission from that click and/or purchase at no cost to you, which helps with the day-to-day running costs of my blog.