
I can get so committed to my love of appliqué circle skirts, that sometimes I forget how much fun it can be to make a beautiful dress. It always a good idea to flex your creative muscles now and then and step outside of that trusty circle skirt comfort zone. And given how dark and grey the world has seemed lately, it should be no surprise that I turned to the sunniest yellow floral border print I could find….
As someone who likes to find the silver lining in everything, one positive takeaway from the pandemic has definitely been the flurry of creations that have come out of my sewing machine this year. I shared a post on IG recently, where I counted my 2020 creations….and it turned out there were 16. 16 people! That is both a little bit crazy….and a little bit awesome…


This latest sewing adventure was one of the Charm Patterns, designed by sewing maven Gertie. If you’ve never heard of Gertie or Charm Patterns before, they are at the epicenter of a vintage sewing wonderland. Charm Patterns are an amazing collection vintage-inspired patterns, graded to a wide range of inclusive sizes. Gertie also has an amazing blog and a Patreon, where she shares exclusive content.
If you’re trying to dip your toe into sewing for the first time (and aren’t that comfortable grading patterns), these are perfect for you. One of the features that really sets these patterns apart is the fact they they provide for a range of overall bust/waist/hip measurements, but also provide full bust adjustments, so you can choose your standard size AND your cup size. As a lady who’s cup….errrr….runneth over in relation to my waist size, this is an absolute dream.

Another amazing feature of these patterns is that they’re designed to be modular – you can mix and match tops and bottoms, add special neckline features, and combine them with other Charm patterns to make something truly unique. The instructions are also super easy to follow, with helpful photos, grading techniques, and definitions for common terms and stitches.
If you’re someone who has furrowed your brow at many a vintage pattern that just sort of assumed you know what understitching or stay stitching is, you’ll be relieved to find your brow shall be furrowed no more! Gertie also has an incredible series of YouTube tutorials that walk you through the basics of construction for each of her dresses – I’ve definitely bookmarked more than a few.
I will say, before I enter into gushing territory: I’m not affiliated with Gertie in any way; I just truly believe in giving a shout out to amazing women who are doing amazing things. Having used a few of her patterns now, I can absolutely attest to the care and thought that went into them, and the inclusivity of the designs.

The Pattern
One pattern I’ve had my eye on ever since it was released was the Liz Dress – a beautiful shelf bust fit and flare dress that has seemingly limitless options when it comes to mixing prints and patterns. This was a dress I may have been nervous to tackle if I had to do a full bust adjustment on my own (there are a LOT of pieces that go into this kind of bodice, and the math of grading each one kind of makes my head spin).
But, Gertie and her team had, thankfully, done all of the heavy lifting for me. All I needed to do was choose the that would work best suit my measurements.

The Liz dress (and all of Gertie’s patterns) provide sizing measurements in addition to measurements of the finished garment. Personally, I usually go with the finished garment measurements when deciding which size to choose, because I have a good sense of the measurements that fit me best (years of buying vintage online will do that for you). According to the finished measurement chart, at my measurements of 36″ bust and 28″ waist, the size 6 with the B/C cup would work best for me.
One tip is to not be so tied to your actual size in retail clothing OR necessarily your bra size (which can vary a lot, depending on the brand). You want to take your true measurements, particularly upper bust, and go from there. For example, I wear a 34D/DD bra, but found the B/C cup to work best for me in this pattern.


One recommendation by all of the reviews of this garment I’ve read (and Gertie herself) is to make a toile. Even if you are an experienced sewist, this is always a good idea with a new patten. And given this particular one has 15 pieces in the bodice alone, testing it out for proper fit is really important before cutting into your precious fabric.
Another reason to do a toile, especially for complicated pattern work, it that you can think of it as a trial run. I’ve found that parts of a pattern that can seriously baffle me the first time around are a lot easier after I’ve done them once. I’d much rather make a mistake on my toile than on the garment I actually want to wear.

Personally, as a general rule, I tend to trace all of my patterns first onto butcher paper. I do this so that, if I need to make any sizing adjustments, I can make them to my butcher paper and not have to alter the original pattern. This might seem silly (and time consuming), but I’ve been known to make a million small tweaks, only to find in the end I’ve made a big ol’ mess and the original pattern was actually better all along.


I have a stack of scrap pieces of Kona Cotton after my latest circle-skirt-a-palooza, so I opted for a blue bodice and a white cotton contrasting bust (which served more to help me keep track of pattern pieces than anything else. 15 bodice pieces people!) I cut out all of my pattern pieces and lining, transferring all of the markings and notches. It’s amazing how quickly things can start to look like a jumbled mess, so I tried to keep pattern pieces and their matching lining together (be sure to number your traced patterns – it really helps to keep things straight).
I worked through the toile pretty quickly one afternoon – although there were a lot of pieces, the instructions were pretty straightforward. I was really happy to see that my toile actually looked wearable! I did a quick check for fit and, other than needing to lengthen the straps a smidge, was otherwise really happy with the sizing option I had gone with.


With the toile done, I turned my attention to my real fabric. This fabric and I have a bit of a sordid past, as she had to travel the high seas before we could finally be together.
Many moons ago, I spotted a stunning yellow rose border print cotton sateen that Gertie had designed last year for Spotlight (if you’re unfamiliar with this store, Spotlight is a popular fabric store in Australia and NZ). But, much to my chagrin, it was ONLY sold at Spotlight. They didn’t ship overseas and no retailers in the US stocked it.
If you know me, you know I can be a very determined person and obstacles usually have a detour if you look hard enough. Lucky, my lovely best friend from Perth was more than willing to serve as my fabric mule. I shipped the fabric from Spotlight to her, and she soon had it sailing into my waiting arms all the way from Aus.

When my world-traveled fabric had arrived, I knew it was worth the wait. An absolutely stunning cotton sateen, with an ombre effect of yellow roses swirling up from the edge. I could see exactly how she would come together in my mind – using the border print for the skirt and some of the strap detail, with a contrasting solid yellow bust.
And so it begins…
To recreate this dress, you will need:

The Construction
With all of my fabric ready to go and my toile complete and fitting how I wanted it, I spend a lazy Sunday afternoon cutting out all of my bodice pieces. I took care with print placement here – although it definitely adds to the time, it’s really worth it to think about how you want the print to sit. I knew that I wanted to skirt to have the border print, but I also took the time to consider the rose placement on the bodice.
In the end, I opted for rosebuds at the waist, and the larger yellow roses to go up the shoulder straps and down the back. I carefully cut out each piece, transferred my marking and notches.


Several of the pieces also required interfacing according to the instructions – this stuff is great to help stabilize the bodice and provide some structure (aka, so your body doesn’t have to do all of the work).


Next up was the contrasting bust, which I cut out of some leftover scraps of lemon Kona Cotton I had from another project, which I thought complimented the yellow in the print quite well, plus some lighter yellow cotton voile for the lining.
The bust required the pattern piece, the lining, and an interfacing layer. Needless to say, the bust cups would be going NOWHERE once they were done.


Once all of the pieces were cut, the first step was to underline all that required it. This included pretty much all of the bodice pieces and the bust cups. As above, I used a medium weight fusible interfacing for this, which I carefully pressed onto my pattern pieces.


Then, it’s a simple matter of putting it together (har har). First off, I sewed in and pressed the back darts, and sewed the front midriff pieces together, attaching them to the back bodice pieces (you essentially have one long piece at this stage).


I repeated it for the lining, which went together pretty quickly. This stage in the process is all straight stitching – thanks to the interfacing, the pieces are all pretty stable, so I zipped this up in under a half an hour.


With the bodice done, I turned my attention to the straps, which consist of an inner and outer portion (plus lining). I started by stitching the two front pieces together at center front, which I repeated for the lining. The straps end up as one long continuous piece, which go under the bust and over the shoulders.


With right sides together, I sewed the strap front to the lining, keeping the ends and the center front open (so that I could pull it right side out). I carefully clipped all the way along the seams (the trick is to make a clean clip at concave curves, and ‘v’ shaped notches at the convex curves).
My best advice here is to clip more than you think you need – trust me, you’d better get used to it now. Much more clipping is in our future…


I graded the seam allowances and turned the straps right side out. Once it was right side out, I understitched as far as I could along both edges of the straps (this is to keep the seams from rolling).


I then pressed the strap flat (this under stitching makes this part super easy), taking my time to ensure that the seams were as open as possible. I then basted the raw edges together.


Next up, I needed to connect the bodice to the strap. This part was a little tricky, and I found it best to work in stages. There are a LOT of curves to work around for this part, so pins will be your best friend.
I started with the underbust portion, pinning every 1/2 inch or so. It addition to keeping things together, it ensures that the straps didn’t get twisted while I sew. While it will seem at first glance that these won’t stitch together – trust me, take your time, guide the fabric around the curves, and they will.


With the bodice in place, I turned my attention to the bust cups. These are pretty fiddly, as they are made up of a ton of pieces, but if you go one step at a time it ends up being reasonably straightforward.
First up, I needed to make the pleats for the upper part of the cup.

For each pleat, you bring the lower pleat line to the upper, matching your markings, and press into place. Repeat this twice on each side, so that you have 2 pleats per upper cup.


Then, with wrong sides together, sew the pleated piece together with the upper bust lining. I put these to the side and turned my attention to construction the lower cups.

For the lower part of the cup, I stitched the left and right sides together, and trimmed the seam allowance to 1/4″ and pressed them open. I repeated this for both sides.


Then, I sewed the lower cup to the pleated upper cup I had just created, taking my time on the curves. Again, I trimmed the seam allowances and pressed each seam open. Low and behold, it actually looked like a real, molded bust cup! I was pretty stoked…
Small wins people! Celebrate them.


I then stitched the left and right cup at the center seam, taking care to match up the seams and the pleats. You will want to take your time here – sometimes it helps to hand-baste each pleat together so they line up, and then machine stitch.
I repeated these steps for the lining – with the key difference here being the lining had a smooth upper cup, without the pleats. I also used a darker yellow shade for this that I found in my stash, which actually gave the bodice a more vibrant color.


I pinned the lining to the outer bust cups at the upper neckline – again, you will want to use a boatload of pins here and take your time on the curves.
You will also once again be very generous with the notches at the concave curves on the upper bust (you’ll thank me later).


Lastly, I understitched the bust cups as close to the seam as possible at the neckline and pressed everything flat. I pinned her on my dress form and decided that it was a job well done! I predicted my bust would be very happy with the end bust cup result…


Next up was attaching the shelf bust to the bodice front. Because you are working with multiple layers of fabric at this stage, you will (again) want to pin generously and sew slowly.


The trickiest part of this process (at least for me) was lining the bodice. I personally preferred to do this in a few steps, because there were so many layers and so many curves.
I started with the underbust portion, pinning first and sandwiching the bust cups in between the outer bodice and the inner lining. I worked my way around verrrrry slowly so none of the layers would catch.


My next step was to tackle the attaching the underarm and back section of the lining. I will say, this part was the most stress inducing – Gertie herself says this is NOT a step to tackle when you’re tired (she’s totally right. I tried it once at 10pm…had to unpick and came back to it in the morning when I was more refreshed).
For the back piece, you have to carefully tuck the bodice straps inside the lining and pivot the the top of the shoulder piece, careful not to catch the strap in your stitches (I tried to photograph what I mean below). I found it easiest to sort of roll it up and, keeping my needle in the down position, I could pivot at the shoulder piece.


Ithen turned the lining to the right right. To fully turn at the shoulder notch, my favorite tool for this is a tiny wooden dowel. I can push the narrow upper back piece, so the seam edges are clean. I understitched the lining wherever possible and pressed all of the seams flat.


After one stop and start (seriously. don’t try this step until you’ve had a good night’s sleep), I was proud to say I had a bodice! I pinned her to my dress form and was so relieved to find she fit!
Phew…


With the hard part done, next in line was to whip up the skirt. I knew I wanted the yellow rose border along the bottom, with a 28″ from waist to hem final length. Taking into account seam allowances, I carefully measured along the length to 31″ (which I would hem to 28″), until I had a long rectangle.


Using my very favorite gathering foot, I quickly ruffled the upper edge to my desired length. I usually ruffle it down to 30″ width – with seam allowance an ease, this will get me to my waist measurement of 28″.


Then, with the ruffles in place, I just had to attach the skirt to the bodice at 5/8″, matching up the edges and easing in the yardage to 30″. I also sewed up the back seam (doing my best to match the print), leaving an opening for the zipper.


Finally it was time to stare down my nemesis: the Zipper. The key here was working to match the seams and ensure that the V-back matched perfectly. I went with a 16″ natural zipper, and following Gertie’s tips from her Lamour Dress tutorial, I got it in without issue.


Then came the final finishes – a hand stitched blind hem and finishing the lining at zipper and at the waist lining with a clean ladder stitch.


If you’ve been following the blog for awhile, you know I have a minor illness. And that illness is called 3D appliqué. I can (apparently) never leave well enough alone. After I put this beauty on my dress form, I glanced over at the small pieces of leftover fabric and just had to use some of those beautiful yellow roses as appliqué on the bodice….
I started by interfacing the back of the fabric and then tracing the general shape around each flower with my water soluble pen.


I pinned my fabric to a solid white lining, and then followed my blue line with a tight zig zag stitch, almost the entire way around the perimeter. I left a small hole in the stitching open (for now).


To give the flower a 3D quality, a took a small amount of polyester batting and, using my small dowel, pushed it into the flower. I then closed up the gap with the same, tight zig-zag stitch.


I repeated these steps until I had a garden of small and large yellow roses. Then, I used my Fray Check and dabbed it all along the perimeter of my zig zag stitch. A few drops of water and my blue lines disappeared like magic.


I then carefully cut out each flower, being sure to cut outside of the zig zag stitch line. I added a bit more Fray Check to any areas that looked like they might fray, which would keep them looking cleanly cut.


With a rose garden to play with, I started to try various combinations of bloom placement on my bodice. Once I was happy with the floral arrangement, I set about adding a bit of structure to the flowers that needed them.


For the flower that was hanging over the edge of the bodice and the one at the waist, I wanted to add some wire to the inside so I could bend them in place as needed. For this, I needed some thin wire with a plastic stealth. Mr. Dressed happened to have just what I needed in the garage.

I placed the flower in place, and traced the portion that would hang over the edge of the bodice. Then, I used that line as an outline and drew on the wire skeleton, that I could use as a template to glue my wire.


With my template drawn and ready, I turned to my favorite trusty fabric glue – fabric fusion. I seriously love this stuff, and have used it on nearly all of my recent sewing projects.
Using my lines as a guide, I quickly cut the wire to my desired length, which I could then glue onto the back of the flower.


Because it comes in a handy pen, I could easily mark a thin line of glue over my marking, onto which I quickly placed my wire. I repeated this for all of the wire pieces, leaving the center vein to last. Then, I put a coaster over the wires to keep some pressure on, and let them dry overnight.


To cover up the wire (and protect my skin and/or the dress from getting snagged), I knew I wanted to cover up the wire. So, I used my water soluble pen and roughly followed the outer shape of my flowers on a piece of plain white cotton, which I quickly cut out.


Once the glue was dry, I placed my flower backing over the wire, and stitched it on using a straight stitch – these stitches were pretty much invisible, as I stayed on one edge of the original zig zag stitch.
As a final step, I dabbed some of my Fray Check onto the edges of the white backing, just to prevent it from getting frayed with wear.


Last up: applique! I have had way more experience with appliqué than I ever thought would be possible this year, so I quickly stitched the flowers in place with tight backstitches round the perimeter.
For this step, I recommend pinning the flowers where you want them, but then trying it on before you commit. The fabric will stretch and move when it’s on your body, and you want to make sure you’re flowers don’t stretch or bunch oddly.


For the waist flower, I quickly glued on two brooch clasps to the back – this would give me some flexibility with this piece. I could add it onto the dress wherever I fancied, and take it off if I wanted a slightly different look.


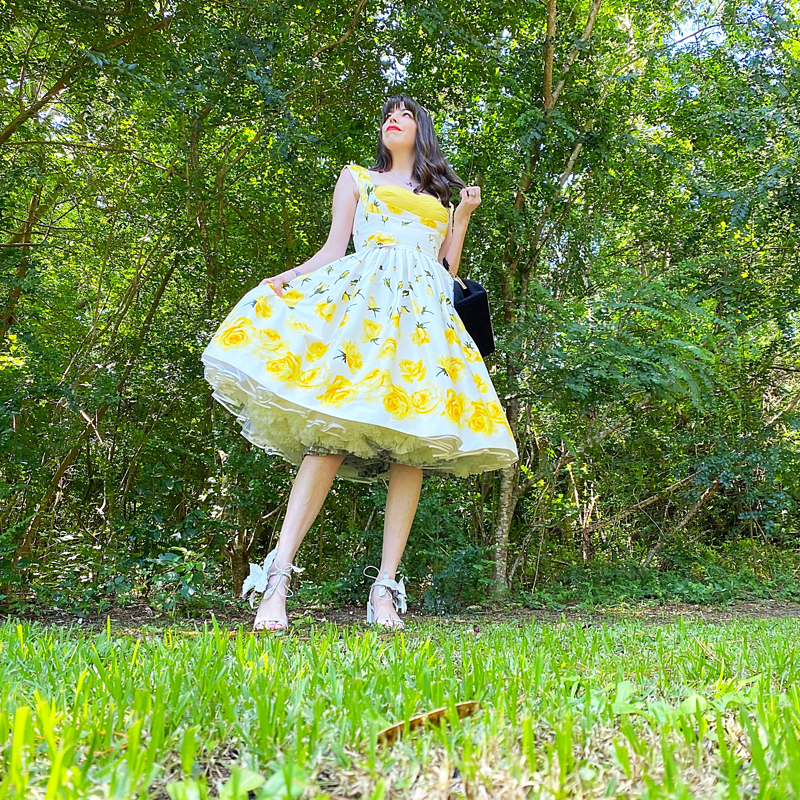
And suddenly, there she was. A big ball of sunshine graced my sewing room and bounced happiness around every corner. It is just so difficult to be sad when in the presence of such a bright, happy color. And believe me when I say I NEEDED something bright and happy the last few months…


The Debut
I took this beauty for a spin around the backyard, and I swear the birds started to chirp a bit more loudly and a calm breeze merrily floated through, as if the entire garden caught its breath and cleared a path for this dress.
I am absolutely in love with this pattern, and definitely see other Liz Dresses in my future. Even though there are a lot of pieces to this one (which can be a bit intimidating at first glance), my best advice is to take a deep breath, make a toile, and tackle it one step at a time…


A yellow rose is the promise of a new beginning


This post was meant to go live last week, but I was a big ball of nerves and just couldn’t focus on sunshine when faced with so much uncertainty. And the joy and relief that radiated through me this weekend, signaling the start of a country that I hope can start to heal, was like nothing I have ever felt. Yellow roses are about new beginnings. And I fully intend to wear this dress as we usher in a necessary renaissance.
But, there is something important that I’ve learned: we can’t ignore the hate, and anger, and atrocities that have been emboldened to bubble to the surface these last four years. If I will take something from this experience, it’s that we can no longer sit idly by in a cloud of ignorance. We see the truth. And we will. not. accept. it. any. longer.
So, I slipped on this most perfect dress, festooned in my happy color. I straightened my spine and felt my chin rise. And the sun began to peek through the clouds as change was ushered in…
xoxo
Construction Details:
Shelf bust fabric: Kona Cotton in Lemon
Dress Fabric: Gertie Yellow Rose Print Cotton Sateen
Pattern: Charm Patterns Liz dress
Batting: JoAnn’s
Additional notions (zipper, thread): JoAnn’s
Outfit Details:
Dress: Made by me from the Charm Patterns Liz Dress!
Headband: Forever New (similar)
Handbag: vintage, Mercedes Bien (similar here and here)
Shoes: Cecelia NY
.
instagram // twitter // facebook // pinterest
.
Any items marked with a “c/o” (courtesy of) a retailer mean I was provided with an item for free in exchange for a review and/or feature on my blog. I always provide my honest opinion of any item I’m reviewing, regardless of whether it was sent to me as a courtesy item or if I purchased it myself. In addition, this post may contain affiliate links. This means that if you click and/or make a purchase through certain links or ads on this site, I may make a commission from that click and/or purchase at no cost to you, which helps with the day-to-day running costs of my blog.