
I’ve always had a thing for clothing that finds its way to nature. Floral border prints, necklaces of leaves snaking around my neck, and you are all by now pretty aware of my fruit-themed sartorial obsession. I wonder if it’s a way to help me feel more grounded. Where, despite the pavement I click my heels down or the car I zip to the lab in, I am always a little bit connected to nature.
Given my proclivity for all things green and flora-inspired, it should therefore come as no surprise that my latest dress design, made of vines and leaves that grow upwards from the hem, feels as if it’s coming out of the earth. And if not, at least it feels like it’s come straight out of a 1950’s garden party…


The Inspiration
Awhile back, I spotted the most stunning vintage dress at Sweet Bee Finds – I’ve gotten many a 1950’s beauty from Brooke’s shop, and was pretty bummed to see the clear SOLD sign. But, I loved the ombre green border print, with a fanned out bodice and three straps coming from each of the petals. I saved it to my long list of ISOs, hoping I might find her twin out in the wild one day.
Of course, I couldn’t quite get that bodice out of my head. And true to form, the wheels started turning and I wondered if it might be possible to recreate it – putting my own spin on it of course. I would need the perfect print and a pattern I could hack, but these seemed like small hurdles to overcome.
Famous last words….


The Design
First step is always finding the right pattern. While I’ve been getting a bit better with pattern drafting this past year, I felt more comfortable starting from an existing pattern and making modifications than I did in jumping into a draft from scratch. I ended up finding the perfect option in Simplicity 4440: although it’s a pattern for a gown, the part that caught my eye was a wing petal bust that I knew I could easily modify to bring the dress in my head to life.
Turns out, this is one tricky pattern to track down. I was lucky enough to find one, but it was made for the miniature, with a 30 inch bust. I glanced woefully down at my 34D’s and knew we had embarked on a bit more of a project than we bargained for. But, after hunting the pattern for weeks and coming up with nothing, I clicked on “buy” and crossed my fingers I could make the necessary adjustments.

The other magic ingredient for this dress was going to be the perfect print. I knew I would never find one that was exact to the vintage original (and I like to put my own spin on things anyway). I immediately started browsing on the shop of one of my favorite graphic artists – Peacoquette.
I had worked with Sarah before on some of my early sewing adventures – she designed the dahlia print and the Jane Austen border print that went into two of my favorite creations. Her prints are always eye-catching and they never fail to inspire. She had a vine print already in her collection – so I messaged her to see if we could make it into a border print on a white background, with those glorious Hedera helix-esque vines snaking up from the hem. She more than met my expectations – and I couldn’t wait to get started.


If you feel similarly inspired recreate this dress, you will need:

The Construction
While Sarah worked away on the print, I gathered the rest of my materials and set to work trying to get the pattern to a place where it might work. I knew this one was going to take some alterations and more than a few toiles. I always start by tracing the original pattern onto butcher paper.

I‘m definitely no expert in pattern drafting, but the general way to size up a pattern is something called the “slash and spread.” I knew I would need to add a good 6″ to this pattern to make it fit.
Given that there were 6 pieces that make up the bodice (a top and bottom that meet at center front and two back pieces that meet at the back zip), I decided to add 2″ to the two front pieces and used my standard block for the back (which has an extra 1″ than the pattern), giving me 6″ total. Being long waisted, I also opted to add 1″ of length to the bodice.


Because I like to think I’m the sort of person to learn from past mistakes, I knew I would need to make a toile (or 3) before cutting into the fashion fabric. If you’ve never heard of it before – a toile is basically a practice run on scrap fabric where you can test a pattern and make the necessary adjustments.
Thankfully, I have piles of cotton scraps from my various circle skirts, so I went through a couple of iterations of the bodice before I had a fit I was happy with. This is always the part of the process where I can get impatient – it’s such an important step, but I always want to get on with the sewing!


Now that my pattern was set, I got to work cutting everything out. This would take a bit of extra planning to ensure good print placement. I decided to do the waist portion of the bodice in white, with the green vines on the bustling. Armed with my rotary cutter and pattern pieces, I got to cutting.


I cut out the bodice, back, and waist pieces, as well as a repeat of each for the lining. I also opted to cut out interfacing for each piece, to give it a bit of extra structure to the bodice.


Then, I cut out the series of bodice “petals” on in a denser green version of the print and the other in white. I lined them all up and prepped the pieces to sew together.


I started by pressing all of the interfacing to the bodice pieces, and then added in the darts to each of the back bodice pieces, pressing them towards the center.


Next, I stitched the bottom front bodice pieces together at center front. I pressed the center seam flat, and then put it to the side while I worked on the upper bodice. I also sewed the top front bodice together at the center front, and pressed the seam flat.


I connected the dots of the front bodice, pinning them together. Flipping to the inside, I sewed 2.5″ inches between the dots, creating three equal seams down the center of the bodice.


I flipped to the front, and carefully pressed and pressed it flat, ensuring equal spacing of the pleats. If I were to do this over again, I would probably decrease the length of the seams, which do have a flattening effect. I would likely go with 2″ or even 1.5″ on a second pass. Ahhh hindsight and all…


Next up, I pinned the lower bodice to the upper, careful to match the center front seam. I sewed them together at 5/8″, pivoting the needle slightly at the center.


For the petals, I planned to sew in a a green rattail cord for the straps, which would come out of the tip of each. I started by taking each piece of fabric and pressing it in half with right sides together.


I tucked in a piece of rattail cord (cut to ~12″ of length) inside the fold, leaving the excess primarily inside and a small 1″ portion sticking out at the corner. Then, I sewed the seam closed at 1/4″, securing the rattail cording to the seam allowance. I stitched around there corner, leaving a gap.


I pulled the fabric through the gap to the right sides, and carefully pressed each seam flat. This part can be a bit fiddly, but I worked slowly and used a small wooden dowel to press the seam from the inside while working with my iron. I repeated this until I had four finished “petals.”


I then returned to the bodice and sewed the back panel to the front at the side seams. Then, I put the lining together as with the original bodice. Before stitching the bodice front to the lining, I similarly placed my rattail cord at the corner of the front bodice, pinning everything together.


Working slowly, I stitched the lining to the bodice along the top seam and the underarms. I clipped the curves and flipped to the right side, pressing all of the seams.


With the bodice together, I measured and pinned the petals to the bodice, crossing them at the front for a bit of extra detail.

To secure them in place, I opted for a ladder stitch – this has the benefit of affording me a lot of control, but can be nearly invisible when you pull the thread taught. I’ve shared a more detailed tutorial before, but basically you create a stitch on one side of the fabric, and then make an equal length stitch on the opposite side. You repeat up the seam, creating a “ladder” of stitches. Then, you pull the thread, closing the seam.


On the inside, I used a slipstitch to secure the petal to the lining. I then repeated the process for the white petal, until the bust detail was complete.


Next up was to finish the straps. I measured equal spacing across the back shoulder seam, and pinned the rattail cording in place to get the bodice to my ideal length. After a quick basting stitch so they wouldn’t move, I closed the seams with right sides together, and sewed them securely in place.


As a final bit of security to prevent fraying of the straps, I added a dot of fray check to the edge of each strap (which dries clear). Because this will be a high stress area, it’s good to think ahead.


Then it was time to add the skirt to the bodice. I quickly gathered the skirt using my ruffler foot (Bernina Foot #86 for my Activa 220 is seriously the best sewing accessory I have ever invested in).


I sewed the skirt to the bodice at 5/8″ seam allowance, with right sides together. taking care to keep the lining out of the way so it didn’t get caught in the stitches.


It was finally time to tackle The Zipper. Although I’ve gotten a lot more confident with zippers since my Circle Skirt Making Mania, I admit dress zippers are a little tricker. But, I followed Gertie’s zipper tutorial (I will never stop recommending that video) and had little trouble, sewing in a 22″ white lapped zipper.


Because of the shape of the bodice, I noticed it had a tendency to gape at the front. One trick I’ve seen in several vintage dresses is to actually make a tab out of plastic boning that can tuck into your bra at the center front.
I dug up some boning from my stash, and cut off a ~3″ long piece. I trimmed the plastic down a bit, leaving the fabric sleeve in tact.


I stitched this to the inside of the bodice, right at the start of my cleavage. I tacked only the top portion (that had the excess fabric), leaving the bottom free. This would allow me to tuck the tab into my bra, keeping the center of the bodice flush against the skin.


Although I had been doing fittings throughout, it’s always tough to truly test a fit until you have the zipper in. It was at this stage I realized something I didn’t account for in the original design: the straps likely weren’t meant to come from the tips of the bodice wings. Although the bust cups fit well in my toile (which was the thing I was focused on), when stitched together the shoulders were far too wide.
I partially solved this issue by adding some discrete darts into the back shoulder, with one each in between the straps. They were hardly noticeable when worn, but definitely improved the fit.


But, even though the boning tab prevented some of the bust gaping, there was still just enough excess fabric in the front bodice to be annoying. I added additional darts to the front as well – it change the shape of the bodice a bit from the original design, but I actually think I might prefer its architectural vibe. Next time may modify the original pattern and take out some of the excess if I want to keep a straight petal shape.


As a final step, I pressed up the hem to 29″ length, and finished it off with an invisible hem. I also pressed up the bodice lining, and secured it in place with a slip stitch, hiding all of the seams.


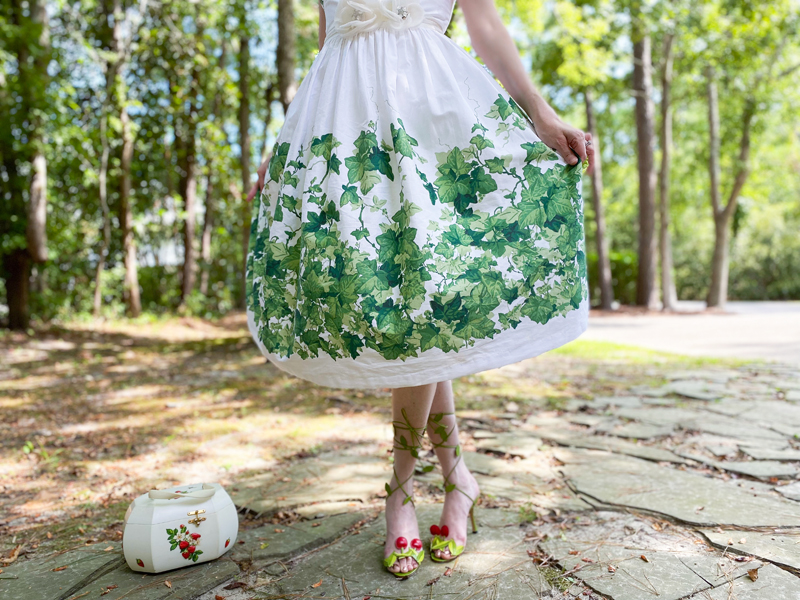
Although it ended up a bit from where it started, I am so happy with how this dress turned out, like ivy snaking up a trellis. I love the print and the unique bodice, which finally fits like a dream.


The Debut
I have definitely felt the shift this past week, where winter’s icy grip starts to pull the world towards her and fall is starting to acquiesce. I guess that means I’ll have to start to put away all of my summer sundresses and turn my mind back to patterned tights and wool felt circle skirts. Hmmm….what shall I make next??


But, like ivy
We grow where there is
room for us
Miranda July


English ivy, or Hedera helix as we nerdy scientists call it, is a fairly hardy plant. It can be found thriving in the most unlikely of places – climbing up walls and fences, reclaiming forgotten buildings. Unlike other flowering plants that might need a specific amount of sunlight or regular watering and pruning, H. helix is pretty content to just do its thing without too much intervention.
I like to think of all of us this past year like an English Ivy. Finding our way up and out, supporting ourselves on brick walls and narrow trellises, growing wild and free. Sometimes I wonder who we might become if left unfettered; where we might grow.
Let’s find out…
xoxo
Construction Details:
Dress pattern (modified): Simplicity 4440
Fabric : Romantic English Ivy Border Print by Peacoquette via Spoonflower
Rattail cording: Jungle Green from Griffith Gardens
Additional notions (zipper, thread): JoAnn’s
Outfit Details:
Dress: Made by me!
Necklace: gift, Firefly
Belt: gift, Alannah Hill (similar)
Handbag: vintage, Anne’s Pocket Finds (similar here & here)
Shoes: Manolo Blank, thrifted on eBay (similar here)
.
instagram // twitter // facebook // pinterest
.
Any items marked with a “c/o” (courtesy of) a retailer mean I was provided with an item for free in exchange for a review and/or feature on my blog. I always provide my honest opinion of any item I’m reviewing, regardless of whether it was sent to me as a courtesy item or if I purchased it myself. In addition, this post may contain affiliate links. This means that if you click and/or make a purchase through certain links or ads on this site, I may make a commission from that click and/or purchase at no cost to you, which helps with the day-to-day running costs of my blog.