
Truth be told, I hate the rain. Now, don’t get me wrong – I know we need it. Without rain, life as we know it would pretty much not exist. But, I still can’t help but sigh when I wake up and see grey and gloom outside my window. Rain is not a friend to a suede shoe or an appliqué prone to color bleed. So, in the middle of a two week bought of nothing but grey skies and soggy sidewalks, I decided to turn the weather into inspiration.
I‘ve collected a lot of vintage patterns over the years – much like my vintage wardrobe, I very rarely ever hunt for a specific pattern. Rather, when I find one that pulls at my heartstrings, I scoop it up and store it away in my pattern drawer until inspiration strikes. The McCall’s #3591 pattern has been in said drawer for ages, patient her creation would come. With multi-colored umbrellas around the hem against a cloudy grey blue sky, clearly it was just sitting and waiting for a rainy day….


The Design
Even though I would be working from pattern McCall’s #3591, I always like to make things my own and simply can’t help but mess with the original a tiny bit. Or a lot bit. In this case, the “messing” would mostly be BLING. I decided to modify the original from a half circle skirt to a full (cause ain’t nobody got time for a skirt that can’t hold 3 crinolines). And, to add some sparkle, I decided what this umbrella skirt was missing was some rain…

For the base fabric, I opted to go with a Kona Cotton – this is currently my favorite cotton to work with, as it has a nice weight and drape, but is also breathable for summer. I pored over many options, and ended up going with the color Breeze from Hartland Quilt Shop, which is a light grey-blue befitting an overcast day, and the matching thread in Copen Blue (#227).

I wanted to stay true to the original design in my umbrellas, which are in shades of green, dark blue, pink, and yellow around the hem. Because this isn’t my first appliqué rodeo, I went straight to BBD Supplies for sheets of wool blend felt in cotton candy, buttercup, columbia blue, grassy meadows, and black glitter for the umbrella material and details.
I also picked up some Sulky metallic embroidery thread in black (#7051) and pewter (#7009) from JoAnn Fabrics for some of the additional detail on the umbrellas.

Now, if you’ve been reading the blog for awhile, you will know that my favorite color is glitter. So, naturally I went in search of some rain that would add a bit of sparkle. I found the perfect teardrop-shaped sew-on rhinestones at Fancy Element. Even better, they had them in multiple colors and sizes.
I went with the 17 x 28mm glass teardrop in clear and light sapphire blue, the 10.5 x 18mm in light sapphire blue, and the 13 x 22mm in sapphire blue. This would give me the option of grading the raindrop down, with the smaller drops towards the waist, and larger drops down by the umbrellas. So, elements in place, it was time to get to work!


To recreate this skirt, you will need:

The Construction
The original skirt pattern called for a half circle skirt, with 2 umbrella appliqués per 1/8th of the circle (ie, 8 umbrellas total). Without even batting an eyelash, I knew we would be doubling that and making it a full circle and spacing the umbrellas a bit more (12 umbrella appliqués, 3 per quarter), ripe for twirling. One of the good things about learning how to make a circle skirt is that, once you learn the trick to them, you don’t event need a pattern to whip one up.
So, leaving the pattern to the side, I quickly whipped up a circle skirt to suit my 28″ waist and preferred 28″ length to hem measurement (this corresponds to a 4.5″ waist radius, and 34.5″ length radius – see this post if that sounds super confusing, where I walk through how to make a circle skirt).


With the circle skirt done, I turned my attention to the umbrellas. I had previously selected the four colors of felt that would bring this beauty to life. The pattern calls for cotton for the umbrellas (with some tricks for folding under the seam allowance). However, I have found wool blend felt super easy to work with, with the added bonus of not having to ever worry about raw edges.

Using the included pattern for the shape, I cut out 12 umbrella tops (three of each color). Depending on your preference, you can use scissors or a rotary cutter for this part. I love my Olfa 28mm” rotary cutter for small shapes, which gives me a clean edge and can easy tackle small curved edges.


What is an umbrella without a handle? While the pattern called for hand embroidering this detail, I felt that (a) my embroidery thread wasn’t super thick and I wanted a more substantial handle and (b) the felt would be miles easier to work with. I worked from the shape on the pattern and used that as a template to cut out 12 black glitter handles.


Also using the black glitter felt, I cut out series of small umbrella tips, each one about 1.5″ long with a rounded end.


As a test, I placed the umbrellas around the hem of the skirt, alternating angle but keeping them roughly the same distance up from the hem. To keep things looking symmetrical, I worked one quadrant at a time (with 3 umbrella’s per quadrant) – the best thing to do is place them, step back, and tweak.

Once the canopies were where I wanted them, I used their position to determine the placement of the handles and umbrella tips, double checking my measurement up from the hem to ensure it was all still symmetrical. Then, I removed the canopies and got ready to get my sew on!
I opted to machine sew on the straight part of the handle to make it really secure.


After the straight stitching was complete, I used fabric glue for the curved parts and the tip pieces (it can be tricky to get the glitter felt to go smoothly through the feed dogs on curves).
My personal preference for fabric glue is Aleene’s Fabric Fusion – I have also found the fact that it comes in this handy pen to be really useful for these kind of projects, where you need precision. I added the glue to the back of the handle and umbrella tip, and pressed them in place. I left the skirt for a few hours at this stage to ensure the glue was dry.


Once dry, I could appliqué on my umbrella canopies over the top of the black glitter felt. Working one at a time, I attached each one to the base skirt using a tiny backstitch around the perimeter. This part went reasonably quickly – as I’ve said before, the best way to get through it is to find a good show to binge on Netflix and attack it.
I was able to get all of the umbrellas done in ~2hours, which meant I could spent most of my time on the fun details…


If you’ve been following for awhile, you know I love to try to learn new skills with each project I tackle – while I have a lot of experience with appliqué, I decided to up-skill this time with some hand embroidery to add some detail to the umbrellas. I will start this section by saying: If any of you out there do a lot of hand-embroidery, you are my hero. Seriously. This is a TIME COMMITMENT.
The original design called for details along each umbrella top, depicting the canopy skeletal structure, in black. I went with black metallic thread for this and decided to up my embroidery game and learn how to do a split stitch. Described as one of the “easier” stitches, I knew I could dip my toes in without getting in over my head.
Turns out, unlike most of those “easy” sewing patterns out there, this wasn’t false advertising and the split stitch was actually pretty straightforward!


I watched this super helpful YouTube video by Cutesy Crafts and then read this post on the Sublime Stitching blog (because I personally like to work both with videos and remind myself of the process with pictures when I’m sewing for quick reference).
For this stitch, you essentially bring your thread up to the top and down again. Then, you bring the needle back up in between the stitch you just made, essentially “splitting” the stitch. Then, you bring the needle down again and repeat, creating a chain link effect.

After practicing a few times, I felt I had mastered the process and could try it on my skirt. First, I drew the lines onto my umbrellas using my trusty chalk wheel – I would follow this line with my split stitch. On each canopy, I drew 4 curved lines from the umbrella tip out to each of the peaks at an arc.


I threaded my needle with three strands of black metallic embroidery thread, and doubled them – giving me six strands of thread to create a thicker stitch. Starting with the middle lines and working my way out to the edges, I slowly worked along each line with my slip stitch.


I will admit – this part was a beast. It’s very fiddly work and takes ages to do. But, I was really pleased with the outcome. It definitely added some sharp contrast to the dreamy pastel felt, and gave some depth and dimension to the design. And the split stitch was time consuming, but not very complicated and pretty easy to master.
There is also something magical about feeling and manipulating the fabric by hand – it may sound a little cheesy (okay a LOT cheesy), but there’s almost an energy transfer during this process, going from you to the garment. The time and painstaking patience puts a piece of you into the piece you are creating. They say food made with love is better. I say the same is true for circle skirts.


This part took a fairly long time – partly because of its tedious nature and partly due to a week and half gap where I ran out of my black metallic thread and had to (oh-so-patiently) wait for more to arrive from Joann’s (Confession: I was not patient. I even loudly complained to my mom about it, so deep into my commitment to this project was I). All in all, after about 10 hours of work, I was pretty happy with how jaunty my umbrellas were looking.
After that (somehow), I wasn’t entirely burned on embroidery. So, I wanted to give the handles a little bit of pizazz. Using 6 strands of pewter metallic embroidery thread, I brought my needle up on one side and down on the other side of the lower handle, looking a bit as though it was wrapped around the end.


Once the hand embroidery had come to a blessed finish, I consulted the pattern, which called for a rhinestone at each point of the umbrella canopy. I’m not usually one to shy away from bling, but knew I would be getting my sparkle fix with the rhinestone raindrops.
So, I opted to add a small adhesive pearl to the ends instead. I had a few sheets leftover from my Jane Austen dress, and had already figured out the best technique to use.

For each point, I would put a dab of fabric glue – I found it was best to use a glue pen that was pretty full, allowing me to have a lot of control over how much glue came out. Then, I would remove a pearl with my scalpel, and place it directly over the bead of glue. Although the glue dries pretty quickly, I let it fully set over a few hours before I went on to the next step.


Next up came the part I had been looking forward to the most – GLITTER! I was so excited to get to play with rhinestone raindrops. But, knew I needed the large elements to be done first before I could. Finally, the hour was nigh!
I started by getting organized. First, I gathered all of my raindrops and divided them up so I would have an equal balance of color and size. My brain tends to work in quadrants, so this meant that for each quarter of the skirt, I would have (roughly) 6 each of the 17 x 28mm glass teardrop in clear and light sapphire blue, 6 of the 10.5 x 18mm in light sapphire blue, and 9 of the 13 x 22mm in sapphire blue. I separated them into four clear piles, allowing me to keep track of them.


I wanted my rain to have a bit of a graded effect – keeping larger raindrops closer to the hem and smaller ones up by the waist. In addition to helping keep heavier items towards the bottom, this also seemed more realistic to me – raindrops appear larger the closer they get to the ground, right?

Starting with the 17 x 28mm glass teardrop in clear. I evenly spaced them around near the hem of the skirt, careful not to make things too symmetrical. I wanted a balance, but also a randomness to the design (cause that’s how rain is after all).


After the clear drops looked evenly placed, I moved on to the and light sapphire blue. I found that working one color and one size at a time helped with keeping things looking well-distributed – I could add all of the one color, making sure that looked balanced, before moving on to the next.


Lastly, I added the 10.5 x 18mm light sapphire blue and finished with the 13 x 22mm in sapphire blue. Just going one at a time and making small adjustments, I was able to get a pattern to look random, but intentional.


Because I couldn’t pin the rhinestones in place, once I was happy with their placement, I used my disappearing ink pen to mark the tip of each one and a small code so I knew which size and color of raindrop was meant to go there. This way, I could sew on each one at a time without worrying about losing my painstakingly placed design. Later, I would spritz with water and the marks would disappear.


The rhinestone raindrops from Fancy Element could be glued or sewn on – I opted to sew them. Each one had a pre-drilled hole at the top and the bottom. Lining up my rhinestone raindrop with my mark, I would stitch it on at the top with 4-5 quick looped stitches. After tying off the thread, I would repeat this at the bottom.
My main advice here is to be careful not to pull the thread too taught, which can cause puckers. Just take your time, working one element at a time, and buckle up for several hours of hand sewing…


When it was done, my fingers were pincushions, but the effect was….in a word: Spectacular. It sparkled from every angle, casting rainbows throughout my living room and reminding me of all of the good that can come after the rain. I was so excited to have gone with my gut and added this element – it really made the design unique and brought it to a level I didn’t even know was possible.


You would think at this stage I would call it a day – but Mr. Dressed came at me with one more idea: What if I used the silver metallic thread and, every so often, showed a “splash” on top of the umbrella, leaving a memory of where a raindrop had just hit?
Although I was pretty over hand embroidery at this point, I had to admit it would be pretty darned cute. Since this would be my first skirt in awhile without a critter, I needed at least one overly adorable element….


Next up – lining, waistband, and zipper. Aka – the Home Stretch! I had pre-cut the lining out of white Kona Cotton, which I attached to my skirt at the waistband at 3/8″ seam allowance. I closed up the back seam for both lining and base, leaving 9″ at the top where I would add my zipper.


I started by cutting out two 3″ x 32″ strips from the Breeze Kona Cotton, which would be the front and lining to my waistband. I stitched the two pieces together at the top, pressed the seam flat, and then under stitched the lining, folding it in half. I attached it to the skirt with a 3/8″ seam allowance, leaving excess at the edge to create a tab.


Then, I took a 9″ all purpose poly zipper in white, and stitched it into place using a simple lapped zip (if you struggle with zippers, Gertie’s tutorial is the best!). To cover all of my stitches, I pressed under the waistband lining seam, which I would later secure it to the waistband with a quick slip stitch.


When I put the skirt on my dress form…I have to admit it felt like it was missing something (how a skirt with 108 rhinestone raindrops and hand-appliqued umbrellas can be missing something is beyond me, but I tend to go with my gut on these things). Using a few pieces of leftover fabric, I started to drape on my dress form and wondered how the skirt would look instead as a pinafore.
Essentially, this wouldn’t change too much with the design – I would just add two straps to the waistband skirt that could be taken on and off easily with buttons. This would give me even more flexibility with the skirt – which could be worn as a pinafore or as a simple circle skirt.

I cut four 3″ x 35″ strips out of the Breeze fabric and interfaced two of them (as if they were a waistband) and stitched the front to the lining at one side, flipping and pressing it closed. To give them some structure, I decided to add a few rows of parallel stitching (like a standard JLC waistband).
Spaced 1/2″ apart, each strap got 4 rows of stitching along it. Once I got to the last row, I pressed in the seam allowanced and closed them with a topstitch.


For a final bit of cute, I decided all of the rain on the skirt had to come from somewhere, so why not use the pinafore straps to create a raincloud? I quick cut a cloud shape out of wool blend linen felt, which I stitched onto the top of the left strap at the shoulder, trimming the excess.


Next, I took 3 leftover raindrops and hand-stitched them to the front of the strap, looking as though they were falling from the cloud (and started all of this rainy business).
Once I pinned them in place and stepped back to admire the effect, I couldn’t imagine this skirt without the pinafore option. Lesson learned: always trust your gut when it calls for a little extra.


Although I was obsessed with the pinafore, I knew I wanted the straps to be optional and easily put on and removed depending on my mood. This meant I would have to have an easy attachment system, which I planned to achieve with buttons. First, I put the pinafore on and pinned the straps at the right height, criss crossing them at the back.


Once I was happy with the fit, I marked the length of the straps with my disappearing ink pen where they would meet the waistband at the front and the back. This was simply a way to confirm I wasn’t accidentally sewing the buttons on in the wrong place (trust me. this can go rogue when sewing).

Reaching into my stash, I chose the buttons I wanted – with two 0.75″ diameter buttons at each strap in the back and one large 1″ button for each strap at the front. I measured out the diameter with my marking pen and quickly sewed in buttonholes into the straps using my buttonhole foot.
Once they were all sewn, I carefully opened up the center of each with my seam ripper.


Positioning them onto the waistband, I then marked the places where the buttons should be, following the buttonholes I had just sewn. I sewed the buttons in place to the lining of the waistband only, so that they wouldn’t show through to the front. Then, I used a slipstitch to secure the lining of the waistband to the skirt, covering all of my stitches.


Last steps involved pressing under the hem and the lining, securing them together with a quick slip stitch, and adding my snazzy personal labels from the Heart of Wonder to the inner waistband.


I breathed a sigh of relief when I put her on my dress form to snap that final photo, still in disbelief at how a dress made of rain could literally light up my sewing room….


One of my favorite moments of closure for a sewing project is to put together a creation video – it’s always hard when you see the finished product to remember just how far you had to come to get it there. But, here’s hoping I never forget…
The Debut
I woke up the next morning after finishing this skirt and saw a grey cloudy sky, with rumbles in the distance warning me of impending inclement weather. But, for the first time in a long time, I didn’t mind. Because, despite the gloom and damp, rain brings with it so many more magical things. Rain puddles to jump in. Flowers soon to bloom. And skirts so sparkly they bounce rainbows around your sewing room.
And it’s true what they say – if you want the rainbow, you’ve got to put up with the rain…


Clouds come floating into my life,
no longer to carry rain or usher storm,
but to add color to my sunset sky.
Rabindranath Tagore


The best thing one can do when it’s raining is to let it rain.
Henry Wadsworth Longfellow


I‘m not sure why, but sewing for me comes in waves. It’s always been that way. I can experience a long dry spell and go months without feeling inspired to create something new or tackle the never-ending tailoring pile. And other times, I almost can’t keep up with the deluge of ideas, my hands itching to produce new projects before I’m even through with my current one. I guess it’s true of life and true of sewing: when it rains, it pours….
What are you creating these days?
xoxo
Construction Details:
Skirt Pattern: McCall’s #3591
Skirt fabric: Robert Kaufman Breeze Kona Cotton
Skirt Lining: Robert Kaufman White Kona Cotton
Appliqué: 12″ x 18″ sheet of wool blend felt in cotton candy, buttercup, columbia blue, grassy meadows, and black glitter
Rhinestone Raindrops: clear, light sapphire, and sapphire from Fancy Element
Additional notions (zipper, thread): JoAnn’s
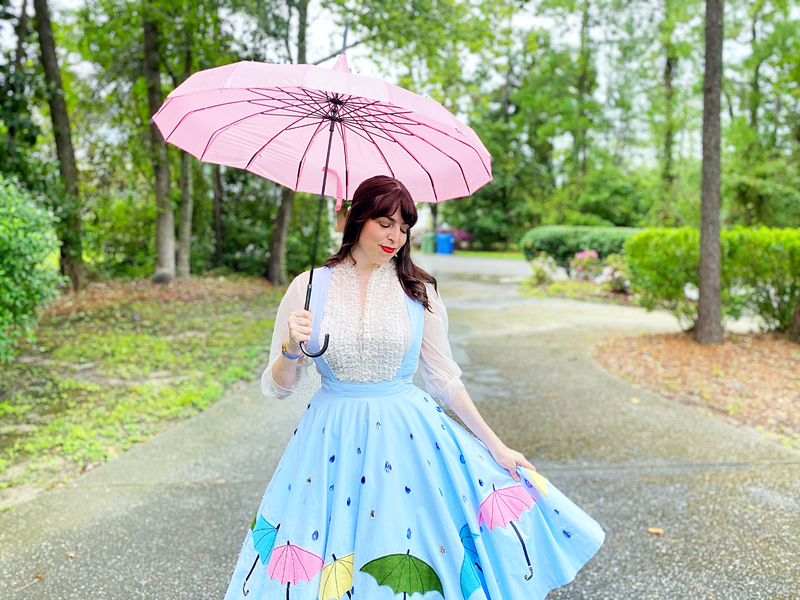
Rainy Day Outfit Details:
Top: Beleza Vintage (similar here & here)
Skirt: Made by me!
Raincoat: Elements Rainwear
Umbrella: Unique Vintage in pink
Rain boots: Modcloth (similar here)
Sunny Day Outfit Details:
Top: Lucy Teacup
Skirt: Made by me!
Necklace: gift, Swarovski
Handbag: Veracious Vintage (similar)
Shoes: Steve Madden (similar)
Lip Color: Schiap
.
instagram // twitter // facebook // pinterest
.
Any items marked with a “c/o” (courtesy of) a retailer mean I was provided with an item for free in exchange for a review and/or feature on my blog. I always provide my honest opinion of any item I’m reviewing, regardless of whether it was sent to me as a courtesy item or if I purchased it myself. In addition, this post may contain affiliate links. This means that if you click and/or make a purchase through certain links or ads on this site, I may make a commission from that click and/or purchase at no cost to you, which helps with the day-to-day running costs of my blog.