
There is something truly captivating about a city skyline at night. Looking out across the sea of buildings, feeling so far away from the world, but somehow still seeming connected to everyone and everything. I always loved how the lights blinked on slowly as the sun set, hinting of the lives within those windows. Both mundane and magical.
When I was in college, I was lucky enough my senior year to get into a new high-rise dorm overlooking the Charles River. Even at 21, I somehow knew I would never get a view that spectacular again. Walking through the front door, with almost floor to ceiling windows in front of me, took my breath away. Every time. I still remember cramming for finals in that living room. My roommates and I putting on facemasks and clattering away on our laptops. Ordering pizza with my best friend and planning for graduation. Feeling as if the whole world, much like that skyline, was out in front of us, ready for the taking.


The Design
I am a huge proponent of the fact that fabric sort of calls to you. For those of us who sew, I guarantee we all have stacks of yardage – in bins or on shelves – waiting for the right project to beckon her. I rarely (if ever) hunt for a fabric for a given project – I find the fabric first and know the project will find me.
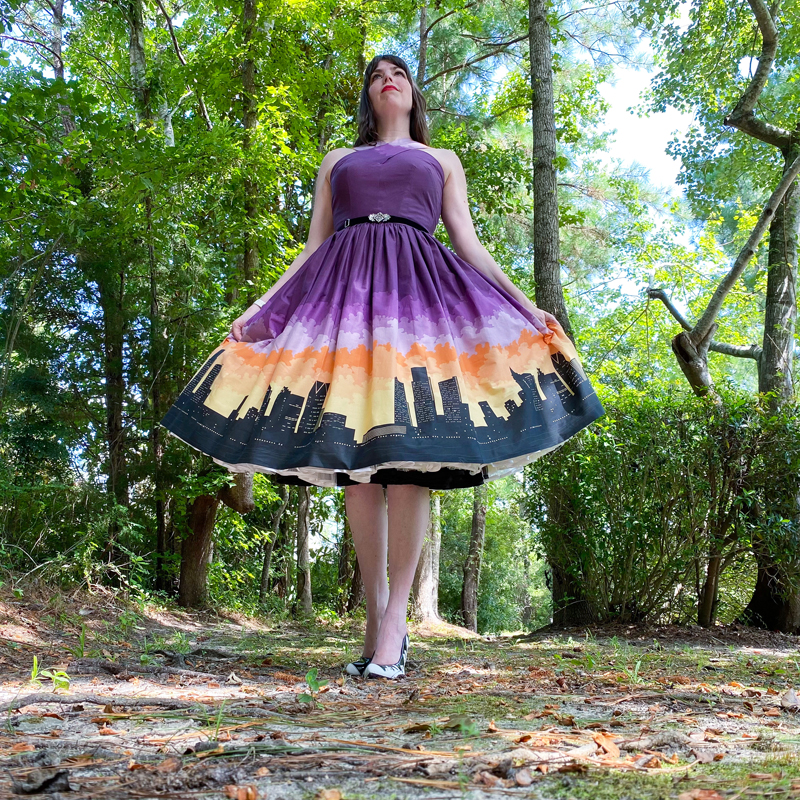
Years ago, I had gotten this city skyline fabric from Spoonflower – it’s Detroit at sunset, in shades of purple and orange. I bought it without a project in mind, knowing one day the right pattern would present herself.

I was taking a gander on IG one day, and saw my girl Rose has posted an amazing dress she had made – with a unique criss-cross bodice. It didn’t take me long to find out that the source of this pattern was Subversive Femme, who had graciously converted an original Clotilde #3170 dress pattern to a printable pdf. Even better, at 36″ bust and 28″ waist, it was already exactly my size….


To recreate this skirt, you will need:

The Construction
With the fabric in hand, it was time to get the pattern printed. While I was a traditionalist for many years and loved original patterns, I’ve really come around to pdf patterns recently. I love the accessibility and the fact that, in general, printer paper is far less delicate than tissue thin pattern paper. Plus, because I very rarely need a pattern for my skirts, I can save on space because I only need to print the bodice pieces.
If you, like me, are a bit new to pdf patterns: prepare for your world to be rocked. Essentially you can buy and download them immediately (no waiting for shipping) and either print them at home or your local print shop. Good pdf patterns come with a clear guide on how to set up the grid – and so you just fold down the edges, match the lines and tape it all together. And in a few short minutes, we were ready to roll!


Once the pages were all taped together, I cut out the pattern pieces along the printed lines (checking and double checking that I was not at any point using my sewing scissors to cut paper. The anxiety is real here people!).


With any new pattern, you want to make a toile to see if you need to make any adjustments to the pattern before you cut into your fashion fabric. Before I started, I knew I would need to elongate the bodice (because I always do). So, I added 1″ to the straps, and cut it out of some leftover blue fabric I had in my stash.
Based on my toile, I was thrilled to find I really didn’t need to make many adjustments for fit. But, in addition to the lengthened straps, I did decide to fully line the bodice rather than use a facing. I also wanted to add some stability and would interface the full bodice to give some extra structure.


With confidence in the fit of the bodice, I turned to my printed fabric. Because I had this fabric folded in my stash for several years, this was the first time I unfolded it. To my dismay, I found a printing error, where every yard was punctuated with a white line running down the full length of the print, perpendicular to the selvage. There was no way to justifiably contact Spoonflower about this (seriously, it has been years and an entire ocean and continent since the purchase), so I decided to come up with an alternate solution.

On each white line, I carefully folded the fabric onto itself and pressed a sharp crease. Then, I sewed a tight stitch just on the outside of the white line, almost like a pin tuck. When I turned the fabric to the right side and pressed, the line was gone and it just looked like a seam (without losing any yardage or messing up the continuity of the pattern).
Because I was going to create a really full skirt in the end, I knew the seam lines would just get lost in the folds.


With the minor printing issue sorted, I turned to my fabric to cut everything out. I decided to use the border print along the skirt hem and the edges of the strap, and line it in a dark purple I had in my fabric stash.


Print placement is always really important when working with a border print. I decided to line up the edges of the straps with the bottom of the fabric so that you would see the buildings coming up from the back bodice straps, and the purple would fade into the waist. Once I had it right, I pinned the pieces in place and cut it all out. I also cut pieces of interfacing for the bodice, which would help give it some extra structure.


Then, it was time to get sewing! First up: pressing the interfacing to each bodice piece. Personally, I really like using interfacing. It gives structure, but it also prevents the fabric from distorting – which is important when you’re creating a super fitted bodice that will have to face some strain over time. You definitely want to press more than iron when it comes to interfacing – or else it can bunch up into a hot mess (literally).


Once the interfacing was pressed on, I sewed in the darts to the front and back bodice, pressing them towards the center for the waist darts and down for the underarm darts. I also repeated this for my lining fabric. Pressing is really important here – I like to press from both the back and the front to get that dart seam perfectly flat.


I then sewed the two bodice pieces together at the center front and did the same for the lining. I also attached the back bodice to the front at the side seams, pressing all of my seams flat.


The most complicated part of this pattern was definitely sewing the straps to the lining. This might be easier if you just go with a facing, because I was working with the added bulk of a full lining. With right sides together, I sewed the lining to the bodice straps at the center, only down to the dot at the front center. I then pressed the seam open (this saves a bit of hassle later trying to press this seam once you flip it to the right side).
With right sides together again, I sewed the long edges together and along the back bodice pieces, leaving a gap for the straps. I clipped the curves of the straps, turned the fabric to right sides and pressed, pressed, pressed to get the seams open and flat. I was extra glad I did a toile – if for nothing else, I got to practice this tricky step before cutting into my fashion fabric.


Although it wasn’t part of the pattern, I also decided to put some boning in the bodice at the side bust (a bodice like this means you can’t wear a normal bra – and I’ll take all of the support I can get!). Now, one can make their own boning casing or actually sew boning into the seam allowance. However, my lazy self opted for 1/4″ boning with casing, which saved me a ton of time and effort at this step.


I started by measuring the length I would need, and cut out two strips of boning with casing. I scrunched the casing down about an inch, and trimmed and tried to curve the edge of the plastic boning, before covering it with casing again (again – use some old scissors for this. It can do a bit of a number on them).


Then, I pinned the boning in place on my lining (very important – you don’t want to sew it to your bodice, or the stitch lines will show. On the wrong side of my lining, I sewed around the edge of the casing, securing the boning in place. I repeated this on both sides.


With the bodice mostly complete, I turned my attention to my skirt. I knew I wanted my waist to hem length at 29″. Taking into account hem and waist allowance, I measured up 30″ from the edge of the fabric (up from the border print), and marked along the yardage. I quickly cut out my skirt piece in one continuous piece.


I turned to my favorite Bernina accessory: my ruffler foot, Bernina Foot #86 for my Activa 220 (I have blown some minds on IG recently with this little gadget – it really is SO handy for perfectly gathering a full skirt). I ran the yardage through my ruffler foot, working quickly through the 3.5 yards.


I pinned the finished skirt to my bodice, making sure my measurements were correct and the fabric lined up end to end. You have a bit of wiggle room here in the ruching, but you want to do some test runs beforehand to see how much fabric is needed to get to your ideal waist size.


At this point, it was time to face my Fear of Zippers. Luckily, my 16″ all purpose zipper went in with minimal issues – maybe I’m getting better at this??? (though please don’t ask me to do an invisible zipper…)


Once the zipper was in, I pressed the bodice lining to the inside, pinning it so all seams were covered (don’t you just love when the inside of a dress is almost as pretty as the outside?). I secured it all with a quick slip stitch, hiding all of the construction underneath.


You might think at this stage, I was just about done. But I had an idea in my head that I just couldn’t shake. Remember back when I decided to embellish my dancing daisies skirt with some prong set rhinestones? Well, it had apparently been long enough for me to forget about the pain…
Luckily, I still had plenty of leftover rhinestones and settings (size SS16 in clear crystal + push-through flatback settings), and decided to add a bit of twinkle to some of those windows, as if they had just flicked on in the impending twilight.


I didn’t want to overwhelm the design, and would just add rhinestones to a few windows in each building. I laid one section of the fabric flat on the table. For each, I took a prong setting and pressed it up from the back side of the fabric, making sure the four prongs pierced through the other side.


Flipping the fabric over and holding the setting in place, I added the rhinestone stone to the center of the setting. Using some small tweezers, I would carefully press down each prong one at a time, making my way around the setting.
Funnily enough, I actually bought a little rhinestone setting contraption after the daisies skirt – but in the end I found it was still easier to use my hand setting method. Luckily, this piece didn’t require as many rhinestones as the last, and I was able to finish it in a couple of hours.


Once the rhinestones were in place, I quickly pressed up the hem and secured it with a blind stitch. And because I had kept the selvage, I didn’t have to press under the edge.

Because I had some leftover fabric, I had to make myself a matching mask – with a few rhinestones (natch). I really love the Charm Pattern’s Glamour Mask – it fits my face perfectly and is really easy to whip up.


Even though I lengthened the process a bit with my glitter-obsession, overall this dress was a pretty quick make. I have a feeling when I make it again it’ll go even faster (which is always the way with new patterns – sometimes it takes a bit of brow furrowing at pattern instructions before it clicks). But, I absolutely love this pattern and can see many more in my bright lights, big city future…


The Debut
While I imagined first wearing this dress out on a trip to NYC or some other bustling metropolis, we are still staying cautious in our adventures. But, look out Broadway – because I am coming for you. I have places to go, people to see, showtunes to sing. Hopefully one day soon. Until then – keep masking up people!


No urban night is like the night there…
Squares after squares of flame,
set up and cut into the ether.
Here is our poetry,
for we have pulled down
the stars to our will.
Ezra Pound


Cities are kind of these odd, living entities in and of themselves. I’ve always found it intriguing that, the larger a city seems to get, the less we know its inhabitants. It’s almost as if the city itself takes on a life of its own and becomes a breathing beast, swelling with the thoughts and minds of the people who live there.
I think back to that girl in college now and then, staring out of those windows and the world that lay beyond, wondering where it could lead to. I’m not sure I could have ever imagined it would lead me to nearly a decade of my life abroad, a husband who would jump onto that adventure about halfway through, my own lab and my own graduate students, books and publications and a closetful of dresses like this one to twirl through it all in. But, then again, maybe I did imagine it. Maybe if you imagine it, you become it.
Dream big, sweet friends.
xoxo
Construction Details:
Dress pattern (modified): Historical Stitches 1007 via Subversive Femme
Fabric : Detroit Skyline Border Print via Spoonflower
Rhinestones: Flatback, SS16 in clear crystal + settings
Additional notions (zipper, thread): JoAnn’s
Outfit Details:
Dress: Made by me!
Belt: Alannah Hill (similar)
Handbag: Fresh to Death Vintage (similar)
Shoes: Irregular Choice (similar here & or same here)
.
instagram // twitter // facebook // pinterest
.
Any items marked with a “c/o” (courtesy of) a retailer mean I was provided with an item for free in exchange for a review and/or feature on my blog. I always provide my honest opinion of any item I’m reviewing, regardless of whether it was sent to me as a courtesy item or if I purchased it myself. In addition, this post may contain affiliate links. This means that if you click and/or make a purchase through certain links or ads on this site, I may make a commission from that click and/or purchase at no cost to you, which helps with the day-to-day running costs of my blog.