
I’ve always been a huge fab of florals – giant rose border prints, floral appliqué, vines snaking up a bodice. I want it all. So it’s only natural for me to drool all over uniquely floral pieces from vintage past, particularly those that have dotted my Pinterest wishlist for years.
Even though there is a place (and a vase) for the popular flowers that always have a date for prom, I admit I have a soft spot for the lesser appreciated flowers. The artists. The weirdos. The ones that stayed in during their teen years and seem to march to their own drum. Enter a rather special bloom: the Bird of Paradise. Sometimes called the Crane Flower, these flowers are named due to their resemblance to the bird with their namesake.
I have a really vivid memory of these blooms dotting the first bouquet Mr. Dressedapp ever gave me over 13 (good lord!) years ago. I remember thinking, “Now there’s a guy who appreciates the beauty in oddity.”


Photo Credit: Gardening Know How

The Inspiration
Awhile back I shared a unique Juli Lynne Charlot skirt that I had seen was originally sold at Fab Found Frocks. I had saved it to my Pinterest ISO Board, thinking it might be one that just needed a little patience in order to acquire. It was different from a lot of the JLCs I owned or had seen. In my opinion, her designs either veers towards the obscenely romantic, with large appliqué roses in shades of red and pink. On the opposite end are her more whimsical pieces, depicting everything from the Garden of Eden to trains zooming around a track.

But this piece seemed to stand apart from these I’d seen before. It boasted brightly colored birds of paradise agains a bright yellow background, the fiery orange unapologetically bursting forth from the skirt. I loved the wink she gave, both in the color and the design. This one was definitely no wallflower.
So, with no true vintage piece in sight, I stretched my arms up to the sky, pulled my imagination taut, and set to work to recreate it…

The Design
One of the most important decisions with this skirt was going to be finding just the right shade of yellow. I had started this project smack in the middle of the pandemic and wasn’t comfortable going into my local fabric store; so the only option was online. Luckily, awhile back I invested in the Kona Cotton swatch card.
After a bit of hemming and hawing, I went with a Kona Cotton in Lemon Ice – which just looked like the most cheerful yellow. I was actually grateful even more for the swatch card, as most images online looked almost chartreuse. But, it’s a bright, vibrant yellow with cool undertones.

While waiting for my yardage to arrive, I turned to my felt swatches. Luckily this part of the process was a bit easier, because I’ve become so familiar with the wool blend felt on offer at BBD Supplies. I wanted a deep green for the stems and leaves that wouldn’t fight with the yellow. I went with hunter green – a deep green shade that would still pop.
For the petals of the flower, I wanted to create some depth and dimension in both the shape and the color. I went back and forth between multiple shades of orange, but really liked the balance of Hallow’s Eve and Dark Orange. With my materials set, it was time to get to work!

To recreate this skirt, you will need:

The Construction
And we begin as (nearly) all of my skirts begin: as a basic circle skirt. These I can whip out blind, and was able to quickly fold the fabric, measure the waist radius (4.5″) and the full length radius (33.5″), which would ultimately get me to my ideal 28″ waist and 29″ length.
As ever, if the math of the circle skirt construction is a bit overwhelming, you can check out this post for a more of a step by step through the process.


Once I had my half circle and two quarter circles, I quickly stitched up the side and back seams (leaving a 9″ gap at the back seam for the zipper) and pressed the seams open. It was ready for decoration…


With the base set, now it was time to turn to the decorative elements (aka, my favorite part). Given the vines would set the stage for everything else, I decided to start there. Using my rotary cutter, I cut several long 1/4″ strips out of the hunter green felt – I’ve found a rotary cutter is ideal for this type of cutting and I zipped through it quickly.


Working from my sketch, I set to work laying the thin strips of green felt onto the skirt, trying to match the overall scale and curvature of the original. You don’t have to be too precious at this stage, because you can move things around. I would work one stem at a time, step back, adjust as needed, and then lay down the next one.


The next task I gave my rotary cutter was to tackle the large leaves that would dot the stems and the base of the flower, which would be in the same felt. While I could have given this job to my Cricut, because the leaves looked to be a range of sizes and shapes, it was easier to just zip through them on a stem-by-stem basis. The shapes didn’t have to be perfect – we are trying to mimic nature after all…
I started with the base of the flowers themselves – which were added to the end of each stem.


Next I added the leaves, matching their placement to my sketch. These were fairly large and added a bit of drama to the overall design. I liked how the were sort of floating in space, as if to give the illusion you were walking through a misty garden of birds of paradise, with parts of the flower appearing through the mist.
Once I was happy with the placement, I pinned all of the pieces in place.


Whenever you’re working on a large-scale “print” of sorts, I always recommend putting it on a dress form (if you have one) or draping it on your own waist to check the placement of all of the elements. What can look great in flatlay can sometimes look a bit off when it hangs the way it will in real life.
I put this up on the dress form and, with a few minor tweaks, took to the sewing machine!

I opted to sew all of the stems and leaves down at this stage – when you have too many things pinned, things can very easily go a bit wonky. Plus, the petals of the flowers were going to be more 3D, which would be trickier to navigate through a sewing machine later. I simply used a straight stitch and matching thread, and followed each stem around the curve. I went straight through the middle of the leaves as well, which added a cool vein effect….
Note – I did NOT sew down the flower bases yet. That would come later…but I needed to get my petals sorted first.


Now it was time to add some color. Things were looking a little too neutral for my taste and I was ready for some bright pops of orange. From the original, I could see the petal of each flower had sort of a teardrop shape. I knew I could easily design and cut the shapes, and build my flowers one at a time to get a 3D structure using my favorite toy Cricut.

I quickly drew a teardrop shaped “petal” in Photoshop with a small tab at one end (which will become important later). Then, I set Cricut to work and she merrily cut out 30 petals from the Hallow’s Eve and 20 from the Dark Orange as a contrast. Cricut zipped through the task and in no time I had a neat pile of petals.


To get the 3D shape of the petal, I would pinch the end of each, just above where I had left the tab. Then, using matching thread, I created several, quick looping stitches about 1/4″ up the end of the petal, creating a 3D shape.
Then, lather, rinse, repeat about 8,000 more times and you will eventually have petals blooming before your eyes.


Once I had all of my petals, then it was just a matter of placing them. I started by lifting up the base of the flower, and placing about 6-7 of the petals in a staggered row, mixing up the two shades of orange. Once I was happy with their placement, I pinned them from the base.


I repeated this all the way around the skirt, until each flower was in fiery bloom. And once you placed the base of the flower back in place, the illusion was complete and the petals looked like they were growing upwards like a real bird of paradise.
I was amazed at how much the color brought the skirt to life – I really liked the mix of the two orange shades to keep it from looking too static.


Now that all of the elements were in place, there was only one thing left to do. So, I got my appliqué game face on and got to work! I started with the petals – and this is where that handy tab I had added to the shape from the start would come in. The tab gave me a flattened piece to sew down to the skirt, without contorting or twisting the petal.
Working one flower and one petal at a time, I attached each with matching thread and tiny, tight backstitches. To keep the top of the petal from flapping too much, I added a single tack to the center of each, about 1″ down from the top.


Next, I moved on to the base of the flower. For these, I wanted to add a bit of batting to give them some of their own dimension. I started by appliquéing all around the perimeter of the green felt, but not sewing it down completely.


Then, I took a small amount of batting and filled the space between the skirt and the green felt. For this, you want to resist the tendency to overfill – a small amount of batting will really go a long way. Once the batting was in place, I closed the opening and the illusion was complete!


With nothing left to do but the finishes, I set to work to tackle the waistband, zipper, and hem. I went with a 9″ white lapped here (if you struggle with zips, I highly recommend watching Gertie’s AMAZING zipper tutorial). I sewed the lining to the skirt first, and then quickly got the zipper in place and moved on to the waistband.


In keeping true to the original JLC, I wanted an extra wide waistband with the rows of parallel stitching that are definitely a JLC trademark. I quickly cut 2 long 4″ by 32″ rectangles out of the Kona Cotton. I backed one piece with interfacing and stitched the waistband and waistband lining together, pressing the seam flat.


Then, starting from the top of the waistband, I sewed parallel rows of stitching at 0.5″ inches apart. I’ve shared this trick before, but a good hack for keeping things straight is to tape a flat edged guide at the correct measurement (like a piece of cardboard or, in my case, my pack of sewing needles). Before I got to the last row of stitching, I stopped – so that I could attach the waistband to my skirt.

With right sides together, I sewed the waistband to the skirt and the lining, and then pressed it upwards. I then topstitched the final row of stitching, securing the lining to the waistband and completing the last of the 1/2″ parallel rows.


I spent the next evening doing the finishes – starting with the hem. I pressed the hem of the skirt under 1/2″ and then pressed the lining to the inside about 5/8″, securing the two together with a slip stitch and hiding all of my stitches from prying eyes.


Then, for the piece de la resistance, I added two waist clasps and carefully pressed in my custom (GLITTER) labels from Heart of Wonder. When I put her on my dress form, she just looked so bright and cheerful that I let her brighten the place up for several days before I took her for a spin….


I often wonder if Juli Lynne Charlot even realizes how much of an impact she’s made on the vintage community (not to mention how much we hunt and covet her work like rabid wolves), and how truly inspiring her work is. I can only hope one day she happens upon my little corner of the interwebs and is happy with what she sees.
The Debut
The Bird of Paradise (both flora and fauna version) symbolizes freedom and joy. This seemed rather fitting, as we’ve been expanding our radius further and further from the house these past few weeks – it still feels a little weird to leave our safe bubble, but I can almost feel my whole body stretching and reaching outwards towards the sun, growing a little taller with each new step.
Another thing that brought me so much joy came from the most amazingly sweet and generous Amy who, after watching my progress on this skirt, sent me this perfect brooch across the sea. I know there are so many reasons why social media is problematic, but the friends I have made in this community are too wonderful for words.


The bird of paradise alights only on the hand that does not grasp.
John Berry


Inch by inch, thanks to my bird of paradise, the feeling of freedom is certainly reclaiming me. I’ve been going into the lab about once a week, catching up with friends on occasion for outdoor drinks, and trying to recapture some semblance of the order I had once before. I am still operating with an abundance of caution, but am finding ways to rejoin the world and still feel safe about it. It feels weird, but wonderful.
Speaking of weird – this week we have a big shipment of samples heading our way from New Zealand. Better carefully set this skirt aside, roll up my sleeves, and prepare to get a bit sharky…
What’s on your schedule for the week? Package of sharks as well? No? just me…..
xoxo
Construction Details:
Circle Skirt: Self-drafted
Skirt fabric & Lining: Robert Kaufman Lemon Ice Kona Cotton
Appliqué: Felt from BBD Supplies
Additional notions (zipper, thread): JoAnn’s
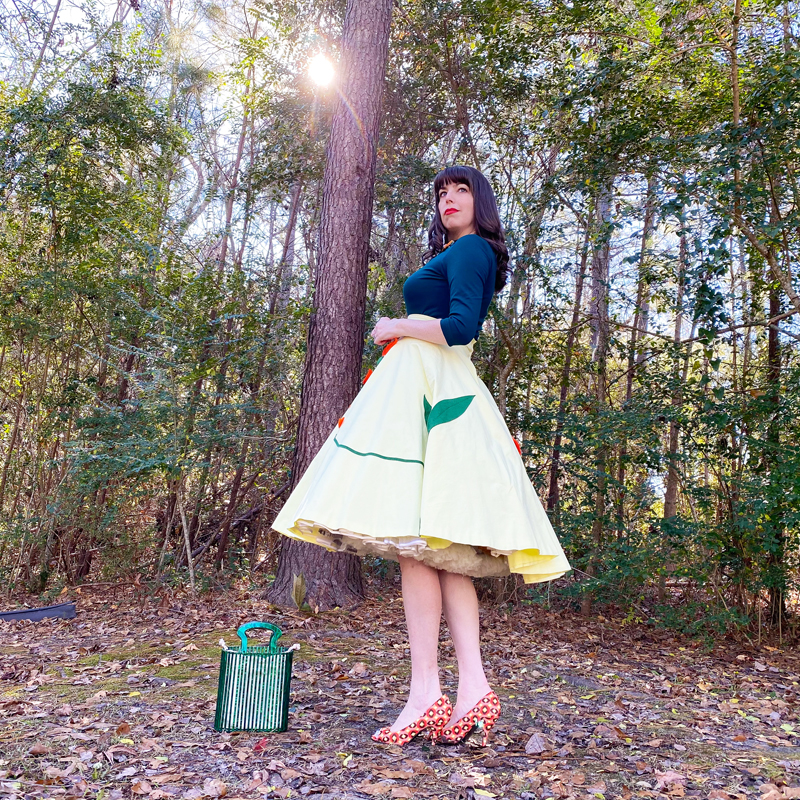
Outfit Details:
Top: Vivien of Holloway
Skirt: Made by me!
Brooch: Erstwilder, gifted by the lovely Amy
Handbag: gift, Looks Like Summer
Shoes: DSW (similar here & here)
.
instagram // twitter // facebook // pinterest
.
Any items marked with a “c/o” (courtesy of) a retailer mean I was provided with an item for free in exchange for a review and/or feature on my blog. I always provide my honest opinion of any item I’m reviewing, regardless of whether it was sent to me as a courtesy item or if I purchased it myself. In addition, this post may contain affiliate links. This means that if you click and/or make a purchase through certain links or ads on this site, I may make a commission from that click and/or purchase at no cost to you, which helps with the day-to-day running costs of my blog.