
Have you ever had an idea that, when thinking about it in retrospect, you realize if you had known then what you know now, you never would have started it? (the wave skirt comes to mind…) That’s a long winded way of saying my latest sewing project started as a sketch that seemed very doable, and yet took more hours and more steps than should ever be humanly possible.
Sometimes an idea simply flutters into your brain, and you can’t escape it. It beckons from a very organic place, calling you to bring it to life. I really enjoy creating pieces where the art of it lies in a ton of tiny elements that somehow come together in a way that manages to feel cohesive and non-chaotic. But, boy oh boy, are those the most chaotic to make…


The Design
I wish I could remember where this idea actually came from. I keep a notebook of my skirt ideas, and this one wasn’t something that crept up. I turned to a blank page and it just appeared. I remember thinking about how funny it is that different groups of animals have specific names. A group of sharks is called a shiver. A group of cats is called a pounce (amazing). A group of porcupines is called a prickle (I really want to be in the room with the people in charge of making these up).
Long google rabbit hole later, I learned a group of butterflies is called a kaleidoscope. Sometimes a flutter. And I just thought that was the most remarkable thing. And that sparked this perfect imagery in my head for a skirt that was an explosion of color and shape and wings and seemingly frenetic energy, moving forwards towards a common goal. And thus, I grabbed my pencil and started to sketch…

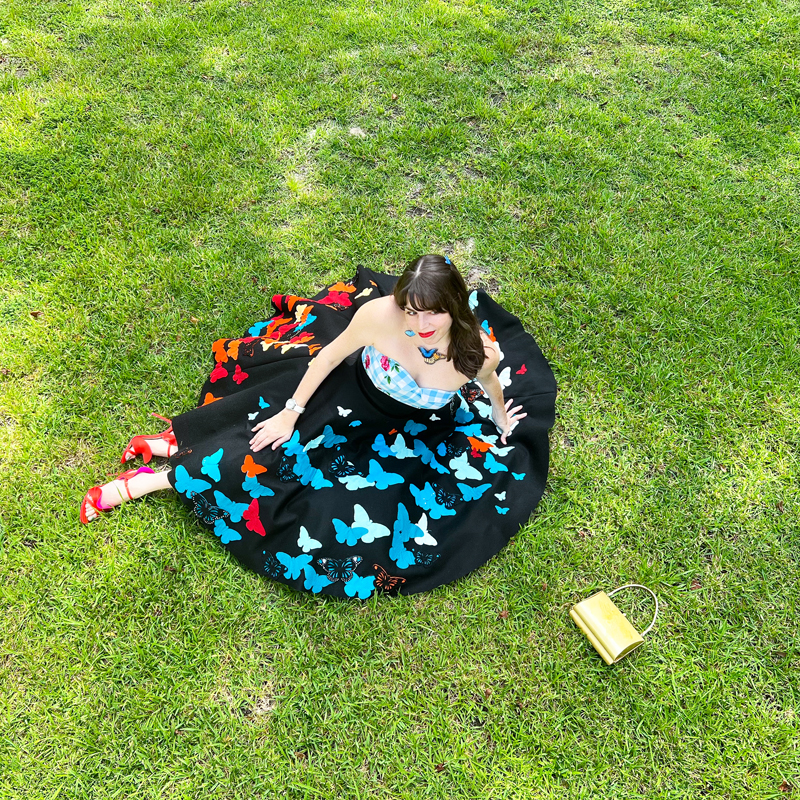
There really wasn’t much debate on color scheme for me, to be honest. I toyed with a pastel version for awhile, but have always been a fan of monarch butterflies. I love the orange wings, interlaced with black and white. I love that they stand out from a crowd, and aren’t afraid to move to a new city if an opportunity strikes (or, you know, a season). So, knowing I wanted some pops of orange, my complimentary color would be pretty straightforward (spins imaginary color wheel). And a skirt of teal and blue and tangerine, popping against a bed of black, was born.
Now, this may not be the way everyone works, but Powerpoint is my best friend. Because of how many elements this thing was going to have (across so so many shades of blue and orange), I knew I needed to go from a sketch to a digital plan for the design. Hey, work with what you know people….
With the color scheme set, I turned to forever fav BBD Supplies to get the felt in just the right hues. Their wool blend felt is one of my favorites to work with. Ages back, when I was tackling my first appliqué skirt (who can even remember that far back), I had purchased their swatch card. So, after a quick consultation, I settled on wool blend felt in turquoise, blue bayou, alluring aqua, and blue snow for my blues, and barnyard red, dark orange, hallow’s eve, and native maze for the orange tones.


Because my sketch was going to involve a LOT of butterflies fluttering around the skirt, I opted for a 100% wool blend felt to build upon. So, I turned to another old standby: the Felt Store. When using 100% wool felt, you don’t get the bevy of color choices as you do with wool blend felt, but is a bit thicker and more robust, and could handle the kaleidoscope that was coming its way.
And away we flutter…..

To recreate your own butterfly skirt, you will need:

The Construction
Although I think I start like a broken record, there are really only so many ways you can say: Step 1: sew a base. For me, this is almost always a circle skirt onto which I shall sew and sew and sew until she can hold no more appliqué. I quickly drafted a circle skirt to to my waist circumference (4.5″ radius = 28″ finished waist) and my ideal hem length (28″ + 4.5″ = 32.5″ outer radius).
Using those measurements, I cut out one half circle and two quarter circles out of the black felt and stitched them up at the side seams and up the back seam, leaving a 9″ gap for the zipper. If you aren’t as familiar with the geometry behind making a circle skirt, check out this post for a more detailed walk through.


With the circle skirt done, it was time to put Cricut to the test. Cause boy did she have some work to do. If you guys have never heard about this device, it is a lifesaver for appliqué projects. (It still blows my mind that I used to cut all of my appliqué elements by hand). It is especially useful when you have to cut out multiples of a piece. Because, you essentially design the shape, and then, with a few clicks of a mouse, let Cricut do her thang.

To begin with, I needed to find the perfect butterfly shape. It couldn’t be too detailed, because I planned to have a zillion of them. But, it couldn’t be too simple, where you didn’t notice they were butterflies. Since nothing on Design Space was quite right, I opted to design my own, which I would cut in large (6″ wide wingspan), medium (5″ wide), small (4″ wide), and x-small (2″ wide) sizes. It also ended up working out well, because I would use the same base for the monarch butterflies I had planned.

With the shape design set, I got to cutting. This part took a reallllly long time. However, the beauty of Cricut is that it took hours upon hours over many days, but my main labor was rolling out new felt onto the mat and letting Cricut do the heavy lifting. But, all in all, to bring this design to life I would need 189 butterflies in total, which was going to take a hot minute.


Because your girl is a planner who had digitized her sketch and planned out the placement of each butterfly and how many of each size (and in what color) I would need, there wasn’t a whole lot of guesswork in terms of how many butterflies I would cut. I just made myself a little chart and checked things off as quickly as Cricut could spit them out.
When I finally looked up from my felt roller after about 12 years of removing felt butterflies from the mat, I already had quite the kaleidoscope on my hands….


Just when Cricut thought her hard work was over, I turned to my Monarch butterflies. In my original plan, I wanted to intersperse some Monarchs throughout the piece, just for a bit of extra drama (extra drama? Who me??). For these, I was going to take some of my colored bases and layer a second piece of black felt with cutouts so the color peeped through.
To get this to work, I was going to need to get a little sneaky. While the 100% felt is pretty sturdy, it was going to be tricky to make all of those cutouts and not have a felt disaster on our hands. So, I saw someone on IG post about a fabric stiffener called (appropriately) Stiffen Stuff. Because felt is made out of pressed fibers, this seemed like the ideal solution: it would essentially act like a glue that would hold the fibers together a bit more firmly.


Once the felt was dry, then I could let Cricut spend hours upon hours cutting out the black butterflies. It was some pretty intricate cutwork, which meant I couldn’t make teeny-tiny monarchs. So, I cut out a series of small, medium and large, set to work weeding (aka, putting out all of the cutouts one by one). I recommend watching Project Runway while you do this. Or else any of Iliza’s comedy specials on Netflix. You will laugh SO HARD.
This part took some time, but I got into a rhythm pretty quickly. Once it was done, I knew I already loved the overall effect and was excited to start to put them together.


To keep these intricate shapes from fading into the background of my skirt, I wanted to add a layer of color, which would pop through the cutouts. Going to my design plan, I knew how many I would need (a lot. eh hem). So, I grabbed my very favorite fabric glue, switched on the Great British Baking Show, and got to work.


I found it easiest at this step to add the glue to the black pieces, and press the colored one onto it. Taking advantage of the fact that my fabric glue comes in a handy pen, I added a thin line of glue along each spoke of the cutout and around the edges, and pressed the colored backing carefully in place.


After they were dry, then the real fun could begin: painting. I am no painter by any means, but to create the monarch butterflies that were fluttering through my brain, I had to get out of my comfort zone quickly. I gathered what I would need, including some paintbrushes, dotting tools, acrylic paint in white, and textile medium, which makes the acrylic paint safe on clothing.


After mixing the paint and textile medium in a disposable cup (2 parts paint to 1 part textile medium), I dipped my dotting tool in, and just let my creativity go with it. I made a mix of large and small dots on my butterflies, using my paintbrush for larger shapes on occasion, making each one a little different. Before I knew it, I had a colorful array of Monarchs taking flight across my sewing table.


When I laid them all out on my sewing table, I realized I had created a literal ARMY of butterflies. Seriously, we could storm the Capitol. Now I just had to bring my plan to life on the skirt itself, which would be no small feat.

I started as I often do: with my chalk wheel. This little device is a secret in my sewing arsenal, becuase it lets me draw a design on fabric without needing to worry about messing up. If you do, you just brush it away and start again. With my chalk wheel, I drew the arcing shapes from my sketch, which would emulate the kaleidoscope of butterflies fluttering across my hips and up from the hem.


With my plan in place, I started to build up the skirt. I knew I wanted the main arc to be mostly blue butterflies with pops of orange, and the back to have the fiery flutter of orange and red, with a few hints of blue. To keep things fairly organized in my brain (there were a LOT of elements here), I worked one color at a time across the various size ranges, starting with the various shades of blue.


After the solid colored butterflies were set, I would then go in with the cutout butterflies and a smattering of my monarchs. I wanted to use these sparingly, so they would serve as a bit of a surprise amongst the throng.


From there, I just worked one color at a time, slowly building it up and working to create a bit of an ombre effect – with larger, darker butterflies towards the hem, moving up and adding more of the smaller, lighter blue butterflies at the tip. I added some adorable teensy butterflies at the end, which I scattered here and there.


After the blues were all in place, it was time to switch gears and work on the oranges and reds. I followed the exact same process – working one color at a time, creating an ombre effect of size and color and adding in monarchs here and there. I was completely in love with the way the oranges and reds complimented the blues, which looked like they were creating a tornado effect of wings and color.


At each step, it was so important to step back and make adjustments, swapping out colors and sizes until it all looked balanced. Once I was happy with placement, I spent a good hour or so pinning it all in place (and actually had to rustle up more pins from deep inside my stash).


My plan was to sew most of the butterflies flat to the skirt. But, for a few of them, I wanted to give more of a 3D effect. To accomplish this, I took some of my small butterflies and folded them in half. Then, I sewed a line of stitches about 1/8″ from the fold. When I opened it out, voila! Butterfly in mid flutter.


As I always recommend: this is a good time to put the skirt on your dress form to see if you like the placement when the skirt sits as it will sit on you. I almost always make adjustments here – so I never skip this step. While it was on my dress form, I added some of my 3D butterflies, taking care to avoid places where they might get squashed (e.g. the backside is never a good idea!)


I started to feel a bit of impending dread, because I knew that some serious hand sewing was coming next…. This was going to take awhile, but the best thing to do was just get on with it. Over the next week, I worked my way around the skirt, sewing each butterfly down around the perimeter with tiny, tight backstitches.


Sometimes, smaller elements can get damaged when trying to hand stitch them. So, for the smallest butterflies, I opted to use my fabric glue to secure them in place. I added the fabric glue to the back, and carefully pressed it in place, leaving it to dry overnight.


Now, you might say the skirt was already looking a little extra, but we have met, right? I decided that the skirt needed a few hints of sparkle – nothing crazy, but just a glint here and there on a few of my fluttering butterflies. Luckily, I had some prong set rhinestones leftover from a previous project.

For this, I decided to use flatback rhinestones in a mix of SS12 and SS16 in clear, with push-through flatback rhinestone settings in SS12 and SS16. To start with I took a prong setting and pressed it up from the back side of the appliqué, making sure the four prongs pierced through the other side.


Flipping the appliqué over and holding the setting in place, I added the rhinestone stone to the center of the setting. I then carefully pressed down each prong one at a time by hand, using a set of small tweezers. I did slightly different designs for each butterfly I added rhinestones to (maybe 6 or so in total), which added just a touch of sparkle to the piece.


I was a bit shocked when I got to the finishes of this skirt (aka, the zipper and the waistband). Getting all of the elements together had taken so long, I started to wonder if this skirt and I would simply perish together. If they would find me an old woman, resplendent in something fabulous, clutching this skirt in my arms, the needle still in my hand.
But, here we were, nearing the end!

In keeping with the arcs and curves of the butterfly formation, I opted for a curved waistband, which I had from my Valentine’s Day skirt awhile back. I cut one strip out of my black felt, a second out of a black cotton I had in my stash, and final out of interfacing. I pressed the interfacing to the back of the felt to prevent distortion.


Isewed the waistband to the lining and trimmed the seam allowance down. Because it was a curved edge, I created a series of notches along the seam allowance.


I pressed the seam allowance to the inside, and sewed along the edge of the seam, before pressing it flat. I pinned the edges together and set it to the side for the time being.


Now, before I could sew it to the skirt, it was time to tackle The Zipper. Luckily, I’ve done so many of these over the last year that it went in with minimal issue. The main challenge here was just the bulkiness of the felt. But, going slowly, I was able to keep my stitches (mostly) straight.


Once the zip was in, I added the waistband to the skirt at a 5/8″ seam allowance. I pressed the lining under on the inside, and pinned it in place. Then, using a slip stitch, I secured it to the waistband, added two waist clasps, and then pressed one of my custom clothing labels in place…


And with the flutter of about 8,000 butterfly wings, she appeared in my sewing room, a tangle of color and sparkle and exuberance. It’s always a thrill to bring a new garment to life. But, it’s somehow even more special when it’s not based on a vintage piece or inspired by something in particular. It just fell out of my brain and onto the page, and came to be from a pile of felt.


The Debut
Although people rather enjoy telling me that they’ve never seen me wear the same thing twice, what they don’t realize is that I am actually a master of the remix. I love wearing things in different ways that make them seem wholly new again. Case in point: my Lamour Bustier. Even though it seems like a statement piece in its own right, I knew it was the perfect garden for my butterflies to flutter through.
Also, gingham is one of my neutrals…


The butterfly counts not months but moments, and has time enough.
Rabindranath Tagore


We are nearing the end of October (though I can’t even believe it), which means that all of the felt circle skirts are getting their day in the sun. We’ve been having these random bouts of warmth, but I know from experience they will become fewer and further between as summer gives up her fight to autumn and an inevitable winter.
I learned that the scientific name for the monarch butterfly is Danaus plexippus, which apparently translates to “sleepy transformation” in Greek. I love the idea that we harness the power for change. For metamorphosis. That you can close your eyes and take a good long nap, to be born anew. A lot has happened in the last few years that have irrevocably changed many of us and the way we view the world. But, with an eye on the upcoming elections, I am holding out hope for the changes we so desperately need. That even after an unwelcome metamorphosis into a more disillusioned (and dare I say it, cynical) me, there is still reason to believe. There is still room for the good.
Here’s hoping…
xoxo
Construction Details:
Circle Skirt: Self-drafted
Skirt fabric : 5 yards of wool felt for the base and butterfly outlines from The Felt Store
Appliqué: Felt from BBD Supplies
Paint: JoAnn’s
Additional notions (zipper, thread): JoAnn’s
Outfit Details:
Top: Made by Me! See how here
Skirt: Made by me!
Necklace: Oh My Butterfly
Handbag: gift (similar)
Shoes: Sophia Webster (similar here & here)
.
instagram // twitter // facebook // pinterest
.
Any items marked with a “c/o” (courtesy of) a retailer mean I was provided with an item for free in exchange for a review and/or feature on my blog. I always provide my honest opinion of any item I’m reviewing, regardless of whether it was sent to me as a courtesy item or if I purchased it myself. In addition, this post may contain affiliate links. This means that if you click and/or make a purchase through certain links or ads on this site, I may make a commission from that click and/or purchase at no cost to you, which helps with the day-to-day running costs of my blog.