
When I was little, one of the biggest treats was getting to visit my Mimere (our name for grandmother). She called it our “bonding time” and always made me feel so special. The pantry was always stocked with my favorite cereal (Cinnamon Toast Crunch – dubbed a “sugar cereal” and therefore forbidden in my house), let me watch Pretty Woman (though put a pillow over my face during the rude bits), and would stroke my hair until I fell asleep.
Sometimes during Bonding Weekends, we would go out – one of our adventures was to a restaurant a few miles away called the Hukelau, which served Americanized Chinese cuisine. What blew my mind as a kid was that it was a buffet – the idea that I could go up again and again and get whatever I wanted made that place magical to me.


The Inspiration
On the side of the restaurant opposite the buffet was a stage where they would sometimes have shows to accompany dinner. I don’t remember much about them, except a song that they would sing at the start about “Tiny Bubbles.” Ohhh how merrily we would sing, “Tiny bubbles….in the wine. Makes me so happy…makes me feel fine.”
My grown up self now thinks of the lyrics and realizes they are about champagne and getting tipsy…but my 8-year-old self always imagined little fishes at the bottom of the glass, happily blowing bubbles up to the surface….

I had this song on my mind a fair bit lately – we had to say goodbye to our Mimere several years ago now, and she still wanders into my mind pretty regularly. When my grown up self buys her own Cinnamon Toast Crunch. When I got tenure and almost picked up the phone to share it with her, knowing she would have been so proud of me. And when I spotted an amazing 1950’s vintage skirt at Off Broadway Vintage, with fishes blowing bubbles lazily up to the felt sky…


As has happened on more than several occasions now, my lovely friend Amy and I are often similarly inspired by vintage felt circle skirts. Though we are occasionally in sync (case in point here & here), sometimes I’ll tackle one and send her photos to help her with her creation, and others she’ll tackle one and kindly send me photos and pattern pieces. It’s been an amazing collaboration over the years, saving us both time and energy. Plus, having a long-distance sewing partner has only made me better.
The Fish Skirt was an example of one that Amy tackled first, sending me photos of her finished piece that I might have the chance to whip up my own version. So, with a sip of champagne and “Tiny Bubbles” whistling tunefully in my mind, we were off on our next sewing adventure!

The Design
To bring this one to life, the first stop is always materials. Because my plan was to veer away from the original color scheme a bit (Amy and I were on the same wavelength and I envisaged more of a mint and pink). I found the perfect hue called Mint Leaf in my swatch card, which would come from my go-to store, BBD Supplies.

Next up came the perfect accent colors for my applique, which would also come from BBD Supplies. I found the perfect offset to the mint in pink sweetness, cotton candy, silver grey, which I would use for my bubbles and fish accents. I also already had some leftover black felt from another project, which would make up the fishes. And we were off!

To recreate this skirt, you will need:

The Construction
With the materials in hand, we need to start with a base circle skirt. I quickly drafted a circle skirt out of the Mint Leaf felt to my ideal waist circumference (4.5″ radius = 28″ finished waist) and hem length (29.5″ + 4.5″ = 34″ outer radius gives us a 29″ final length). Note – because felt doesn’t need to be hemmed, you don’t need to take into account a hem seam allowance, just the waist.


Using those measurements, I cut out one half circle and two quarter circles out of the felt (so I could have a back zip, but avoid the front seam that I personally don’t like). I sewed the pieces up at the side and back seam, leaving a 9″ gap for the zipper. If you aren’t as familiar with the geometry behind making a circle skirt, you can check out this post for a more detailed walk through.


Because they would be the main focal point the design would swirl around, I started by cutting out the two fish. Amy had thoughtfully provided me photos of hers, so I was able to quickly sketch the shape in Photoshop, and cut them out on my Cricut Maker. One of the fish was wider than my mat could accommodate, so I solved this by cutting the body and tail separately.


Then, using pink sweetness wool blend felt (ie, the lightest pink), I cut out the eye and stripe accents for both of my fish, lining them up and spacing them evenly along the dorsal and ventral side of the body.


For the eye, I made two small sips in the center of a circle. I laid both fish on the skirt, resplendent in their snazzy accents, and you could already see some personality. Needless to say, I was getting excited to see it taking shape.


While I would be hand sewing most of the elements on, when it comes to accents on larger appliqué pieces, I have found fabric glue to be a winner. My personal favorite it Aleene’s Fabric Fusion, which comes in a handy pen. I quickly glued the stripes and eyes in place on both fish, and let it all dry overnight.


The feature that would really make this design was going to be the bubbles, which were going to be a range of sizes and cut out of my pink and grey shades of felt. Cricut is really perfect for this type of thing – not only does it speed up the process tremendously, but hard as I try, I could never cut a perfect circle by hand….
After mapping out the design (and consulting the original and Amy’s creation for reference), I cut out a series of circles in pink sweetness, cotton candy, silver grey at 3.25″, 2.75″, 2″, 1″ and 0.75″ in diameter.


Then came the fun part: laying out all of the bubbles! Working from the original and Amy’s photos, I laid out the bubbles with a random mix of colors and sizes, arcing around the sides of the skirt to the back. When you have it in flatlay, you can see the way they arc and curve, much in the way real bubbles would float up from the fish and to the water’s surface.


Unlike some of my other designs, which have layers upon layers of appliqué – the layout was pretty much done at this stage. I just needed to get everything sewn down to secure the design in place. Using a mix of matching threads, I worked my way around each bubble, securing them in place with tiny, tight backstitches.


I used the same strategy for the fish – I worked around the perimeter and attached them using evenly spaced backstitches. The best trick I can offer for this is to keep the fabric taught. I usually sit on the couch the the skirt draped over my knees to I can keep each section I’m working on as flat and taught as possible.


I love adding a bit of extra realism to my pieces, especially if that realism involves glitter. What this piece was missing was a bit of a glimmer to the bubbles, where light would be bouncing off. I opted to do this with an arc of sequins around a few of them. I then dug into my stash and found some iridescent sequins, which were perfect….
For this sequin effect, I brought my needle up at one edge of of a bubble, and threaded the sequin onto the thread, followed by a bead. Then, I bought my needle down slightly to the side of the original thread, securing each sequin in place. I repeated this until I had an arc shape on the bubble, before moving on to the next.


Although it wasn’t in the original, I decided to add a black trim to the hem – this kind of detail always seems to ground the skirt and pull in the black of the fish to the whole design. Plus, because I wasn’t planning to line this piece, it would give a bit of weight to the hem, which always helps it to drape beautifully. I could out several 1/2″ wide strips of black felt, which I stitched together. I then secured it around the hem with a simple topstitch.


To finish the skirt, I needed to add a waistband, hem, and zipper. I also had a final accent to add to the waistband once it was complete, which would really make the whole thing pop. Starting with a matching 9″ zipper in white, I quickly stitched it in using a simple lapped zip (my fav for these types of skirts).


Next, I cut one 4″ x 32″ strips out of Mint Leaf felt, and a second out of some extra cotton I had in my stash. I also cut a matching strip out of medium-weight interfacing. I pressed the interfacing to the back of the waistband piece to prevent distortion and give it a bit more structure.


Then, I sewed the waistband to the waistband lining, pressed the seam allowance to the inside, and stay stitched along the edge of the center seam, before pressing it it half. Before sewing it to the skirt, I decided to add one of my favorite JLC-inspired details to the waistband: several rows of parallel stitching.


With the waistband folded in half, I sewed parallel rows of stitching at 0.5″ inches apart, starting from the top of the waistband. I’ve shared this trick before, but a good hack for keeping things straight is to tape a flat edged guide at the correct measurement (like a piece of cardboard or, in my case, my pack of sewing needles). Before I got to the last row of stitching, I stopped – so that I could attach the waistband to my skirt.


Then, I added the waistband to both layers of the skirt at a 1/2″ seam allowance. I finished by topstitching the final row of stitching, securing the lining to the waistband and completing the last of the 1/2″ parallel rows.


As a final accent, I wanted to add a black band around the base of the waistband, which would pull up the black hem trim and finish off the whole design. I played with several different widths, and settled on a 5/8″ wide strip, which I topstitched onto the waistband. I also sewed in two waist clasps, and pressed one of my custom clothing labels to the inner waistband.


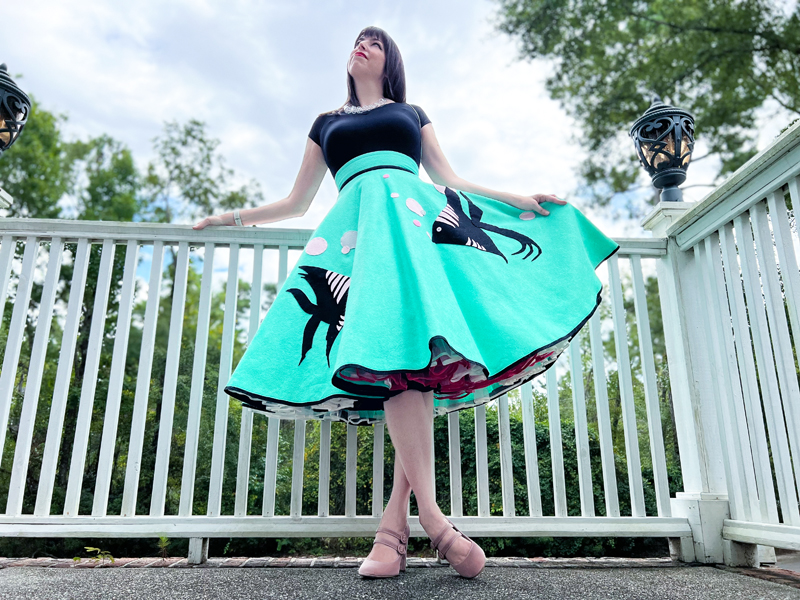
I put her on my dress form and was instantly charmed. This was a pretty quick make by my usual standards, but she is absolutely perfect in her simplicity. I can almost feel my Mimere tucked safely within the bubbles, like moments captured in time, floating up through my memory.


The Debut
As we’re heading into autumn, I am more and more excited to bring my felt circle skirts out to play. While it’s definitely not a traditional autumn hue, I always feel this time of year can benefit from a few bursts of unexpectedcolor.


A fish only begins to realize its potential
the moment you throw it in deep waters
Matshona Dhliwayo


So far, my break from teaching has been truly glorious. I’ve been spending hours at a time in the lab and have been able to have more one-on-one time with my grad students and undergraduate researchers. It’s a really amazing gift to have the opportunity to reclaim what I love about my job – to sit and think and troubleshoot and not have to dash off to campus.
I also have a grad student visiting this week from New Zealand – he has been trying to come for several years now, but Covid derailed our plans. Now that he’s finally here, we can finish off a few projects and get him on track to complete his thesis. Here’s hoping the week goes as planned (but when does that ever happen??)
Just keep swimming….
xoxo
Construction Details:
Circle Skirt: Self-drafted
Skirt fabric : 4 yards of wool blend felt in Mint Leaf for the base
Appliqué: Felt from BBD Supplies
Sequins: Amazon
Additional notions (zipper, thread): JoAnn’s
Outfit Details:
Top: Unique Vintage
Skirt: Made by me!
Necklace: ShopSAX, no longer available (similar)
Handbag: gift, Mary Frances
Shoes: Nine West (similar here & here)
.
instagram // twitter // facebook // pinterest
.
Any items marked with a “c/o” (courtesy of) a retailer mean I was provided with an item for free in exchange for a review and/or feature on my blog. I always provide my honest opinion of any item I’m reviewing, regardless of whether it was sent to me as a courtesy item or if I purchased it myself. In addition, this post may contain affiliate links. This means that if you click and/or make a purchase through certain links or ads on this site, I may make a commission from that click and/or purchase at no cost to you, which helps with the day-to-day running costs of my blog.